-
Posts
4,107 -
Joined
-
Last visited
-
Days Won
52
Everything posted by Brian
-

File Explorer right-click shut down
Brian replied to mrlang30's topic in The Windows & PC Hardware Forum
Yeah, the whole Anti-Virus Software thing is from the 1990's. People don't get viruses anymore. In fact, Avast! could be doing more harm than good. I'd actually un-install it if it were me. Honestly? Windows Defender & Firewall that is built into the OS does a pretty good job for what it is. The only caveat is you need to run Windows Updates every so often to make sure that Windows Defender is updated regularly. Yeah, you have a laptop that has two video cards. Hopefully You are using your GeForce GTX950M these days because I'm sure Photoshop CC will be complaining about the Intel Graphics, if it hasn't already. We will address this issue later. The Windows System File Checker never really fixes the "Big Problems," but it is a fairly quick way to see if there is OS Corruption or not. We will need to proceed to the next step. You are going to need to open a CMD (Command Box) with clicking "Run as Administrator" to get elevated privileges, just like you did before. Type the following commands in order and press enter after each one. You should be able to copy and paste them via the Keyboard if needed: DISM /Online /Cleanup-Image /CheckHealth DISM /Online /Cleanup-Image /ScanHealth DISM /Online /Cleanup-Image /RestoreHealth Quick note: While the command is running is normal to see the process stuck at 20 or 40 percent, after a few minutes, the process will complete successfully. Report back when finished. Hopefully this will fix some things. Otherwise, we are looking at reloading Windows and such and you may have to take your computer into a local repair shop. There is only so much I can do over a Forum on the Internet. Sidenote: Photoshop CC isn't going to like your laptop for much longer. (your video cards are quite old technology-wise.) I'd actually start saving for one now. -
Well, not the "best" of everything. A lot of what I choose is usually in the middle, or the next level up from the default configuration. Of course, you always start with the model in the right-most column. Even though it's more "expensive," in the long run you actually save money. "Huh?" "How?" Apple penalizes you for choosing a lower-priced model when it comes to the upgrades. They will charge you a few hundred dollars MORE, for the same exact damn HD upgrade, than if you went with the more expensive model to begin with. So by going with the most expensive, those upgrades may only cost you $100 more for having better hardware, as opposed to selecting the $1999 model, getting slower components and paying more for the upgrades that you were going to choose anyway. For example, increasing the HD capacity from 500GB to 1TB may cost you $200+ on the lower cost model than if you just spent the money outright. Apple is notorious for things like this! Go Big or Go Home. While it's true that I have a natural gift for spending other people's money, there is a method-to-my-madness. I hate wasting money on this shit and having buying remorse. It doesn't do you any good by purchasing something that's "Good Enough," but not ultimately what you should be buying, which is something you "Need." There is a difference. Yes, I usually recommend the higher-priced options, but I build my computers with a 7+ year time-frame in mind. By purchasing something "Affordable," you are in the market within 3-4 years. So you could spend $6000 with say...4 years, or just fork out the $4600 and have it last for 7+ years. KWIM?
-

File Explorer right-click shut down
Brian replied to mrlang30's topic in The Windows & PC Hardware Forum
This is serious. When this is happens, it usually means that Windows itself is severely fucked up, to put things bluntly. Before we dive in, what video card / video card drivers are you using? I've heard of corrupted NVIDIA Drivers causing this, but I'm not 100% if this is true or not. Have you tried creating a new Windows Profile and see if the problem remains? Are you running any AntiVirus or Security Software? If so, which one? The first thing I want you to try is this: Click the Start Button. Just type the letters CMD. You don't have to hit enter, just CMD. Look towards the right and you should see "Run as Administrator." Select that. We want to run the Command Box with Elevated (Administrator) Privileges. In the command box, type: sfc /scannow then press the Enter Button. The Windows System File Check should start and hopefully it will find the corruption and fix things. Report back with the results. If the problem remains, (likely,) then I have a few more commands for you to try. -
Did by chance did you see the Article Pinned at the top? I have a Mac Laptop Section. Buying a Mac in 2023. Now, if you can hold out for another few Months, Apple is going to release the M3 MacBook Pros. Probably announced in October, and you’ll be able to get one in November. That said, the specs on your screen shot are fine.
-

Different 4000 series graphics cards with Photoshop
Brian replied to dbowler's topic in The Windows & PC Hardware Forum
The best advice I can give you is to look at a RTX 4070 Ti Version with 12GB of dedicated Video RAM. If that isn't possible, a 4070 or 4080 with 8GB will work just fine. I'd skip any 4060 models, even though they are "current," and the 4090 series is a bit overkill. 8GB of Video RAM is at a minimum, but the more you can get, like 12GB or 16GB VRAM, the better. Drivers? Too soon to tell, but since NVIDIA doesn't seem to have "Studio Drivers" (Drivers meant for Photoshop & Lightroom,) for the 4000 Series Cards, it could mean that the Studio and Gaming Drivers are all contained within one Driver Set. So I wouldn't sweat it. Now the 3000 Series, that's a different story. You want the Studio Drivers for use with Adobe's Products. 7 Years out of a Laptop is really pushing things. Often it's the battery that dies within 4 years or so that kills the laptop. Most aren't replaceable these days and if you are looking for a 7-8 year lifespan, then I'd seriously invest in a Desktop. That said, it is possible to get 5-6 years out of one and I have seen people have laptops that are 7 years old. It's all a "Personal Experience," with not a consistent average across the board. I'd say 4-5 years out of a laptop is more of a "Realistic Expectation." -
Looks good! Just don't forget AppleCare for the Mac Mini.
-
The only difference I see between the two, is the more expensive one has a more powerful battery. 99.9Wh as opposed to 80Wh (Watt Hours). What does this mean in Layman's Terms? The 99.9Wh Battery in the more expensive model, is rated for around 7.85 Battery Life Hours total, in a perfect world / situation. That said, this is all subjective on how bright the screen is, how hard the CPU and Video Card is working, what the RAM is doing, what you are doing, etc. You also lose some battery life to heat, not only from the computer / motherboard and its components, but from the heat generated by the battery itself due to the current draw. Basically, in real world situation, conversationally speaking: 99.9Wh Battery = I'd say 6+ hours of battery life. 80Wh Battery = I'd say around 4 hours or so of battery life is to be expected. So if you are going to be mobile a lot, spend the $178 and get the higher priced version. From a hardware POV, either is fine.
-
Did you get this resolved? I know we covered a bunch on Facebook.
-
Meh. In my honest opinion, “Customer Service” is a thing of the past. All of the manufacturers suck at it, with variations between them. It really depends on the support rep you get and often, they will refer you to a website / chatbot first. I’ve personally never have spoken to Lenovo, but have dealt with Dell in the past. I also am one to fix my own things and when I am forced to call tech support, I often play the game of ”Let’s Stump the Tech Rep” because I’ve already done the things on the script! So I might not be the best one to ask If you get Dell Consumer computer, you are very likely going to talk with someone in India who will read from a troubleshooting script. If you buy from Dell Business, the chances of speaking to a Tech Support Rep in the US increases, though not guaranteed. The reason is money. Plain and simple. Americans want silly things, like a living wage, vacation time, health benefits, etc. Companies want to make as much profit as possible, and they would rather pay someone in India for Pennies on the Dollar instead of full price to do a similar job. Just look at the amount of local computer stores that existed in the past; 30 years ago, you could see Joe at the local computer shop who would give you advice on what to do or how to fix things. Since home computers have been around since the late 70’s or early 80’s, which is over 40 years ago, you are expected to “know computers” by now. I know, I know…but it’s the truth. For comparison, just look how difficult it is to contact your local bank directly. Press 1 for English, for this Dept press this number, then press this number, then wait on hold for 45 minutes, then the dreaded “…all of our agents are busy and we will call you back…” message. If you do decide to go the Desktop route, the prerequisites are similar. Give these two articles a read: Buying a Computer in 2023 Today’s Modern Photoshop
-
No worries. This is why I own my Router and Cable Modem. LOL!! Sooner or later, both pay for themselves.
-
Now, if money is no option, here is a search on B&H's website for the various components that I recommend. Here is one such Laptop that checks all of the boxes: Lenovo 16" Legion Pro 7i 16IRX8H Gaming Laptop (Onyx Gray) And this one is a BEAST: Lenovo 16" Legion Pro 7i 16IRX8H Gaming Laptop (Onyx Gray) (This one is the same as the other one, but it has a faster CPU and better Video Card, etc.) It's very much like buying a Honda CRV, do you want the Basic, Mid-range or Advanced Model? The Basic Model may not have butt-warmers, and the Advanced Model does, in addition to a Sunroof and better interior with upgraded Entertainment System, even though the Chassis is the same between all three. It all boils down to your budget and what you are willing to spend.
-
YES! I can not stand HP Laptops. They used to be good 10-15 years ago, now...notsomuch. Their Trackpads are garbage and the Eco-Friendly Solder they use with their products just doesn't hold up. Dell is decent for what it is. But which Laptop Brand do I like? LENOVO. If you have the money to CLICK BUY NOW, here is a laptop that has limited Stock and is a very decent price: Lenovo 16" Legion Pro 5i 16IRX8 Gaming Laptop (Onyx Gray) - $1569.99
-
Correct. It only affects the image you see on the Camera's LCD. Setting the JPEG Preview to look more "Blah" is so it doesn't go from #Amazeballz to #Blah while in ACR / LR; it's to get the JPEG Preview looking more like the Raw file. That said, IF you use your Camera Manufacture's OEM viewing software, and why would you since you use Adobe's products, then it will also look Flat / Neutral there. But if you have never used the Nikon or Canon software, it's something you aren't aware of and the Raw file will remain intact.
-
This is one of your problems: A Intel i5 CPU is really pushing things with the modern version of Photoshop CC in 2023. 40GB isn't that much more than 32GB, and you'd be better off with 64GB. The other thing that comes to mind is... ...are you running Chrome or another Web Browser with a bunch of tabs open? If so, that isn't helping things. Chrome eats RAM and EVERY Open Browser Tab is a serious drain on resources. My wife is famous for this very thing. In fact, her next computer will have at least 64GB due to the 100's of Tabs she has open in Chrome. OK, I'm exaggerating, she has about 50-60 Tabs open. Source: Hedger Humor. (Totally worth checking her Comics out. She's really funny.) If this sounds like you, close out Chrome and try to not load as many images as you once did. It's really time for you to seriously start saving for a new Mac. In fact, I would NOT upgrade to PS CC 2024 or whatever Adobe will call it. You are at your limit version-wise and be sure to turn off Auto Updates within the Adobe Mothership App. You could upgrade to 64GB, but honestly at this point? It's just a band-aid. You still are going to have the sluggishness due to the i5. I have a upgraded i7 of your computer, the best one that Apple offered at the time and even MY computer is a bit sluggish now. Bottom Line: Start Saving. Budget for new Mac: $4600.
-
You will never see what the Raw Image looks like on the back of the camera. The reason is what you see on the Camera’s LCD is the JPEG Preview that’s embedded within the Raw File. That said, we can change what you see on the LCD to resemble what the Raw File will look like, and is what you are asking. Canon Cameras: Find the Picture Style Menu and set it to “Flat.” Nikon Cameras: Find the Set Picture Control Menu and set it to either “Neutral or Flat,” depending on the Camera Body Model.
-
Yep! That’ll work. I would go into Computer or Windows Explorer and right-click on the drive and give it a name. (Rename) Helps keep things straight, especially if you have multiple copies of the same drive / capacity. Just got the PayPal notification, THANK YOU!
-
"Delete Volume..." 'ya Wally. It's the only delete, LMAO! AAAAANNDDDD!!! You are not following my directions!!! I said click on the Hard Drive that you want to delete. Down where it says Disk 0, Disk 1, Disk 2, etc. Right-Click on the SSD Drive that has the exFAT Partition and select "Delete Volume..." Now the way you are doing it will work, but when it comes to hard drives, it's REALLY-REALLY-REALLY EASY to accidentally click on the wrong drive. I'd hate for you to Nuke the wrong drive. I also said to remove all of your other externals before deleting / nuking the drive. I see another Extreme SSD, a My Passport Drive, a Data D Drive, etc. etc. Only one external at a time, unless you are copying. Make sure you eject them and don't just yank them out of the computer. Granted, if you pick the right one, you should be fine. But I do not want to have the conversation of trying to do Data Recovery with you in a Panic. I have personally done this once, Nuked the wrong drive, it's a good thing i had a full back up mostly backed up of that drive and was able to re-install things, well except photos from 2007-2011. Not many were that important, except all of the photos of my kids when they were young. I got some back, but not all of them. This is why I'm paranoid about these things.
-
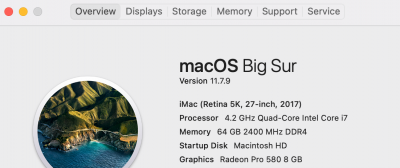
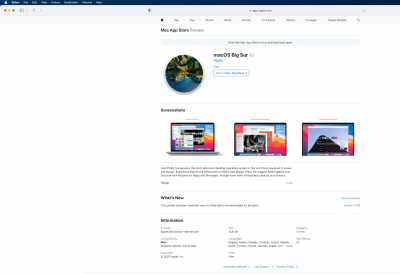
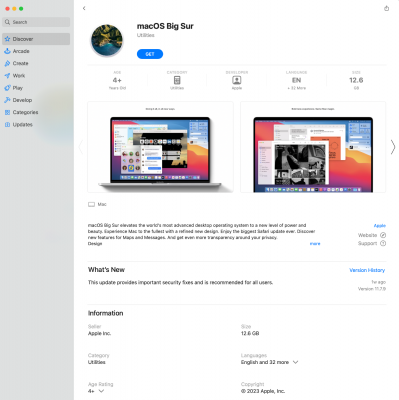
Most likely, this is your issue. My 2017 iMac, with 64GB RAM and other upgraded components is starting to lag with the newest versions of Photoshop. So much that the Cooling Fan is kicking on high way more than before. If you didn't get the upgraded Video Card at the time of purchase, that will also cause you issues. Post a Screenshot of your "About This Mac," but without the Serial Number. Here is mine: What does your say next to Graphics? Now Catalina is also another big issue. The good news is, you can upgrade to Big Sur without issues. Big Sur is a Mature OS at this point and is A LOT better at dealing with the latest versions of Photoshop CC. In order to upgrade, you need to use Safari, AND ONLY SAFARI, to open this link. Do not use Firefox, Chrome, Edge or other browser. Only Safari. macOS Big Sur When you click that link in Safari, it will take you to this Web Page: Then click the link "View in the Mac App Store" and it will open the App Store. Click "Get" download and run the installer. Now, I'm not saying Big Sur will fix all of your issues, but my Photoshop CC was crashing every time I opened it and only when I upgraded from Catalina to Big Sur did it finally stabilize. Big Sur is fine for your Mac, the 2017 and 2020 models have no issues with it. I would not go past Big Sur at this point. The new macOS is really meant for the M1 & M2 chips, not the Intel ones we have.
-
Let me know how it goes.
-
Yep!! Open the HD you want to copy the data from. Perform a "Select All" (usually CTRL+A) and then right click and select Copy. Open the "New/Temp" EHD and select Paste. All of your files should transfer over. Always use COPY & PASTE, never "Move/Cut." When you "Move/Cut" files, it deletes the originals as it does stuff. IF something were to screw up during the data transfer, you can hit Cancel and try again, but only if you use COPY / PASTE. If you "Move/Cut" the files, you are screwed. After verifying that all of your data from the original HD is now on the "Temporary / New" HD, I would eject the New/Temp Drive and remove it from the computer. (This is to prevent any possibility of you screwing up and deleting the wrong HD. Nothing personal, even ** I ** do this to make sure that I don't screw up. Head back to Disk Manager, select the exFAT external drive you just copied from, right-click on it and select "Delete Partition." Windows will ask you if you really-really-really want to do this, tell it yes/ok. Your HD that was exFAT should be empty with a Black Line all the way across. Right click on the area with the Black Line, and run the HD Wizard to create a NTFS partition, use the full capacity of the HD, AND perform a Quick Format. Open up "Computer" or Windows Explorer, and you should see the HD appear with the NTFS Partition. Attach the New/Temp Drive and Copy & Paste your files back. After you are 110% sure everything is copied over, I'd do a quick format on the New/Temp EHD to start fresh for the next data transfer. Then perform the same steps with the other exFAT HD. When you are finished, you should have three NTFS EHDs. Easy-Peasy. Should take you about an hour or so if you are on USB 3.0. Don't overthink, just approach things methodically and logically.
-
Yes. But you will need to copy the entire contents off of that drive, delete the existing exFAT Partition, and then create a NTFS one in its place. Then you copy the data back over. So the real trick is having another clean hard drive that has enough capacity to store all of your files and folders of the ones you wish to convert. Just do one HD at a time. Keep things simple. Honestly, it's pretty straightforward, very much like shuffling books around in a bookcase; this row of books goes over to this other bookcase, you then clean the bookshelf and then move the books back. Think logically, one step at a time. I can help if needed. Since you have a new SSD Drive, is this one large enough to store the data on the other drives? You basically are playing a shuffling game. The partition routine, as you have discovered, takes a few minutes. It's the data transfer speed that's a huge time-suck.
-
Moving this thread to the Windows Forum.
-
NTFS! NTFS! NTFS! NTFS! NTFS! NTFS! exFAT is over-rated since both the Mac OS and Windows OS will read and write to it. Manufactures love this because people think it's so convenient to go in between both worlds. BUT! It's not bullet-proof and can be as glitchy as hell. I personally think it's one of those "Tinkering with something in the Garage" that Microsoft did a few years back, and really haven't updated it much. In fact, I would NEVER-EVER-EVER use exFAT on ANY of my HDs. Especially ones with important data. If you want to go that route, that's fine, you are on your own...no help from me when it corrupts.
-
Yeah, Windows 11 has its own issues. I have yet to install it and play around with it. Windows 10 is a Mature OS, and I'm going to keep using it until I can't. The good news is, upgrading to Windows 11 Home when the time comes *should* be free. Microsoft is taking a cue from Apple.
-
Here is what makes a Mac Sluggish: Not enough RAM. You want at least 32GB in 2023. Hell, 64GB is nice to have. 16GB no longer cuts it, and 8GB...forget it. Full Hard Drives, internal or external, does not matter. You never want to go above 75% - 80% full on ANY HD. Once you go over 80%, performance takes a hit. If you are 95% or more full on ANY HD, you are in danger of data-corruption. Crap on your Desktop. I know it's convenient to store everything on your Mac Desktop, but the truth is, the more crap you have on your Desktop, the slower the damn thing runs. The reason is the macOS treats ANY file / folder that is stored on the Mac Desktop as an "Open Window," for lack of a better term. Got 1000 Photos from the Smith-Jones Wedding or the Sullivan Family Session of the park that is a few hundred shots? Well, the Mac considers all of those 1000+ images to be open Windows, whether you are doing anything with them or not. PS can also be glitchy by not having an updated macOS, I've seen outdated copies of Catalina causing issues with the modern versions of Photoshop. In fact, I had to update to Big Sur in order to stop Photoshop from Crashing. Lack of Video Card Power. Most folks are concerned about the CPU Speed, HD Storage and RAM when it comes to buying a computer. Well, now there is a 4th thing you need to be worried about: Purchasing a computer that has a Beefy Video Card with lots of Cores and dedicated Video Memory. In fact, I wrote a whole article based on this very subject, give it a read. Could you fill this out for me and post the results here in this thread? Details about your computer's health As far as a Clean-Up Program for your Mac, I highly recommend CleanMyMac X from Macpaw.com. You can download and scan your computer for free, just to see how much space it will free up for you, but if you want it to do anything, you'll need to pony up the $40 or so and purchase the program. (There are coupon codes to be found on a normal basis, be on the look-out for them.)

