-
Posts
4,098 -
Joined
-
Last visited
-
Days Won
51
Everything posted by Brian
-
10-4. Well, whichever device has the best chance of accessing the corrupted EHD is the one we want to use. First thing is to prep the new EHD before we try anything. Let me know when it arrives.
-
Which computer do you have a better time with? The Desktop or Laptop? What I want to do is prep the new EHD correctly and then attempt to copy a handful of files from the old HD and see what happens. Partitioning and Formatting a HD is easy but takes like 5 min to do.
-
This is one of those tough problems and it sounds serious. Your problem is one that does not have one "fix" and it will be trial and error. What Make / Model is the EHD? What operating system is your laptop and what is running on your desktop? Are you able to access the EHD on one computer or are you getting the error message on both? Also, how did you create the EHD's partition? Did you just start using or did you use some sort of software / come pre-loaded? Often, some HD manufacturers will use their own proprietary software to make a EHD compatible with both a MacOS and Windows, and this usually results in disaster when this software corrupts the HD. How important are these files? Could you afford to lose them if they went "Poof?". Do both of your login profiles on the laptop and desktop have Administrator Rights & Privileges? I would get over the flu first before we attempt anything. I need you at 100% for this.
-
Good to know! Thanks!
-
Now here is a curveball, a computer from DigitalStorm looks really good on paper and I'm considering it, here is the link: https://www.digitalstorm.com/lynx.asp Pick the $1579 (US Dollar) "Ultimate" Configuration. Not sure if they ship to Canada. Dell will.
-
Here is a blurb from an article that I just completed. It will be in a yet-to-be-released FAQ section that will debut in a few months: Just to clarify things, I receive no compensation or kick-back of any kind from any manufacturer. I'm not an Amazon or B&H affiliate and anything I link to is a direct link. So why do I always seem to recommend a Dell XPS? Because they are decent for what they are. They tend to have better components under-the-hood as compared to the consumer-grade Inspiron Line, are easily accessible world-wide, and are affordable to the majority. Basically, they are easy for me to link to and are pretty straight-forward in terms of their configurations. Not to mention I know who will be repairing the computer if things go wrong, I know what phone number you are going to call if you have a problem. That's the dirty little secret with technology, what happens when it breaks? Who is going to support it? Who is going to fix it? Where are the parts coming from? With Dell, I know they have a world-wide tech support phone number. They all have at least a 90 Day (Usually 1 year standard with enhanced options) in terms of Warranty, and I know Dell is going to supply the parts. Same thing with Apple. Apple or and Authorized Repair Center is going to fix their products and supply the parts, within reason. A 10 Year old computer might have limited parts availability as to a newer model, but if you buy a Dell or Apple, chances are someone knows what you are talking about and can source the parts. This is why I recommend them. I purchased a Dell XPS for my wife a few years back. So I put-my-money-where-my-mouth-is. When it comes time for me to add a Windows Computer in addition to my Mac, chances are I'm going with a Dell XPS.
-

memory slots in Dell XPS 8700 not working well
Brian replied to Jennifer's topic in The Windows & PC Hardware Forum
Yep, Office365 is the subscription based one, just like PS CC. The cool part is you can install it on multiple computers, I think up to 5, so at that point, Office is really cheap. $100 a year for 5 computers that each have the current MS Office. Just be sure to un-register the old computer when it gets replaced so you can install it on the new one. -

memory slots in Dell XPS 8700 not working well
Brian replied to Jennifer's topic in The Windows & PC Hardware Forum
Honestly, it's better to get at least Office 2016 or the just released Office 2019 to work with Windows 10. I signed up for Office 365 myself. Since everything is downloads and streaming, you can my MS Office use a @live.com account or Microsoft equivalent and your License Keys will be stored there. -

memory slots in Dell XPS 8700 not working well
Brian replied to Jennifer's topic in The Windows & PC Hardware Forum
Ugh. You will need to see if there are any manufacturer drivers for the USB & Bluetooth Controllers. This isn’t good. Either your USB ports will flat out not work or work at USB 2.0 speeds. You should check Device Manager to see if there is anything else that doesn’t work. -
In order to keep the price down, he is going with the Ryzen CPU, which is fine. Personally, I’d like to see a 1TB SSD or m.2 Hard Drive.
-

What Windows Laptop do you recommend for Photo Editing?
Brian replied to Brian's topic in The Windows & PC Hardware Forum
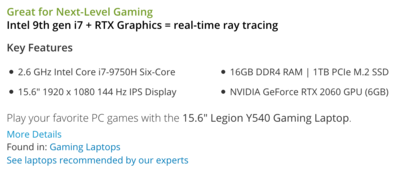
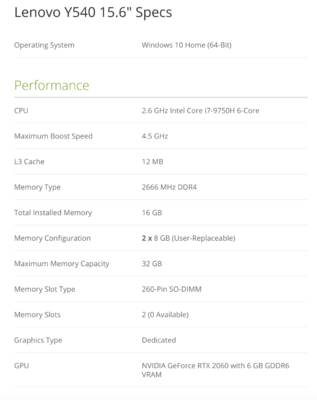
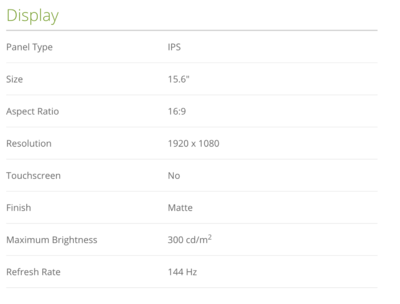
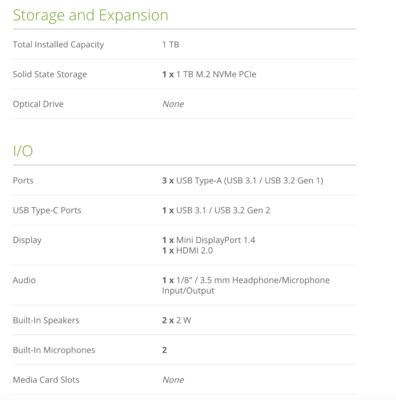
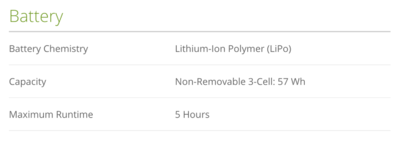
Let's go shopping. First we will start out with a simple Google Search: "Best Laptops with IPS Panel in 2020." Seriously. That is the very first thing I do when asked, "What is a good laptop for Photo Editing?" I might even put in 2019 if my searches don't give me many good models. I will also use a similar search term on Amazon, as well as B&H. Amazon B&H I know, really complicated stuff!! All that typing. Phew! I'm exhausted. All kidding aside, that’s where I start. From there we find a model somewhat within our price-range and then go from there. Remember, when it comes to a laptop, it’s better to get one that is a little more expensive than your comfort zone allows, has great reviews and meets my minimum technical specifications. Once we find that laptop that catches my eye, I will usually take a quick look at the quick-specs listed and then head straight for the Technical Specifications section. I’m not falling for Marketing ploys or any other sales tactics. I want to know what is under the hood; WHAT am I really buying. First thing I'm looking for: IPS Display Panel. Yes, I know this is the very search term that we used, but I assume nothing. IPS is a little more expensive, it's an "Upgraded" option. If a Laptop has it installed IT WILL BE LISTED IN THE TECH SPECS. Trust me. For example, here is one I just picked at B&H, listed for $1299. Remember when I said above to have a $1500 budget in mind? This is why: Right off the bat, we see two of my non-negotiable check-off items: An IPS Display and a Dedicated Graphics Card - NVIDIA GeForce RTX 2060GPU (6GB). Remember, if a laptop has these features, they WILL point them out. They will not be hidden. The Manufacturer will brag about it. IPS Screen? Check! Dedicated Video RAM? Check! (The 6GB in parenthesis is a dead give-away.) i7 CPU? Check! Minimum of 16GB? Check! So far this model is worth investigating. Onto the Tech Specs! CPU - Check. RAM, comes with 16GB it's up-gradable to 32GB. "User-Replaceable." Big Check!! Graphics? "Dedicated." Perfect! Big Check! Now onto the Display: Panel Type? IPS. Check! Screen Finish: Matte!! Perfect! This is a Non-Glossy Display! Perfect for editing photos. Big Check! We don't care about refresh rates or even the aspect ratio. We are just editing still photographs and not playing Video Games. Moving on... Hard Drive & Other Items Wow! I am impressed. This particular laptop comes with a 1TB Main Hard Drive. More than enough for today's computer. It has a USB 3.2 Port, which is on-par with Thunderbolt 3 speeds. So that's a win. (Provided you have a EHD that is at least USB 3.1 to take advantage of those Speeds.) It has both a Mini DisplayPort AND a HDMI Port. So that's what we want. No media card slots which is fine, since I want you to use a Card Reader instead. Moving onto the final couple of sections, it has typical WiFi Stuff and it has a Gigabit Ethernet port, so I'm not going to screen-shot that. But the battery section, I will, since the info is relative to what to pay attention to. OK, it has a typical Lithium-Ion Battery, and it lasts for about 4-5 hours. The only thing that I'm making a mental note about is the phrase, "Non-Removable." So when this battery wears out in a few years, the laptop will need to be taken completely apart and the battery replaced. It's not a user-replaceable / spare battery setup. Unfortunately, this is common place today. Boy, do I remember when people gave Apple Sh*t when they went over to this type of configuration with the iPhones. Funny how it is now a trend. But I'm digressing again. LOL! As you can see, this particular laptop meets all the things that I look for and would be one that I might recommend. So is it one that I would tell you to buy? Possibly. The next step is to take a look at the reviews. Most of the reviews seem positive, but a few of them I did pay some attention to. One of them seems to be a "Crackling/Static" issue coming from the speakers, which could be a design flaw or something as a bad electrical ground. Someone also commented on how hot this laptop gets, and that's to be expected, as the more horsepower you have at your disposal, the hotter things run. Other reviews seem to be real and mostly positive. There seems to be a few bad ones in the bunch, so be sure to read the fine-print for returns whoever you purchase from. Terms can vary greatly from store-to-store. Make sure if you do have a problem, don't ignore it. Contact the reseller and schedule an exchange immediately. Also, PLEASE be aware of any restocking fees; again...always read the fine-print. Bottom Line: This particular laptop would probably make it to some sort of list of recommended laptops. Edit: As I predicted, this laptop has been discontinued. I'm being 100% Truthful when I say laptops only have a 4-6 week life-span before they are replaced with a newer/different model. So if you are having trouble finding one you can afford, just wait another 6 weeks and save up some more. Not only will you have more money to spend on a higher-quality laptop, you will be looking at a current model. -

What is a good Laptop for Photo Editing - Short Version
Brian replied to Brian's topic in The Windows & PC Hardware Forum
Display Panel Type and why it is so important. Often I will go on-and-on about having a IPS Display Panel. Not for Laptops, but for Photo Editing in General. If you can't afford or find a Laptop that has a IPS-based Display, then I would recommend purchasing an external IPS Display, such as the Dell Ultrasharp IPS Series. Why is this such a big deal? Aren't all screens the same? The answer is a big-fat "No." To keep things simple, we will discuss the main two types of Display Panel Technology: TN and IPS. TN or Twisted Nematic - This is the one you want to AVOID. This display panel is MUCH cheaper to produce than IPS. They are often bright and are generally better for General Computing and playing Video Games, as their refresh-rates tend to be higher. The way they reproduce color is different than a IPS display. Often they use Dithering Technology to reproduce color, which affects the overall sharpness and contrast of the image. Not to mention the viewing angle is smaller than one a IPS Display Panel. So if you think about it, having poor Colors, Contrast, Sharpness and consistency is something that you do not want for editing Photos and/or Video! Stuff like this seems kinda important, at least for me. But let's get back to the main thing: Cost. Manufacturers like to cut costs at every chance that they can. Combine that with the majority of people who aren't editing photos leads them to use this Display Panel Type. It just makes good business sense. If your market is 95% of "Normal / General Computing" Consumers and only 5% or so of Photographers, who are you going to market towards? With a TN Display Panel, it works in a variety of environments, like a Coffee Shop, Airport, Living Room, etc. All sorts of areas it just works in. That said, the area that your Laptop or Desktop Computer that you must edit in should have even and consistent light. Damien as written an article on the subject, and they are worth a read. IPS or In Plane Switching - This is the one that you want. This display panel costs MORE to produce. If cost were no option, by far this Display Panel Technology wins in almost every category. With a IPS Display, there are two transistors for every Pixel which results in better Color-Reproduction, Consistent Contrast & Sharpness, and a Better / Wider Viewing Angle from corner-to-corner. So if you are editing Photos and Video, things like this are kinda important? Eh? That's why I jump up-and-down about IPS Screens and why they are so important for Photo / Video Editing and why this option is Non-negotiable. If the Laptop does not have a IPS Display, simply put: SKIP-IT!! As I mentioned above, manufacturers like to keep their COGS low and this results in them not installing IPS Display Panels in Laptops. Especially the lower price-point models. Which is a shame, because that limits models for us Photographer types. Often, I will have to really hunt for a IPS Based Laptop and with technology today, as things change quite often. They are just down-right difficult to find. (More on this later.) CPU Selection A long time ago, this option was probably THE most important thing that people paid attention to when it came to buying a computer. It was along the lines of buying a V6 vs a 4 Cyl Engine or a 2-Wheel Drive vs a 4-Wheel Drive. The faster the CPU, the "Better" the computer was. If you had more MHz than your neighbor next-door, you would have "Bragging Rights." It's not the case anymore. Well, it is true to some degree, that more Cores / Megahertz can increase performance, often the software must be programmed to take advantage of the technology that makes a particular CPU so fast. When It comes to Photoshop, this isn't the case. Sure, a Intel i9 is a bit faster than a i7 CPU Model, but it isn't THAT much faster. In fact, only a few years ago when the Intel i7 and i5 CPU Chips were all the rage...when it came to Photoshop, there was only a 5%-7% performance boost if you bought and i7 CPU. When it came to Photoshop, spending the extra $$$$ on a faster CPU didn't yield you better performance. Sure, 7% is still 7%, but spending a few hundred more for that 7%? It's not worth it. Same rule applies with today's computers. I would rather have a person spend less in getting a Intel i7 (or AMD Equivalent) and then taking those savings to put towards purchasing a better Video Card, which will be covered in the next section. Video Cards Sometime during the last decade, Adobe decided to use the Video Processor or Graphics Processing Unit (GPU) to aid with performance with their products. Especially when it came to Photoshop. Adobe Camera Raw (ACR) the new fancy Cloning Tools, like Content Aware, and things like Liquify primarily use the GPU in order to work. There are other tools that primarily use the GPU, but those aren't popping into my head right now. I'm sure you are wondering, why is this so important? Remember about that whole COGS thing and that Manufactures want to save money? Well another area that they like to skimp on is when it comes to the Graphics portion of your Laptop's Hardware. If the Laptop is only meant for "General Computing, " meaning wasting time on Facebook, watching YouTube or another Streaming Service like Netflix, answering e-mails, paying bills, etc. you do not need a fancy video card. Not to mention the power requirements that come with a higher performance video card. If your goal is to have a Laptop last for 15 hours on one charge, you are putting in low-powered components. Which brings us to the Video Card... As I just mentioned, Photoshop utilizes the Graphics Card more today than ever for a Performance Boost. Why? Because a GPU doesn't have much to worry about other than creating things for a user to see. A CPU has to worry about the Operating System and Resources, plus any Computer Programs that are currently loaded, what is loaded into RAM, how things are stored on a Hard Drive, WHERE those things are stored, etc. etc. The CPU chip wears many different hats during the course of operation, the GPU does not. It just has to worry about one thing, creating an image on a display panel. It's not worried about Hard Drives or Programs or your data, it's just worried about Video. Plus, the way the GPU itself is constructed, it is way more efficient than a traditional CPU. Which is why Adobe started using the GPU for a performance boost; it's just easier for their programmers to take advantage of the extra unused processing power. Unfortunately, not all video cards are the same. There are two main types of Video Cards: Integrated and Stand Alone. Integrated Video is just that, it's part of the Motherboard. It sometimes uses the CPU and computer's RAM in order to work. These type of video cards are extremely cheap to produce and are very common in lower-priced Desktop Computers / Laptops. There are some Integrated Video Cards that have a low-end GPU Chip, but use the computers RAM in order to function. When it comes to Adobe's Products, especially Photoshop, the best type of Video Card to use is one that has its own dedicated GPU AND its own dedicated Video Memory. These are the "Stand Alone" cards that I'm talking about. Of course, since we are talking about Laptops, the Video Card will more than likely be a part of the Motherboard, but it has its own dedicated components, which makes it a better choice. This way the Video Card lives in its own world and Photoshop can take advantage of the extra performance that you get with a Video Card. Make sense? RAM and Hard Drive Capacity This is the area that most people pay attention to. Well, they should. In today's modern world, you want 32GB of RAM at a minimum and a fairly large main Hard Drive, at least 1TB AT A MINIMUM. Why is this such an issue? Because again, Manufacturers love cutting costs and people do not pay attention. I can't tell you on how many Hardware Threads are created in both here on the Website and FB Ask Damien where an end-user's problem / error message is being caused by lack of Main Hard Drive Capacity! In other words, their Computers / Laptops become full and this results in things not working correctly. When it comes to a Hard Drive, you do not want to go over 75%-80% full, especially the main "boot" drive. In reality, a 250GB HD doesn't have 250GB available for you. After formatting and partitioning, along with Windows being installed, you have A LOT less than 250GB to work with. Now add programs like Photoshop / Bridge / Lightroom, Web Browsers, Microsoft Office, and you quickly start running out of room. Plus there is another thing that occupies your storage space: Cache Files. What are Cache Files? They are areas that are reserved by software to supplement lack-of-available resources on your computer. "Huh?" A Cache File is an area that is treated as "RAM" by the Operating System and a Software Program like Adobe Photoshop to tap into when it needs more "Umph" from your computers resources in order to complete a task. The most common name is the Photoshop Scratch Disk and the Windows Swap File. (Also known as Pagefile.sys.) Let's say you are batch editing in Photoshop and it's running low on available RAM. It will tap into the Photoshop Scratch Disk in order to complete what its trying to do. If the HD that contains the PS Scratch Disk is running low on Space, Photoshop doesn't have much to work with, which usually results in complaining that the "Scratch Disk is Full" error message or things just taking forever to complete. (Or even crashing altogether.) The Scratch Disk increases/decreases in size automatically, without any user intervention. You can't set a particular size and call it good, Photoshop controls this. So that's why it's important to keep your Main Hard Drive as free as possible, because not only is the Scratch Disk trying to work, but your Operating System also has it's own "Scratch Disk." If you are running low on space, this becomes an issue. Now for some tough love: I can not stress this enough...you are an idiot if you purchase a computer that has a 250GB (or smaller) Main HD!! I'm dead serious. I do not accept the phrase, "I don't know much about computers..." We all live in the 21st Century. Home Computers have been around since the late 1970's / early 1980's. Hard Drives in Home Computers have become commonplace since the middle 1980's. I call Bullsh*t. You are smarter than that and should give yourself credit. Out of ALL the things that people can figure out with Laptop Model A vs Laptop Model B, the Hard Drive Capacity should be as plain as day. So when looking at the Technical Specifications, PLEASE PAY ATTENTION TO THE MAIN HARD DRIVE CAPACITY. If it's 250GB or smaller, SKIP IT. I don't care HOW cheap it is or how great the reviews are, just don't buy it. In reality, you want a Main Hard Drive that is at least 1TB. Or larger. Phew! Rant over. Granted, I will accept a 500GB HD, but barely. Honestly...really shoot for the 1TB (or larger) Main Hard Drive. There is no such thing as too much Hard Drive Space! Which leads me to the next section part: RAM. As with a Hard Drive, there is no such thing as "Too Much RAM." In today's computing world, you want AT LEAST 32GB of RAM in 2022, with a preferred amount of 64GB. Unfortunately, when it comes to modern laptops, RAM is often Soldered to the Motherboard. "Huh?" With today's modern laptops, you often have to find a Model that has the preferred amount of 32GB at the time of purchase or one that has the ability to be upgraded at some point. This is quite difficult as the majority of laptops tend to be sealed units, or are otherwise very difficult to take apart. The RAM Slot(s) that allow you to increase the amount of RAM after the fact aren't there anymore so you really need to pay attention to see IF they exist on the model. (I'm looking at you Apple.) The Laptop that has 16GB Soldered is stuck at 16GB. Period. If you want more, you are buying a new computer. Make Sense? Speaking of Soldered Components, there are many manufacturers, such as Apple that not only Solder the RAM to the board, but also the Hard Drive. So if you purchase a Mac Laptop that has 16GB of RAM and a 250GB HD, there is usually no upgrading after the fact. Even though you spent "$2700," you are stuck. Of course there are exceptions to every rule but you still need to pay attention to this kind of thing when looking for a new Laptop. Bottom Line: When it comes to RAM and Hard Drives, there is no such thing as too much. You really want more than 32GB of RAM and to purchase a Model that has a 1TB Main Hard Drive. -

All about Memory - Hard Drives vs RAM
Brian replied to Brian's topic in The Windows & PC Hardware Forum
-

What is a good Windows Computer for Photo Editing?
Brian replied to Brian's topic in The Windows & PC Hardware Forum
-

Laptop VS All-In-One VS Tower/Monitor Set
Brian replied to ashleyribeiro's topic in The Windows & PC Hardware Forum
Hello Ashley! My apologies for not seeing this thread until now. Have you bought a computer by now or are you still looking for advice? -
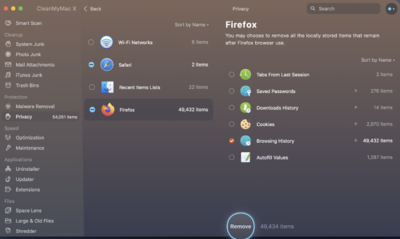
Oh, give this article a read as well... https://macpaw.com/how-to/clean-up-html5-local-storage-on-mac-os-x That article is a bit out-of-date. Click Privacy in CleanMyMac X and then hit the "Scan" button. Before you click "Remove" you will be given a choice of options. I'd start checking things, but be careful, if you aren't careful, you could nuke any saved logins. Here is a screenshot from my computer. Safari and Firefox are the only two browsers installed on my computer, if you have more they will be listed on your computer. If you don't have CleanMyMac X, I'd buy it.
-
I get what you mean. You will want to do a "Secure Erase" of the files on your computer. If you are wanting them to be gone from your computer, you will need to delete everything that is associated with those files. I would also upload them to Dropbox directly via their website, rather than putting them in the Local Dropbox Folder on your HD, which automatically syncs to Dropbox's Servers. Now for the easy part, when it comes to Macs, it's really tough getting files back once you delete them. The macOS does have some built in features that allow you to do a secure erase and a program that I often recommend, CleanMyMac X, has a "File Shredder" option, which makes it easy to securely-erase files. The folks at MacPaw who create CleanMyMac also were nice enough to give you quick-and-dirty instructions on how to securely erase files manually. Now, if you are super-paranoid, I wouldn't have imported them to a Main HD. I would have used a Thumbdrive or an external HD with nothing on it but those images and then did a secure format, 3 passes should be sufficient, but you could have gone as high as five. I would also purge any cache files that deal with Photoshop or Bridge and if you are using Lightroom, more than likely you will have to delete your catalog as well. Every little bit of those files / side-car stuff...everything needs to go. Unfortunately, I've never gone to this extent in trying to cover my tracks, so my knowledge is limited, but definitely start by doing a "Secure Erase" of those images/files on the local side of the computer. Oh, make sure your Dropbox Password is very secure. Don't use simple passwords like your Kid's / Dog's names, make it at least 15 or so characters, with letters, numbers and multiple symbols. Also use a e-mail address that isn't a normal one. Since it seems to be only these images you are looking to secure, I would create a new e-mail account on another computer (Not G-Mail, they read your stuff) and setup a new Dropbox Basic account. You just need this e-mail in order to create a new Dropbox account. I think you get 2GB of free storage, which should be enough for your group of files. Then load those files directly via a web browser. Then run CleanMyMac and have it do a scan and delete stuff.
-

Backing up & Hard drive options
Brian replied to SophieBowden-Caldwell's topic in The Macintosh User Group
Oh boy! You fear of hard drives will ultimately come to bite you in the arse. I'm very concerned with your data backup method. DVDs are not a long term solution for storage or archiving, especially for something like weddings and other important events. Why? DVDs and other media that you burn / create yourself, usually suffer from what's known as "Bit Rot." What is Bit Rot? Bit Rot, also know as Digital Rot, to put it simply, the 1's and 0's that make up your data / images on your DVDs fade away over time as the material that makes up the DVD degrades. In essence, your data/images go "Poof" over time. You do nothing to cause this; Digital Rot just happens over time with the discs sitting on your shelf or in a drawer. Even the United States Library of Congress, who is responsible of keeping records of all media produced in the US, is trying to figure out ways to combat this. So if the US Government, with Trillions of Dollars at its disposal can't figure this out, Sophie the Photographer won't do much good either. LOL!! If you are going to keep burning DVDs as a way to backup, please choose Archive Grade Media, though is not 100% bulletproof, but has gone through additional testing and is reportedly viable for 100 years. I like the brand Verbatim. Here is an Archive Grade DVD-r 100 Pack. We will see in 100 years time if the Discs hold up. At this point, I want you to start pulling out your old DVD Discs and try to see if you can get to your data. DVDs have gotten better over the years, but the ones from the early 2000's seem to suffer the most. Better to be safe than sorry, even if it will take you an afternoon to accomplish. Now for Hard Drives. There are a few brands that I recommend, and a few recommended models within those brands. Personally, I would never buy the $79 Special from Best Buy or any "Green" or "Eco-Friendly" Hard Drives as they have a high tendency to fail. Unfortunately, people don't know better and are usually price-driven. They know they should be backing up, but spending $500 on an external Enterprise-Grade HD seems a bit much, so they usually get that WD Elements Green Drive that's on sale for $129. Or the Seagate EHD that has "Low Power" advertised on the box for $99. Sounds like a deal, right? In reality, these drives usually contain lower-quality components and really did not save that much power in the long run. Why did they make them? To put it bluntly, it's a huge profit maker, for both the manufacture and the reseller. The COGS and R&D for the manufacture are very low, and that sets the price for the reseller at a good cost, which allows them to either double or triple their money. To give you a reference point, Best Buy makes more profit from selling three over-priced HDMI cables than it does selling a single Sony PlayStation! That's why they are always trying to add things to your purchase, including "Service Plans / Extended Warranties." It's based on making pure-profit. As far as the "Eco-Friendly" portion, it just makes people feel better. Well, at least the ones who pay attention to that sort of thing. In reality, a 10-15 Watt power-saving difference (I'm generalizing here) is a "drop of water in the ocean" in the grand-scheme of things. With the known high-failure rates of these drives...it doesn't do the planet a damn bit of good if they end up in a Landfill somewhere. See what I mean? Not to mention the stress and panic that it causes you when you suffer from a catastrophic data loss. The good news is, unless that EHD that failed had a physical data-crash, the data might be recoverable. It will just take a professional service to do it and that isn't cheap. Usually that cost is between $1000-$2000, though it could be more or less and depends entirely on the situation/status of the Hard Drive. If you are wondering who I recommend for this type of recovery, it's Gillware Data Recovery. Now hopefully, your eyes haven't glazed over and you are still with me. At this point in the game, people are yelling at their screen, "Just tell me WHAT TO BUY!!" My first response is, "What is your budget?" I'm a firm believer in "Buy it Right-Buy it Once!" Philosophy. Often my recommendations are a little on the higher-side, but that's due to me wanting things to last...and when it comes to hard drives and data storage, I'm not cheaping out. I'd rather spend a few hundred more now to have a HD that I won't have to worry about, then spending as little as possible only to fork out $1500 when the drive dies and I need to finish editing that wedding. There are also more options than backing up to a single HD, those units are known as NAS units, or "Network Attached Storage." Often these NAS units have data mirroring and other features that span the data across multiple hard drives, so if one HD dies, you can still get to your data. So, now let's talk numbers and tell me, which computers do you have? Are they all Macintosh based? Or do you have a Mix of Windows and Mac Computers? Where are all of your computers? At your studio and home? Or just the studio? Give me an idea of your import process and how you backup. Also what method / folder structure do you use. If you just want to know what HD to buy, I can give a quick answer. If you want your process analyzed and critiqued, we can do that as well. -
Answer number 101, copied from another thread. Here are the current specs (1-2020) that I'm recommending for a "What's a good computer to buy?" threads: Intel i7 / Intel i9 (or AMD Equivalent) 16GB RAM / 32GB or more (Preferred) 500GB Main SSD HD with a larger 2nd 7200 RPM 4TB HD / 1TB Main SSD HD with a larger 2nd 7200 RPM 8TB+ HD (Preferred) A video card that has is own separate and dedicated Video RAM. 4GB (Minimum) / 8GB (Preferred) A power supply that has enough wattage to support the video card Windows 10 Home / Windows 10 Pro (Preferred) I'd get a i7 now as the current versions of PS CC are taking advantage of the Architecture that makes a i7 faster. Personally, I'd skip getting a i9 or AMD equivalent. Photoshop doesn’t utilize a i9. Now if we were editing video, that’s a different story. PS/Bridge...i7 is perfectly fine. Take the savings on the processor when choosing a i7 and put it towards a graphics card upgrade that has it's own dedicated video memory.
-
Check the threads in this group. I have answered this question at least 100 times.
-
This is the problem with laptops. That model does not have a IPS-Based Display Panel, which is what you want if you are editing photos. That laptop would probably be good for culling, not editing. Sorry.
-
Oh, the ONLY time you edit in 16 bit, if if you have severe banding or have a photo that is going to take a lot of work / fixing. 98% of the time, editing in 8 bit is fine. I don’t care what website claims otherwise. They are lying.
-

memory slots in Dell XPS 8700 not working well
Brian replied to Jennifer's topic in The Windows & PC Hardware Forum
Backup any important stat files, actions, favorites, etc. before doing anything. -
As far as the current versions of Photoshop CC, you want to keep up-to-date. I'm not understanding the 16-bit part...you mean 64-bit? If so, that applies to Mac Users running mac OS Catalina. It also really applies to people running Photoshop CS6. If you are on Mojave, you are fine. It's the Catalina Users that have to worry.

