

Damien Symonds
-
Posts
211,838 -
Joined
-
Last visited
-
Days Won
3,476
Everything posted by Damien Symonds
-
I'm so sorry, it's too old. I don't have it any more. If you've got a similar problem, please post your photo in a new thread as usual.
-
Hang on, that looks lighter. Sorry, I meant her throat needs some shadow.
-
I can't really see any difference, sorry.
-
Maybe it needs some on the throat too.
-
Now spread it more gently. So it goes a bit further around the face, but gently.
-
Yes, that's better, but it's too strong on the side of the face, I think.
-
It looks like you've done it with either the Lightness slider in Hue/Sat, or the white Output slider in levels. I think a normal middle slider adjustment in levels would be better.
-
 I think it's nice!
 -
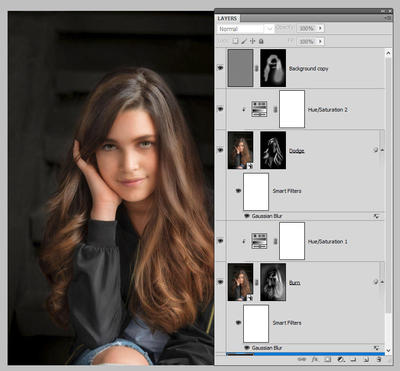
Oh crap, sorry! One more thing I did, I remember now. I clipped a Hue/Saturation layer to each of the "DODGE" and "BURN" layers, with the Saturation slider at +30 on the Master channel on each of those layers. Then yeah, just paint as you see fit. Of course paint on the "Burn" layer where you want to darken, and the "Dodge" layer where you want to lighten. This is what mine looked like:
-
You've got two layers named "BURN" One of those should be "DODGE". But as long as the blend modes are correct, that's cool. Just change the name and you're ready to begin painting.
-
file size for websites
Damien Symonds replied to Falon's topic in Output - print, websites, Facebook, email, client disk, etc
This will inevitably involve some trial-and-error, you know? You can try uploading at various sizes, and at various levels of sharpening, then view your site on various computers and devices. -
file size for websites
Damien Symonds replied to Falon's topic in Output - print, websites, Facebook, email, client disk, etc
I would sharpen for web. And fairly strongly too. It can't do any harm. -
file size for websites
Damien Symonds replied to Falon's topic in Output - print, websites, Facebook, email, client disk, etc
Well, I assume it means 3000 on the longest side (height or width, depending on the orientation). That's what watermarking is for. -
file size for websites
Damien Symonds replied to Falon's topic in Output - print, websites, Facebook, email, client disk, etc
Gee, I wouldn't make 'em bigger than 3000px. -
file size for websites
Damien Symonds replied to Falon's topic in Output - print, websites, Facebook, email, client disk, etc
Well, hopefully WIX will have an FAQ about this somewhere? -
Not quite perfect, but definitely good enough.
- 1 reply
-
- 1
-

-
Sunflower RAW
Damien Symonds replied to rswannabe's topic in Monitor calibration questions or problems
Ok ... that should be useful. How do your prints compare by their light during the day? -
Sunflower RAW
Damien Symonds replied to rswannabe's topic in Monitor calibration questions or problems
Are you near any windows? -
Well, let's not beat around the bush. You were pretty stupid to create this file at 2x3 inches. You're damn lucky.
-
Of course not! Calm down. Just crop it to 8x10 in the usual way (DON'T flatten first!!!!) then sharpen per the sharpening class instructions for storyboards.
-
No no, not at all. Your file, as long as you've done everything properly, is infinitely resizable. By "properly" I mean all the shapes are vectors (paths), and the images are placed as smart objects. So, back to the question - you must have been looking at greater than 100% view, right? That's why you thought the photos were pixelated?
-
They shouldn't look pixelated at 100% view. That's an oddly small size. Is this for a place card or something?


