Damien Symonds
-
Posts
212,136 -
Joined
-
Last visited
-
Days Won
3,489
Everything posted by Damien Symonds
-
As long as you shot raw, you'll be fine. http://www.damiensymonds.net/2010/07/raw-noise-removal.html http://www.damiensymonds.net/2015/10/noise-reduction-and-sharpening-leap-of.html
-

Velvety / Painterly effect v2
Damien Symonds replied to Charliepw's topic in How to achieve a certain look or effect
To be honest, very often it shouldn't matter. It all depends on which blend mode you use. -
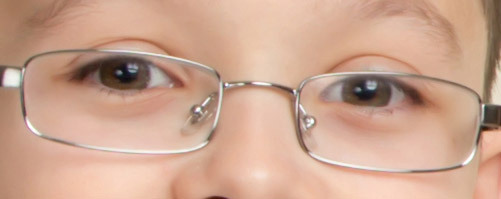
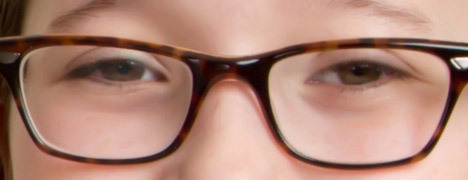
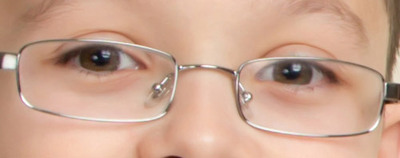
Removing glare from glasses
Damien Symonds replied to Pedipt's topic in Questions about tutorials and articles
Well, I haven't made videos for the same reason I haven't written any tutorials. Because every situation is different.- 1 reply
-
- 1
-

-
Let's not get ahead of ourselves. Sun on faces is a Photoshop matter, and Photoshop editing must not be done until raw processing is completed. Please do so, then post in the Raw Class for my approval.
- 1 reply
-
- 1
-
-
Exporting from Bridge
Damien Symonds replied to Tina B.'s topic in Photoshop / Elements / Bridge / ACR questions or problems
-
Exporting from Bridge
Damien Symonds replied to Tina B.'s topic in Photoshop / Elements / Bridge / ACR questions or problems
How odd. Ah well, no biggie. Use Tools > Photoshop > Image Processor instead. -
Oh, I'm so sorry, no, there isn't. Never mind, cloning will do.
-
Actually, it was the Patch Tool. For the patch on the far left. No, not select-copy-paste. Select then Ctrl J. Technically they probably should be a smart object, but I think we can get away with it.
-
Download the PSD file First, duplicated the Background layer and did a bit of basic cloning and healing, with the main intent of getting one good eye. Then I copied some chunks of that eye as needed, moved them over and used them to repair the other eye.
-
For this, 10%, I think. And yes, constant resampling from different areas. Patience is the key.
-
This one is more difficult. This is the best I can manage: Would it be good enough?
-
For the camera-right eye, simply patient low-opacity cloning. For the camera-left eye, a Levels layer: Red channel 75/1.00/255 Green and Blue channels 85/1.15/255 Then mask on at low opacity.

-
Exporting a Photo
Damien Symonds replied to vmd124's topic in Photoshop / Elements / Bridge / ACR questions or problems
Follow the link Christina gave. All the way through. It will fix this terrible problem. -
Taking this image to the next level
Damien Symonds replied to Lisamjohnson's topic in Help with editing
Hi Lisa, can you provide links to photos with the great pop you desire? So I can see what you like? -
Correct. They apply the adjustments directly to the pixel layer. Very bad. What smart people do is go to Edit>Keyboard Shortcuts, and assign those shortcuts to add adjustment layers instead. Ctrl L to add a Levels adjustment layer, and so on. I wish Adobe would make that the default, you know?
-
http://www.damiensymonds.net/act_web.html
-
Brightening eyes
Damien Symonds replied to Vickielkh's topic in Questions about tutorials and articles
If you go to my site - damiensymonds.net - and type "eyes" in the search bar it should come up. -
Exporting from Bridge
Damien Symonds replied to Tina B.'s topic in Photoshop / Elements / Bridge / ACR questions or problems
What about if you right-click on an image in the filmstrip? Is Export To in the contextual menu? -
Exporting from Bridge
Damien Symonds replied to Tina B.'s topic in Photoshop / Elements / Bridge / ACR questions or problems
Darn. It's there in CS5. Maybe they've moved it to a different menu? -
Exporting from Bridge
Damien Symonds replied to Tina B.'s topic in Photoshop / Elements / Bridge / ACR questions or problems
You should be able to use File>Export to>Hard Drive. -
I see no reason why it would be unsafe to recalibrate.
-
Are you sure you didn't just do something silly like send them jpegs saved at extremely low quality?
-
Thanks, fixed.
-
Thanks. I think you simply didn't go strong enough with the D&S. I just had a try, and I think 10/7 does a good job.
-
May I see a 100% crop of the "before Dust & Scratches"?