

Damien Symonds
-
Posts
212,164 -
Joined
-
Last visited
-
Days Won
3,493
Everything posted by Damien Symonds
-

Watermark action drop shadow
Damien Symonds replied to Jodie's topic in Questions about tutorials and articles
On the variable watermark one, you need to add three steps. Immediately after Unsharp Mask, you add a Smart Object conversion, and the drop shadow. Then the canvas size step remains the same, but after that you add a flatten step. Then the existing Convert to Smart Object happens after that, and the rest of the action runs as normal.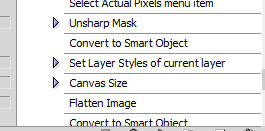
-
Watermark action drop shadow
Damien Symonds replied to Jodie's topic in Questions about tutorials and articles
Ok ... On the fixed watermark one, you need to add these two steps immediately after the "Reveal All" step: Then switch around the order of the "Flatten Image" and "Canvas Size" steps that occur after that, so that canvas size happens before flattening.
-
Watermark action drop shadow
Damien Symonds replied to Jodie's topic in Questions about tutorials and articles
No, wait, sorry, scratch that. Testing now ... -
Watermark action drop shadow
Damien Symonds replied to Jodie's topic in Questions about tutorials and articles
It should be as simple as adding a drop shadow step immediately after the second Canvas Size step. -
Newborn Skin
Damien Symonds replied to Melissa Andreoli's topic in Miscellaneous questions or problems
How did you go, Melissa? -
Watermark action drop shadow
Damien Symonds replied to Jodie's topic in Questions about tutorials and articles
Oh! Sorry! -
Is this too much?

-
Gosh, the first link is a lot more than just the colour of a crop. It's an entire lighting matter. I'm not sure that's what you want?
-
Cloning should work, but only in conjunction with a mask. You would clone sky down over the entire house, and some of the land. Then mask it.
-
Sure, no problem! Just add a Hue/Saturation layer, go to "Cyans", and fiddle with the sliders a bit. I suggest roughly +7, +7, -7.
-
@dex, I want to reiterate that CS5 rocks! Just convert to DNG and be happy that you have incredibly powerful software that you don't need to pay another cent for.
-
How did you go?
-
Watermark action drop shadow
Damien Symonds replied to Jodie's topic in Questions about tutorials and articles
No no no no no. You must add the drop shadow to the actual watermark file, don't try to add it every time in the action. http://www.damiensymonds.net/2012/01/creating-saving-and-using-watermark-ps.html -
You're correct. But it's no big burden, honestly. I've made a video here, if it helps.
-
Those are nice, but can you show me one that's very close to sundown, like your photo?
-
Not quite perfect, but adequate. I trust you can see the problems? It's fixed the acne scars really well, but it doesn't work in creases of skin. You need to be more careful with your masking.
-
Can you link me to any examples of fields you like?
-
No, that's fine.
-
Not bad at all, except for some weird yellow/greenness either side of the tie.
-
I'm not sure. May I see a screenshot of your layers panel?
-
Remember not to try to get rid of all of the shadowing. That would be too difficult, and anyway, would look strange. Just minimise it a bit.
-
Bummer. That would have been really useful here. Well, as a first step, try this method.
-
You're not still in the Raw Class, are you, Laura?
-
Simply hold down your Alt key and the "Cancel" button will turn into a "Reset" button, which you can click to undo your work. Raw files are completely bulletproof. You cannot do anything permanently bad to a raw file.

