

Brian
-
Posts
4,130 -
Joined
-
Last visited
-
Days Won
53
Everything posted by Brian
-
Adobe doesn't overwrite things when it updates. It installs a new version next to the old one. This way if a plug-in were to be incompatible, or something goes horribly wrong, you can still function with the old version. You could uninstall the old version to reclaim HD space, just as long as you are 100% sure that your Actions, Brushes, Plugins, etc. work with the newer version are are installed in the new version. Or you could leave it alone. Me? I've been meaning to un-install the old versions of PS and LR that are on my computer. But I'm kinda lazy. LOL!! Who knows? I might do some spring cleaning this weekend. Before you do anything, I would backup any actions, brushes and record the license info for any plugins before uninstalling anything. It's good practice to do on a semi-normal basis and gives you peace of mind of having a backup.
-
The bottom line is this, even though you have a fast SSD drive, it’s only 256GB and is microscopic by today’s standards. You need at least a 500GB for a C Drive these days, preferably 1TB or larger. As windows and software updates get pushed down, your space gets less and less. In addition, with a 256GB drive, only programs can be stored in it. Absolutely no image files whatsoever. They go on your D drive.
-
Do you have access to her phone? Some people, like myself, use a password manager on my phone, so you may not need a bunch of passwords, just one to unlock everything.
-

Question related to next spending on photography equipment
Brian replied to rahullele's topic in Photo Gear & Equipment
When you use flash, it's a completely different exposure triangle, well...more like the opposite side of the same coin. Your camera's meter is completely worthless when it comes to flash, so the "1/110th of a second" really isn't an issue. Aperture relates to flash power, Shutter Speed & ISO relates to the Ambient light. Normally, I'm at 1/80th of a second and f/5.6 @ ISO 800-ish when I shoot wedding receptions. I also use f/4 a lot. The reason is the main photographer that I shoot with doesn't like complete black backgrounds, she wants to capture some of the venue in addition to subjects. Sometimes I go as low as 1/60th and crank up the ISO to 3200 if needed. Heck, I've gone to ISO 8000+!! LOL!! You can't change the laws of physics and what interests me is you have a friggin' D750, you have better ISO performance than my D3s since it's newer technology! I'm sure you are saying, "...but I need to keep my shutter speed up to reduce camera shake..." That's where flash duration comes into play. The quick pop of the flash freezes your subject. So you don't have to worry about your shutter speed as much as you would with natural light. Honestly, if you are going into Wedding/Event Photography, which is what I call "Running & Gunning Photography," do yourself a huge favor and get a proper flash and learn how to use it. I highly recommend a SB-910 or the newer model, the SB-5000. Yes, I know their expensive, but there are times that you need TTL metering and dorking around with your flash trying to figure out where to put your settings (nose buried in the back of the camera) will cause you to miss shots. I've tried going the cheap route and then finally bought a SB-910, and the quality of light was so much better. In addition, I'm really liking my Rogue Flashbender kit. I also have what I call a "My Flash Rig" which helps keeping the "Flashy" look to a minimum, AND if I want to flip vertically, the flash stays up top. Though I think I did get a defective bracket, as the bearings allow the flash to move way too easily when I don't want it to, and it's a bit small. Now the tough part, there is no easy answer. I've been chasing lights and gear and modifiers for years. It NEVER ends. You don't have to get all fancy. A 60" umbrella, a reflector, and a single flash...you can build a business from. What is the difference is how refined you want your look to be. I did find this video from Zack Arias very useful. Please give it a watch. -
Question related to next spending on photography equipment
Brian replied to rahullele's topic in Photo Gear & Equipment
Before you go buying stuff, WHAT are you photographing? Event? Wedding? Portraits? Adults? Kids? Refresh my memory. Also, what look are you trying to accomplish? -
People are creatures of habit. Try “password” for the password. Was she an avid sports fan? Did her team win the championship? What year? Stuff like that. Pet’s names, hobbies, kid’s names are all fair game. Substitute $ for S.
-
I did find this, so there is hope: https://support.apple.com/en-in/HT202860
-
You are out of luck. The CIA can’t get into Apple’s products. Apple takes passwords very seriously and a trip to the Apple store is in your future, though there is probably nothing that they can do.
-
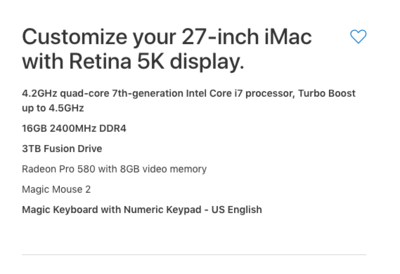
Whatever you do, DO NOT PURCHASE A 21.5" iMac!!! They are a complete waste of money and can't be upgraded after the fact, well easily. They have slower HDs, slower motherboards / chipsets, slower / less powerful video cards, slower CPUs, etc. etc. By the time you purchase a $1499 iMac and upgrade it to 16GB with Apple's overpriced RAM, you are $100 less than a stock $1799 27" iMac...which has better chipsets/motherboards, better hard drives, better CPU performance, better video cards, etc. etc. OK, now that I got that out of the way... Honestly? The stock $1799 27" iMac will be a huge upgrade for you. If it were me, I feel that the $1999 iMac is the best bang for your buck. You can go up to 64GB of RAM when the time comes and it has a faster CPU chip and better video card for only $200 more than the $1799 model. Oh!! With any of the new Retina iMac screens, you will need to budget for the latest calibration tool, such as a Datacolor Sypder5Elite Calibrator. Calibration Tools from a few years ago (2009-2011 era) can't keep up with the new Retina Screens, so it's good to have the latest and greatest calibrator / calibration software. That said, want to know what I would configure? Believe it or not, it's not a iMac Pro. This is probably what I'm going to get later this year, I'm thinking in the Fall of 2018: I started with the $2299 - 27" iMac and upgraded the CPU, RAM to 16GB and HD to 3TB. Why not a SSD drive? Due to the cost and size limitations. A small SSD drive won't do you any good if it's full, so I'm opting for a 3TB HD. That said, prices may come down and I might opt for a 1TB SSD drive and have a huge external drive. I've lived with a 1TB drive since 2009 and it still isn't full. I also want the new keyboard with the number-pad built in. I plan on purchasing RAM from Crucial.com to bump it up to 32GB to start with and also will purchase AppleCare. Cost for the iMac is $2829 plus shipping, tax and AppleCare...and is still cheaper and has way more horsepower than a Mac Book Pro. Why not a iMac Pro? Because I don't edit video. I'm not rendering 3D graphics or creating stuff for Pixar. I'm using Photoshop which isn't programmed to take advantage of what makes a iMac Pro / Mac Pro so fast. It's like owning a elite sports car that is designed to go 200MPH+ only to be used to drive your kids to school 3 miles away @ 25MPH. LOL! In fact, Adobe Photoshop will run SLOWER on a Mac Pro / iMac Pro than it will on a fully tricked out standard iMac.
-
Worry more about getting things in focus rather than the wrinkles. Those can be smoothed out in PS. Plus, you aren’t shooting with a Macro Lens. Those lenses capture every single wrinkle. The biggest challenge that I see is people suffer from the “Microwave Popcorn Button Syndrome;” meaning that if they want popcorn, the but the bag in and hit the “Popcorn” button and they get Popcorn. How does that relate to photography? People are told, “...you have 11 sets of eyes, so shoot at f/11.” Or “...you want blurry backgrounds? Shoot at f/1.8.” Like like PS actions. People are told do do __________ without knowing why. Depth of Field is more than one thing. It’s a bunch of things: Focal Length Distance between Subject and Sensor / Film Cell Distance between Subject and Background Aperture Setting Sub-category: Angle of View (Full Frame Sensor vs Crop Sensor) Now this isn’t part of the “Main” portion of DoF, but does affect the overall look and where you stand in front of your subject or place the subject away from the background. In order to get the “look” that f/2.8 does on a Crop Sensor, you are at f/4 on a Full Frame Sensor. It’s because the Angle of View difference with a smaller Sensor. It forces you to move further back from the subject than you would on a FF Sensor, thereby changing your Depth of Field. Now with this in mind, f/5.6 at 135mm will be different at 200mm or at 70mm, though it’s a good place to start, especially if you are within 5-7 feet of your subject. Heck, you could be at f/4 if you are further back. There is no set rule. There is no “Popcorn Button.” The answer is, “It depends...” One if the easiest Apertures to learn is f/8. That’s the old “Photo-Journalism Aperture” of “...use f/8 and be there.” It is the most forgiving out of all the Apertures and is the one to use with Focus Checks to see if your lens is sharp. So bottom line is this. Get great material to adjust later in PS. Get your exposure and Depth of Field nailed and then adjust in PS. It sounds like you will be between f/5.6 - f/8. It’s much easier to smooth things / tweak things in PS if you have a properly exposed photograph. If these two ladies are so obsessed with wrinkles, they need to have their faces done by a professional make-up artist before you even pickup th camera. A little makeup goes a long way. Otherwise it’s just going to be a massive airbrush job. LOL. Which is probably what they are thinking of with “No Wrinkles.” Damien’s Skin Class is a good one to take. If you don’t have time, Imagenomic Portraiture is also great for smoothing skin, though that’s another thing to learn in addition to editing this session.
-
The main issue with laptops is they are meant to be portable and that means small hard drives. The specs really haven't changed much: 8GB RAM - 16GB Recommended 500GB HD at a Minimum - 1TB Hard Drive HIGHLY Recommended CPU - As much as you can afford A video card that has separate & dedicated video memory. With the current MBP, there isn't a upgrade path, meaning "I'll buy this affordable _________ and then upgrade it in a few years..." Apple isn't that way anymore. They want you to "Go Big or Go Home..." which is why a MBP is extremely expensive AND it can't be upgraded after the fact easily. Also, you will need a few adapters since they no longer come with a traditional USB port, it's a USB-C port and you'll need to figure in the cost of a docking station at some point or adapter cables at the very least.
-
Windows 8 is your problem. It's butting heads with the Wacom Driver. I found a possible solution on the internet: http://leohartas.com/windows-8-wacom-tablet-ring-problem-fix/
-
MacBook Pros are extremely expensive if you want to use it for photo editing. I just recommended specs for a friend who is a professional photographer and the bill came to around $4000 after shipping, taxes and AppleCare. Are you sure you want to spend $4000 on a laptop? Can I recommend a 27” iMac?
-
What version of OS? Microsoft recently pushed out a new version of Windows 10 and I’m wondering if the power settings (sleep, hibernate, etc.) got changed. You might want to look there in addition to using an external monitor.
-
It will be like going from a VHS Tape to a Blu-Ray DVD, so yes...please use a DIGITAL connection. (i.e. DVI-D, HDMI, CablePort, etc.) A VGA port is an Analog connection, which has been around since 1989 and is meant for a CRT (Tube) Monitor up to 20". Today's fancy flat screens ARE NOT MEANT for a VGA connection, and you will get better colors, better contrast, and have a sharper display...which is a good thing when it comes to photo-editing. It frustrates me to no end when I see people using a VGA port and have access to Digital Connections and all they need is a $10 (or less) video cable to make their displays so much better. Sometimes, the blasted cable is included in the box and never gets hooked up because people have always used that VGA connector and never question why the other cable was included.
-
Some video cards will only use one port or the other. If you don't get video on one of the displays, you'll need a video card that supports two displays at the same time. As for which one, either, unless you are viewing things on a 4K screen. Since you have a pair of 1920x1080 screens, I think you should be fine. I'm curious if both displays work at the same time.
-
Dell monitor U2412M changed color
Brian replied to Jennifer's topic in The Windows & PC Hardware Forum
Well, if it's flaking out and changing colors on you and you are using a DVI cable, I'm leaning more towards something wrong in the display. Either the panel is starting to go on you or a power supply / inverter is flaky. OR the cable is the cause of the issue. So if it starts going nuts on you, wiggle the cable, pull the PC out from under your desk and reseat the cable at both ends. If the problem persists, you might be looking at a new monitor. That's my best guess at this point. -
You will get better colors, better contrast, better dynamic range and your picture will be sharper if you use a HDMI cable or other digital cable. It's really a big difference. $10. Monoprice.com
-
Since you are using that stupid VGA cable, PLEASE upgrade it to a HDMI Cable before buying a new video card. That VGA cable is analog, not digital. Think VHS Tape vs Blu-Ray DVD. I just swapped a Blue Display Cable just a little bit ago at a customer's site. Their monitor was having weird color / text shifting issues and as soon as I swapped the cable, the problem went away. Not the first time that a faulty blue VGA cable was the culprit.
-
Depth of Field on a Full Frame body is not as forgiving as it is on a crop body. That Angle of View change really can bite you. When I shot DX, I was always at f/2.8. I lived at f/2.8 and f/3.2. Then I went to FX and am always at f/4. Maybe f/3.2 and sometimes f/5.6, about one stop down from where I was at when shooting a DX body You buy a f/2.8 lens to be really sharp at f/4, a f/1.2 lens to be sharp at f/1.8, etc. Build quality, lens flare coatings, amongst other things is why you went with a more expensive lens. Also, f/2.8 isn't so much of an issue if you are further back from your subject. (Increasing your DoF.)
-
Question related to next spending on photography equipment
Brian replied to rahullele's topic in Photo Gear & Equipment
I don't think you have a focus problem, but more of a Depth of Field problem. I try f/5.6 or f/8 and even try to get back a bit further. Also try using AF-S and manually set the focus point, on the eye closest to you. -
Question related to next spending on photography equipment
Brian replied to rahullele's topic in Photo Gear & Equipment
If you have a 50mm f/1.4G, get what you can for it. It's a P.O.S. lens. I hate that stupid f'in lens. Focus is usually all over the place and it likes to back focus. -
Question related to next spending on photography equipment
Brian replied to rahullele's topic in Photo Gear & Equipment
I wouldn't get a D4. I've had several friends who have had focus issues and others have love affairs. If you do go that route, at least go for a D4s. I will warn you, once you shoot with a Pro-Body, the consumer models feel like toys if you go back. The high ISO on the D850 is insaine. It's better than the D5, but of course it's newer technology. When the D5s hits the shelves, I'm sure it will get "The Lord of Darkness" title back. What is most interesting about the D850 and D5, is not the high ISO, but the ability to focus in dark situations and nail focus. Both the D850 and D5 share the same focusing system, but the D5 has better cpu performance, so it locks on quicker than a D850, but the D850 is no slouch either. You just know you're shooting a D5. Yes, high ISO performance with either body will be better than a D750, especially a D850, though some might argue with me. Oh, the D850 really isn't an upgrade of a D810, it's really a whole new body. -
Dell monitor U2412M changed color
Brian replied to Jennifer's topic in The Windows & PC Hardware Forum
If you are using the 15-pin Blue VGA cable, that's more than likely the culprit. I will bet if you wiggle that cable ends, the colors will change back. If you are using that cable and have access to a HDMI port or DVI-D port, use one of those instead. The traditional cable that everyone is used to dates from 1989, it was never meant for today's fancy flat screen displays. Those VGA Cables only were meant for 20" CRT (Tube) Displays. -
Question related to next spending on photography equipment
Brian replied to rahullele's topic in Photo Gear & Equipment
Wanna hear painful? I played tourist in NYC this past weekend and visited the B&H store on 9th Ave. it was fun and I played with a Nikon D5. Guess who is seriously thinking about dropping $6500 on a D5? This guy. Now I just have to find a way to pay for it. Nikon Aquisition Syndrome. It NEVER ENDS. Especially if you have shot professionally with pro-gear. Gone are the days of a Nikon DX bodily with a 50mm 1.8 lens attached.


