Brian
-
Posts
4,137 -
Joined
-
Last visited
-
Days Won
55
Everything posted by Brian
-
A defective lens. It needs to be sent in for repair. That problem is not normal at all. Now, there are Depth of Field challenges when shooting at f/2.8, but that isn't the case at all.
-
That's good to hear. You just need to practice with the light. It seems that this light is not a run-and-gun light. There seems to be a learning curve. I would use AWB and stop with the "Set it to _______ and fix it in post..." thinking. Just to see if you get better results. You can always go back.
-
I get my cables from Monoprice. That one from Amazon should be fine. I also refuse to pay $50+ for a special super-duper cable that the stores try to push on you. It's a HUGE profit maker for them. In fact, the box stores make more profit selling a single overpriced HDMI cable than they do selling 3 gaming consoles. It's insane. The only time you need to pay attention is if you are viewing 4K video. Then you need a HDMI 2.0 cable that is capable of 18Gbps, but you are editing photos, not watching blow-up action movies on a 60" flatscreen.
-
You are good. Enjoy your new display. Please use a HDMI cable or DisplayPort Cable with the monitor.
-
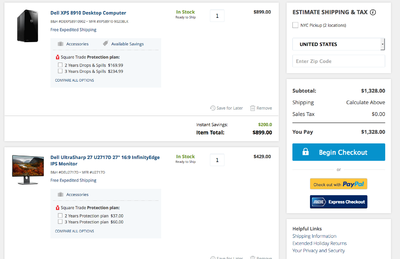
That Dell Computer seems ok, get it before Nov 30th.
-
You can add a second, much larger HD to those computers. It's easy to install and I can walk you through it. I like the WD Caviar Black internal Hard Drives. Been using them for 20+ years. Here is a 4TB model: WD 4 TB 3.5" Performance Hard Drive 128 MB Cache, 3.5" Internal Bare or OEM Drives, Black (WD4004FZWX) https://www.amazon.com/dp/B01GWS2ZOC/ref=cm_sw_r_cp_api_WIwhAbFR979T8
-
I do like the quality of light coming out of the Godox light vs your Canon Flash. It's way more even and less "Flashy." We just need to figure out how to manage the Godox.
-
You are correct in your thinking. The problem is the light itself and it's "personality" or quirks. It all boils down to knowing your gear and fiddling. Since it's so off, I would use your WB collapsible panel in addition to Damien's print out. You are going to need extra help until you figure out your groove.
-
They do, but it's a constant led light, not a flash. StudioFX Photo Video Studio Variable Color Temp 600 LED Bi Color Video Light Panel CN-600CSA https://www.amazon.com/dp/B00M4LM7GI/ref=cm_sw_r_cp_api_LswhAbG865EZF That's just one example. From my own personal experience, those led lights are meant for video and often don't have the "umph" to overpower the Sun / Ambient light.
-
It's worth a shot. Try using more of a blue gel instead of orange to compensate for your warm Godox Lights and to match the ambient light that you are shooting in.
-
@Damien Symonds -- Then you tell me what is wrong. I'm out of ideas. Seriously. What I'm seeing is the light from the Godox in her samples is a tad bit on the warm side. Just look at the white on her large WB thing, the Canon flash produces a brighter whiter light that is different than the light coming from the Godox. As far as White Balance, I was taught that you set it for your main light, in this case it's flash. You are coming at it from an editing point of view, which is fine. From what I've seen, I'm not digging her Godox lights.
-
I like the light coming from the Canon Flash. It's more neutral.
-
Ok. Then her flashes are suspect. Traditionally, Flashes are supposed to be 5500-6000K range. I've seen Godox recommend setting the WB to 5560K on some of their models. You can not physically change the WB of the flash via camera. It is what it is. I have one question, what camera body and lens are you shooting with primarily? I know Sigma lenses tend to add a bit of yellow and Tamron lenses like adding red. With your test shots of the WB cards, try different lenses too. Just to see what the values are (using Auto WB.) One more thing, let's set your camera to both Spot Metering and Matrix (Nikon) Evaluative (Canon) with the Auto WB tests. I want to see if your camera chooses different WB values in a controlled setting. Yes, I know this shouldn't do anything in terms of WB, but humor me. I'd do these tests indoors first. If the flashes are really warm, we should be able to determine that indoors. Especially if the Kelvin Values tend to go below 5500K or hang around there. Start the round of tests without any modifiers. Just camera, flash on a stand and a set of true WB cards on a table or something. Take a series of photos, 4 should be fine, at Full Power, 1/2, 1/4 and 1/8. Use a small dry-erase board with your settings and put it next to the gray cards on the table; it makes this type of test so much easier when the settings are photographed along with the cards. Write camera exposure settings, lens used and what flash power on the board. Spread the WB cards out on a small table take a series of shots with Spot Metering and then Matrix / Evaluative. Write that on the board as well. I want to see those Kelvin numbers and if they change on you. Especially when you change flash power. Oh, I'd have the flash about 4-7 feet away from the cards. Just like you shoot. In reality, the working distance of the modifier is the diameter of said modifier. So if you have a 60" modifier, that gives you up to 5 feet of working distance. Your 40" x 24" Softbox is too small for these outdoor sessions. That's why you have more contrast in some of those shots when the flash was 7' away. But I'm digressing here...
-
Before getting ahead of yourself, I think you need to fiddle. Get off of Daylight WB & Cloudy, it's messing you up. Just set it to auto WB and take a few test shots. If you have a true WB card, use it. I don't want to see any printed WB cards for these round of tests. This is just like using a calibration tool to make sure things are set correctly. We need to figure out a baseline so we can proceed forward. Sidenote: I asked a Photographer Friend who just used his Godox for the 1st time today. He used Auto WB. So let's start there. Next, I want you to set your WB to Manual and set it to as close as 5560K as you can. Then take a round of test shots. Forget trying to make people look good. Forget upcoming sessions. Just fiddle and report back.
-
All flashes are towards blue. That's why they recommend setting your camera's WB to around 5500K - 5600K, give or take, e.g. 5560k. The warmth could be coming from your Softbox; you might think the material is white, but it could be messing with things. Have you tried fiddling without using your Softbox? Speaking of which, what Softbox are you using? A good one like a Profoto or Westcott? Or a inexpensive one? Though I'm thinking it might not be the modifier, but your lights themselves. Does the cameras WB impact the color of the flash? No, not directly. The image that is produced is affected by your choice of WB. The light from the flash is impacted by the bulb itself. If you have a worn-out bulb or a crappy light to begin with, THAT will affect the flash output / light produced. Do you have a photographer friend that is local? Could you borrow a flash? Just for a few test shots, just to see. There is a difference between a $2000 Profoto and a $200-$300 light, the color temp consistency of the bulbs are WAY better with the high-end lights. Alien Bees are notorious for being all over the place, especially if you change flash power. It often takes 2-3 pops of the flash to get a Alien Bee to settle down. I'm not sure about the Godox Lights, I've never used them. I have used Alien Bees and Profotos and I can tell you first hand there is a MAJOR difference. Of course, with a price-tag to match.
-
That takes time & practice, being able to "see" the light and know which gel to use. That's the Craft of photography, it goes beyond camera settings. In addition, you can not change the white balance of the flash. The color temperature that the light produces comes from the flash bulb itself. There is no adjustment. It is what it is. You compensate the color temp by using gels. The CTO 1/4 Gel that I linked to is a good starting point. Some scenes might require more orange, others more yellow. CTO stands for Color Temperature Orange. 1/4 is how dense the color is. Think of it like a Orange Layer in PS at 25% opacity. Yes. A hand-held one. The camera's meter is completely worthless when it comes to off-camera / manual flash photography. Traditionally, hand-held meters concentrate on just exposure and flash power, never take a reading on color temp. That said, there are hand-held meters out there that will take a reading of the ambient/flash color temp, in addition to exposure readings, but they can be really expensive. Fortunately, there is a work around today...your Smartphone. There is a device called Luxi for All. This Smartphone attachment clips over the front-facing camera and you use an App to take a reading. Once such App is Cine Meter II and another one is the free one that Luxi released. Both should take a color temp reading, though it seems Cine Meter II seems to be a bit more refined interface-wise. How to use a Gel? basically it's a piece of colored plastic that clips on your flash. You can get really creative with them to produce your own look. Lots of YouTube videos. Here is one and here is another.
-
That's due to having an Atmosphere, which is a good thing. LOL!! If we could take photos in space, we wouldn't have to worry about white balance. But then you'd see the Sun's true color, which is white.
-
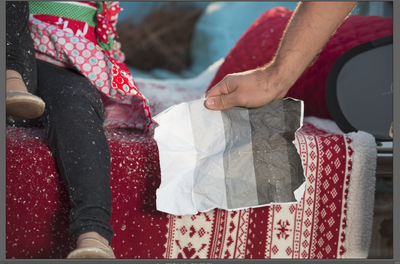
I found your problem. Take a look at the WB sheet: Look closely...SUNLIGHT IS COMING THROUGH THE SHEET. Which changes the rules on you. That area of the photo has skewed colors. It has nothing to do with the flash, the problem is it's a sheet of paper. I shouldn't see a finger shadow coming through the sheet. Honestly, I still would use thick gray cards or print a new sheet, that one is a bit rough and I would only print that sheet on a B&W Laser Printer. Hold whatever WB sheet in front of the subject's torso or face, blocking any light from coming through. Honestly, from my POV, this is just like using a card reader...just use WB Cards.
-
Since you are shooting outdoors, you have two different light sources with two different color temperatures. You either have to set the WB so that it favors your flash, which is usually the recommended method, OR use a CTO 1/4 Gel to get your flash to match more closely with the existing / ambient light. Most flashes produce light on the blue side, that's why the Flash WB setting tries to compensate for this and adds warmth. I took a look at the Godox WB settings and they seem to be around 5560K, which is close to a Daylight WB setting, but not 100% dead-on. Daylight WB, in terms of Kelvin Value Number, is different with each camera manufacturer; they all have different ideas on what that number should be. I took a look for a Gel Kit for your flash and found this one. While it's great you can mount a gel to the flash, the color gels that you get with the kit really aren't that great. Fortunately, you can use the gels that come with it and use them as a template and get a Lee CTO 1/4 Gel sheet. You should be able to make a couple of Gels for each of your flash.
-
White Balance Card: https://www.bhphotovideo.com/c/product/909206-REG/vello_wb_cm_white_balance_card_set.html Have the subject fan out the three cards and put it in front of them and take a test shot. It doesn't have to be perfect, you just need a photo to get your WB numbers off of a sample photo. Take a test shot when you change power settings or move the flash. Especially if you shoot with an Alien Bee light.
-
Relax. That's what White Balance Cards are for. LOL!! I do agree your photos are a bit on the cool side. Do you shoot Canon? The Canon Auto WB always seems to run on the cool side to my eyes. You have enough blue in your sample photos. Do not add a blue filter to that flash. You will create Smurfs if you do. If you set your camera to Flash WB, or your camera knows that it has a flash attached, it will warm the photo. Flash and a Cloudy WB are similar. How large is your Softbox? What flash are you using? (Make / Model) Are you shooting with the flash set to Manual or are you using TTL? It seems you are only using one flash. How far away from the subject is it? How do you have things setup? Walk me through your process, from light placement to camera settings to flash settings.
-

Question related to next spending on photography equipment
Brian replied to rahullele's topic in Photo Gear & Equipment
Forgot to answer this: 1. You would be correct. It is like a 24-55 lens or 24-60-ish, depending on your copy. Keep in mind that Nikon has redesigned the new 70-200E, it performs more like a classic 70-200 from the film days and doesn't have the "breathing" that the older lens has. A Nikon 24-70 stops close to where a 70-200 picks up. It's not 100%, but you really don't notice the change at 70mm going from a Nikon 24-70 to a Nikon 70-200. 2. There are Zoom People and there are Prime People I have a 85 1.8G that sits in my bag, along with a 50mm f/1.8D. I really should use them more but when I'm photographing weddings, there just isn't enough time to fiddle with primes when I'm running-and-gunning Should you have a Prime? Sure. Maybe. Probably not. Clear as mud? 50mm lens is a classic focal length I started with a Minolta 50mm f/1.7 and Minolta X-370. It's how I learned composition, learned Depth of Field using my Aperture setting, etc. and even shot my 1st Wedding at age 19 with that camera and lens. It's too bad that the Nikon 50 1.4G is total crap, the 50 1.8G is MUCH better, but you seem to not like 50mm all that much. I guess if you would take a look at your photos taken with your Tamron lens, what focal range are you at a lot? If it's 35mm or close to it, there are options at that focal length. Same thing with 28mm or even 24mm. If you seem to be shooting 35mm all the time, then ditch the 50 and Tamron 24-70! If you are at 70mm a lot and need a wider Aperture, then take a hard look at 85mm KWIM? It's all relative with no definitive "correct" answer. -
Question related to next spending on photography equipment
Brian replied to rahullele's topic in Photo Gear & Equipment
Keh.com or B&H Used dept. Adorama as well are good places to sell gear. That said, it's pawn shop payouts; meaning don't expect to get any real money for that Tamron lens. I will be surprised if you get $300 for that Tamron. Why? It's a Tamron, even though it "...has a really good DXO score." LOL. It's still 3rd party. Hopefully, I will be proven wrong and you'll get around $600 for it. The Nikon 50mm f/1.4G is a total crap lens, it's one of the few lenses I'd tell people to skip and get a Sigma ART, and I'm a Nikon OEM snob. Get rid of that 50mm f/1.4G ASAP. You could list it on Craigslist to a DX shooter. Since the DX Sensor is physically smaller, it's using the best part of the lens, aka the sweet-spot, the flaws aren't as aparent on a DX body. I have the Nikon Trinity, 14-24 f/2.8G, Nikon 24-70 f/2.8G and the 70-200 f/2.8G. The 14-24 is a legendary lens. It has a short focal range, 14-24mm but is as sharp as a prime in that range. There is a reason that Canon shooters would rent an adapting ring and then rent a Nikon 14-24 lens, it's that good. Now they have the Canon 16-35 f/2.8, so you don't hear that work-around being used as much, but the Nikon 14-24 lens remains as one of Nikon's best. Next up is the 24-70G and the newer 24-70E. Both are fine lenses. I own the 24-70G. I can say that this lens is decent and has made me money over the years. The newer version, 24-70E has VR and is sharper at 24mm and 70mm, is ok sharp at 35mm and is "meh" at 50mm. The older version that I own is decent at both ends, and is better mid-range. Kinda opposite of the 24-70E. The E version is also larger and heavier and if you are into filters, the thread size is different. (Larger @ 82mm). Which one to get? Either. If you are planning on getting a D850 and shooting 36+ MP, go with the newer E version. If you are content with 24MP or less, and want to save some money, get the older 24-70G. You really can't go wrong either way. Personally, if you are a zoom person, your sights should be on a 24-70 next. Primes that I recommend. Nikon 58mm f/1.4E. Great lens it blows the 50 1.8G and 50 1.4G out of the water. Great Bokeh and if you shoot video with your Nikon body, this lens is a must have. That said, the 58mm focal length isn't for everyone. 85mm f/1.8G - Sharp and not too expensive Bokeh is decent and it's actually sharper that the 85mm f/1.4G. This lens is great for headshots. 85mm f/1.4G - Legendary Bokeh. If you shoot portaits or brides, this lens is on your short list. Damn sharp in the center and is decent around the edges. The 85mm f/1.8G is sharper from corner to corner, but doesn't have that magnificent buttery look that you get with the 85mm f/1.4G Nikon 105mm f/1.4E - This lens is superb. It's Nikon's current sharpest portrait lens. Photographers that I respect and shoot professionally state that it's one of the greatest Nikon lenses. Great for portraits and commercial work. The older Nikon 135 f/2.0D. The new 105 kicked this Sharpness King off the throne, but this lens still holds its own. That said, it's a old lens and is in dire need of a refresh. Nikon 105 f/2.8G VR Macro. If you are into detail shots or Macro Photography, the 105 VR Macro lens is THE one to get. Lens that will be my next purchase: Nikon AF-S NIKKOR 80-400mm f/4.5-5.6G ED VR Lens. I call this my "Vacation Lens." I do lots of boat rides and lighthouse / whale-watching tours. This focal range is excellent for that type of stuff since I will be at f/5.6-f/8 anyway. I also call this lens the "Little League Lens." The focal range lets me zoom in on the player running to 1st base, then zoom out to the outfield as the player catches the pop-up fly ball. Lens that I like but won't be buying: The Nikon 200-500mm. If I was headed to Yellowstone and wanted to shoot bears, I'd get this lens. I wouldn't take this lens with me due to the focal range starting at 200mm when photographing Whales and LightHouses. I also don't like how the zoom ring needs a lot of turning going from 200mm to 500mm, but that's nit-picking. I would buy this lens if I really needed it. I have other lenses that I'd list, but we are talking exotic $6000-$12000+ lenses. So we will stop here. To answer your question, a Nikon 24-70 should be next. -
Question related to next spending on photography equipment
Brian replied to rahullele's topic in Photo Gear & Equipment
One more thing... I've enabled you. You now have a case of NAS, Nikon Acquisition Syndrome. Someone let me borrow a Nikon 24-70G many years ago after only shooting with consumer-grade kit lenses. That single lens was responsible for me spending thousands on Nikon gear over the last 6+ years. LOL!! Your wallet will be crying out in pain from this point on!! LMAO!! -
Lenovo sucks. Period. I wouldn't waste my time with that brand. IBM sold that division to a Chinese company and they are not the same. In fact, my company purchased a bunch of Lenovo Laptops for the Field Techs due to them being cheap and I'm on my 4th laptop within 3 years. LOL!! I like that Dell. I bought a Dell XPS for my fiance a few years ago and it's been great. $899 is a decent price. Monitor... The buzzword is 4K these days!! Better get 4K!! Why bother with your old 1080 screen, get a NEW & SHINY 4K screen!!! Um...yeah. Here is the thing, 4K screens have doubled the resolution, using the same physical area. What does that do? IT MAKES EVERYTHING SO TINY. In fact, I'm thinking about switching back to Windows just so I can avoid a 4K screen or 5K screen for photo editing! I would buy the Dell UltraSharp 27 U2717D Monitor. Thanks for the link, that monitor is now on my short list. Oh, if you need a HDMI cable, this one from Monoprice.com will work just fine. That's where I buy my cables. This is what I personally would put in your B&H cart: