

Brian
-
Posts
4,137 -
Joined
-
Last visited
-
Days Won
55
Everything posted by Brian
-
Nope. That's one thing that Apple does...is keep their prices relatively the same. Bear in mind, when I configure a computer, I build it with a 7-8 year time-frame in mind. All too often people will buy a less expensive model, only to replace it within 3 years or so. Apple does have their "Refurbished Mac Store," but you are in New Zealand, so I'm not sure how that will work for you. What they have in the store is what they have. It's not like it's a discount store with 100's of the same item. No, this is the twelve 27" iMacs in various configurations that are in stock...oops, someone just bought one, now we have eleven 27" iMacs... My $6000 NZD could be way off. It might end up being cheaper. Head to Apple.com and it should take you to the New Zealand portion of their website. Configure the iMac the way that I did and see how much it will cost you. Start with clicking on "Mac" then iMac (not a iMac Pro,) then click 27" and "Buy." Start with the one in the right column, which should be the most expensive out of the three. Upgrade the CPU Upgrade the Video Card to the middle one (8GB Video RAM) Upgrade the HD to a 1TB SSD Upgrade the Keyboard to the one with the built-in number-pad, it's totally worth the extra $30 or so. Then click "Add to Cart." Add the AppleCare option Then see what the total is and let me know. I'm curious to see how my numbers are and how far off they are.
-
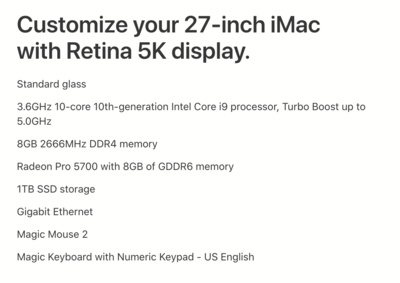
If I had to buy a brand new iMac right now, this is the configuration that I would get. This is what I consider the "Tricked Out iMac" for Photoshop: The cost is $3229 (US Dollar) before AppleCare, Tax and Shipping. The exchange rate as I type this puts your cost around $4469.99 NZD, and that is before AppleCare, Taxes and any possible Shipping charges. So I'd budget around $6000 NZD or so out your way. You will know this better than I will. Now, if you look, you will see 8GB in the configuration. That is way too small for RAM with today's modern software. You want 32GB or preferably more. Unfortunately, Apple is insaine when it comes to their RAM prices! You could spend $600+ to get 32GB, OR you could upgrade the RAM yourself to 40GB and pay only a few hundred or less! All you need is a 32GB RAM Kit. When it comes time to purchase your new Mac, hit me up for some help. I will get you a configuration that will run extremely well for Photoshop.
-
Hmm... 16GB of RAM is the minimum these days, and the free capacity of the HD is fine, but the "Super Hot" is what concerns me. Heat is the enemy, and the hotter your laptop runs, the slower it performs. If you are unable to have in on your lap, that is a big problem. The HD could have data corruption, and the CPU is working harder, or you could have a clogged fan and it's not getting rid of the heat fast enough, which is causing a slow down. I have also seen faulty internal batteries, especially Lithium-Ion start to bulge and overheat, basically they can start a fire if you aren't careful. (This is what brings down airplanes.) Honestly? If it's more than 3 years old, I'd suspect something is wrong with the Batteries, or there is another failure of some kind. This is beyond a "I just ran Glary!" type of fix; I'd seriously have it looked at by a local repair shop.
-
All my prices are US Dollar based. You do not need a Mac Pro for Photoshop. Trust me, you are wasting money if you do.
-

Graphics Card Compatibility with PS
Brian replied to Jenn E's topic in The Windows & PC Hardware Forum
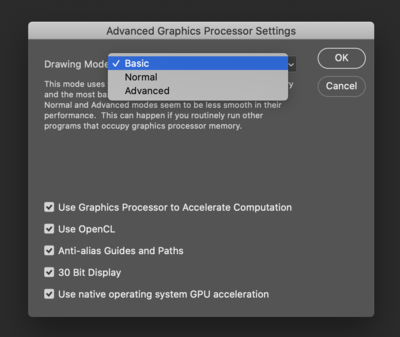
Video Cards are as bad as the latest Xbox and PlayStation Game Consoles. One does not simply walk into a store or even order one online. "Cue the Lord of the Rings Meme..." Seriously, they are being bought up by bots and then resold for triple of the actual cost. $500+ is a starting point. Some of the higher demand cards these scalpers are asking $1000, $1500 or more! Has Adobe ask you to do this in PS? Head to the Preferences, and set the "Use Graphics Processor Mode" (Advanced Settings Button) Set it to "Basic," click OK and OK...then restart Photoshop.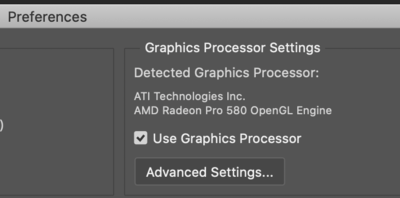
-
You didn't read my article, did you? I covered that in the Mac Pro section: So if you are just doing Photoshop work, a tricked out standard 27" iMac will run better than a if you had a Mac Pro. Now if you want to go ahead and blow $10,000+ NZ Dollars, be my guest. It won't do you any good. I would rather you get a standard 27" iMac, upgrade / tweak its configuration, and then take whatever money you would have blown on a Mac Pro and upgrade your lenses or possibly spend your money on education. THAT will make your photos better.
-
Out of all of those three models, YES...the Asus Vivo is the best choice!

-
Graphics Card Compatibility with PS
Brian replied to Jenn E's topic in The Windows & PC Hardware Forum
The fun part is, since it's a Dell, you need to get the video driver FROM DELL!! Sure, sometimes the Manufacture's OEM drivers will work, but often you will have mixed results. Of course, Dell likes to orphan their products after a few years, which puts you in a bad position...like where you are now. PS wants updated drivers, but you have a Dell Version of _________ video card, which changes things since they haven't upgraded their driver for the video card that came with your computer for 3 years. Fun times, eh? -
NEVER EVER-EVER-EVER-EVER DEFRAG A SSD!!!! YOU. WILL. KILL. IT!!! Seriously, like never-ever. The current versions of Windows 10 won't allow you do defrag a SSD. Besides, defraging doesn't do much in terms of the performance that you are looking for. You have no idea. Hard Drives aren't dumping grounds, and you really never want to go more than 75%-80% full. Once you reach the point where you were at, your HD has a very good possibility of corrupting itself; in which case can put you into the position that you are in. How do you fix it? Format the HD and re-install everything. But before we get into that, how much RAM do you have and how much HD space?
-
You win the Gold Star from me today!! Congratulations!! I am a HUGE proponent of "Buy it Right-Buy it Once!" I hate-hate-hate wasting money on this sh*t. Remember, your laptop is from the 2013-era, 4K really didn't become a thing until around 2016 or so. So it doesn't surprise me one bit that it only goes up to 2560 x 1600 (or really, 1440) which was the top-of-the-line back in 2013. Now, I wrote a thread for what to configure for when it comes to a iMac. You defintely want to stick to a 27" model. No matter how tempting, DO NOT BUY A 21.5" iMac!!! Here is the article: Quick & Dirty iMac Configurations
-
OK. Let me clarify. Regular people like myself, do not go out and blow $3000 on a Eizo Display, especially for a 2013 Macbook. Granted, your thinking is on the right track, to not cheap out, but I'd like to keep things more realistic in terms of budget. Of course, depending on where you are geographically located will affect prices. Places like New Zealand, Australia and Canada will cost more...so it is possible your budget could be closer to the $1000 mark. But if you live in the US, $500-$700 is more than enough for something decent. Wow! I just noticed you are in New Zealand!! Yeah...you are going to pay out the arse for a display. That very same display you linked to is around $600 here in the US. OK, now for your laptop. Bad news! 4K is not going to play well on your laptop and external screen. In fact, your laptop NOT will support 4K! From Apple's website for your model: "Dual display and video mirroring: Simultaneously supports full native resolution on the built-in display and up to 2560 by 1600 pixels on up to two external displays, both at millions of colors." You are better off with a standard 27" 2560x1440 and not the UHD stuff. Retina is going to kick external display's butt. Pictures will be fine, but text might be a bit fuzzy. Apple is very good at scaling and sharpness and colors on their displays, but you won't get that same "Look" on an external 3rd party display. So whatever you do end up getting, make sure the return policy is decent and have realistic expectations. I'd recommend a Dell Ultrasharp U2719DX IPS Monitor and be sure to use a HDMI cable. Keep this thread in mind to refer to: Macrumors.com - Fixing External Monitor Scaling and Fuzziness. Some people seem to have minor success, while others seem to really go out of their way to make the external display look good. If you want 4K, you are going to need a new / current MBP. Can I interest you in a 27" iMac? Do you really need a Laptop? I have a feeling you aren't going to be happy long-term. But I'd try that Dell that I recommended first. If you can't get it looking the way you want, start saving for a new Mac.
-
It's hard to tell from the screenshots on which ones have a IPS based display panel. Can you get me links?
-
Yes. Yes. But this will depend on your Calibration Device. If it's a few years old, it may not be compatible with current displays. So I'd plan on budgeting for a new one. You don't have to buy one right away, but have the money set aside in case you do. For calibrating two displays, I'd recommend either the SpyderX Elite or the current version of the i1 Display Pro. You don't need to go up that high. Around $500 or so should be more than enough, unless you purchase a genuine Apple Display, then you pay a premium. The biggest thing to look for is it NEEDS to be a IPS-Based Display Panel. It will say this in the specifications. The manufacturer will brag about it / point it out. If it doesn't say "IPS" anywhere, skip it. Why is this important? An IPS Screen is more accurate from edge-to-edge in terms of color, contrast, sharpness and overall image quality. Which is kinda important for photo editing. Plus the viewing angle is much better. The second thing it you want to fine a "Matte" Screen or something that has Anti-Glare Coatings. Third, you will have to decide on what resolution and size you are looking for. Personally 27" is more than enough. Damien works on a 19" Display and CS5! Also, will you be after a 4K model or a traditional one? But before I start rattling off a bunch of displays, what Macbook are we talking about? What year?
-
Graphics Card Compatibility with PS
Brian replied to Jenn E's topic in The Windows & PC Hardware Forum
Video Cards are very hard to come by these days due to Data-mining Bitcoin and a shortage of Semiconductors. This is results in extremely high prices and not being able to get them. Seriously, I've seen reports of a Automotive Parts Store selling Video Cards. it's very much like trying to get the latest Xbox or PS5. Unless you budget $500 or more, it's gonna be tough recommending one. Personally, I like the NVIDIA GeForce RTX 3070 8GB or I can recommend a NVIDIA Quadro RTX 4000 8GB. Both work extremely well with PS. As far as it being worth it with the older card? Sure. Why not? If you need to get stuff done, do what it takes. I'm also wondering if you completely remove / reboot / and reinstall the latest video drivers? OR install a older set for giggles? Who knows, the Feb 1st Driver could be the reason for your problems. When did they start happening? -
Graphics Card Compatibility with PS
Brian replied to Jenn E's topic in The Windows & PC Hardware Forum
It's something flaky with the Radeon Driver and the current version of PS. At this point, you can only update the video driver and hope for the best. I did a quick search and aparently there is a video driver that was released on Feb 1, 2021. So that's the latest and greatest. AMD Radeon™ RX 5600 XT Previous Drivers -
Is there a way to recover images straight from the Camera?
Brian replied to CM21's topic in The Macintosh User Group
Unfortunately, no. I'm wondering if you will need to mail them the card for them to recover. Data is data...and if there aren't any real places that do this sort of thing in OZ, you might have to bite the bullet. Honestly, mailing it internationally might be cheaper on wasting money on another piece of data recovery software to come up with null. Just a thought. In the meantime, I'd set that card aside and purchase a new one. -
Is there a way to recover images straight from the Camera?
Brian replied to CM21's topic in The Macintosh User Group
1500? Wow. That’s more than just a glitch. That camera was not writing to the card, or the card is going bad and wasn’t accepting data. Is your camera’s firmware up-to-date? Im thinking you are at the point of a data recovery service. I recommend Gillware Data Recovery . -
Is there a way to recover images straight from the Camera?
Brian replied to CM21's topic in The Macintosh User Group
For those who have Nikon Cameras and come across this thread and are wondering about the setting I was referring to, it's similar to what I pointed out in the above comment box. Newer bodies: Head to the Setup Menu (Wrench Icon) Look for "Slot empty release lock" Set it to LOCK. Older bodies: Head to the Custom Setting Menu (Pencil Icon) Look for "No memory card?" Set it to LOCK. Other version: Head to the Setup Menu (Wrench Icon) Look for "Slot Empty Release Lock" Set it to Release Locked. All three methods accomplish the same thing, the camera will not take a photo without a Memory Card inserted. If you don't manually check this setting and disable it, the camera will take a photo and just store it in the buffer. When you power off the camera, those images will go "Poof" and will be lost forever. It's just not worth it and I can not understand why this setting is turned off by default. SMDH. -
Is there a way to recover images straight from the Camera?
Brian replied to CM21's topic in The Macintosh User Group
Never-mind! I see that you have a Canon EOS R5. This camera has the stupid feature like the Nikon cameras and it NEEDS TO BE DISABLED!! Head to Shoot Menu 6 Look for "Release Shutter without Card" and BE SURE TO CHANGE THIS SETTING TO OFF!!! You do not want the camera to take a photo without a memory card. As I've stated above, ALWAYS power off the camera prior to swapping batteries. I also have a tendency to take a few test shots before any gig at the location. Then I will power-off-and-on the camera and look to see if the images are stored on the card. Then will format the card before things start happening so that you are sure to have a "fresh plate" to work off of. This only takes a few seconds, and makes sure things are writing to the card as glitches can happen. Plus, it's not a good thing to delete in-camera. I know I get push-back on this statement, with usually someone pointing out, "Then why do they have a delete button on the camera?" While it's true that you can delete in-camera, and for the majority of the time nothing happens. But that one time that your images are corrupted or are trying to do data-recovery, it's much better to have the data written sequentially for the recovery software to utilize. When you have holes/gaps in the data stream is when things get harder to recover from. This advice comes from the Inventor of Data Recovery software for flash-based media, so I tend to believe him vs. some guy in a FB group that's being an ass. -
Is there a way to recover images straight from the Camera?
Brian replied to CM21's topic in The Macintosh User Group
Only if the images were stored in the camera’s buffer and not written to the card. Do you have a Nikon camera? There is a stupid default setting that allows this to happen. If this is the case, I’m sorry those images went “poof” and are lost forever. What make / model camera do you have? Also, it’s good practice to power off your camera so that it forces any images in the buffer to be written to the card. If you pull the battery without doing this, stuff like this happens. Always power off your camera before swapping batteries. -
Is there a way to recover images straight from the Camera?
Brian replied to CM21's topic in The Macintosh User Group
Also, here is the thing with recovery software: it’s messy. You will get all sorts of weird files that you can’t open, nor see the previews for them. As for software, id recommend forking out the $60 and getting RescuePro Deluxe. Free software, while handy...doesn’t always give you the best results. -
Is there a way to recover images straight from the Camera?
Brian replied to CM21's topic in The Macintosh User Group
Now I’m curious. Did you delete the images accidentally? Or we’re never able to open them at all? I’m not worried about previews. Also, Macs have a really hard time recognizing cameras to do data transfers normally and if you are throwing data recovery into the mix, it’s just not worth the aggravation. At some point, I will be purchasing this: Sony CF Express / XQD Reader -
Is there a way to recover images straight from the Camera?
Brian replied to CM21's topic in The Macintosh User Group
No. Use a card reader. When it comes to a Mac, all devices are treated like hard drives. So when you do get a card reader just use a recovery software package and tell it to look at the CF Express Card. -
Thank You!!
-
No worries. I just don’t want you to waste money. I hate-hate-hate wasting money on this sh*t. ESPECIALLY when it comes to HDs that my data is stored on. In reality, if you don’t want to utilize a Cloud Service, and that is understandable, you are looking at a RAID1 setup and a second HD to clone onto, and kept offsite. You can copy the RAID1 EHD onto a single EHD (that’s maybe slightly larger) weekly or monthly. Or daily...that’s up to you and your comfort level of what you can stand to lose. Then it’s just a matter of sticking to a schedule.


