Jump to content

Brian

Administrator
  • Posts

    3,880
  • Joined

  • Last visited

  • Days Won

    30

Everything posted by Brian

  1. OH! One more thing!! Uploading files is just as easy!! I just went to upload a Waterfalls Photo to my Instagram and I use Hootsuit to do this. When I went to upload the photo, the main box that appeared in my comment above was the same. I simply then went to the appropriate Alias Folder and selected my File and clicked Open. I forgot just how convenient working with Aliases are and it doesn't take a huge adjustment to your workflow. Here is an example of what I'm talking about:
  2. I'd like to also add the power of Alias Folders. Say you edit a photo in Photoshop. When you head to File >> Save As and then select Desktop, the Aliases on the Desktop will appear in the main column. Just simply select the appropriate folder and click OK. The actual file will be in one of those folders that are contained within your HD and not stored on the Desktop. So in a sense, the only change to your workflow will be clicking on the appropriate Alias and then creating a folder within that Alias Folder, rather than just plopping things on the Desktop, only to organize them later. So if you think about it, it's not THAT big of a deal, and will make your Mac run so much smoother.
  3. Going back to Windows is going to be a bit of a pain. The file system that Macs use and the one Windows uses are completely different. Apple makes it VERY easy to convert from Windows to a Mac...just not the other way around. If you do convert to a Windows Laptop, I can help. Just create a thread in either here or the Windows Forum. But first things first, let's get more space on that HD (clear stuff out, you do not need 75 Raw Files that are photos of your lunch from 5 years ago.)
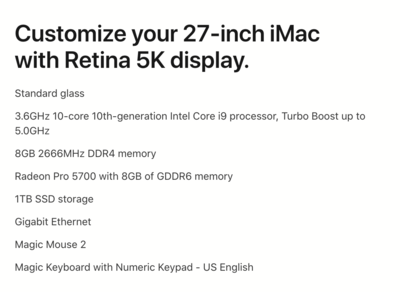
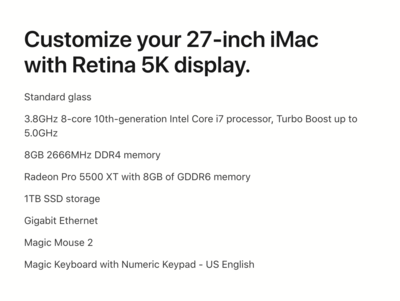
  4. Just as I expected. OK, first things first... You only have 8GB of RAM. That is the BARE-MINIMUM with today's technology that you want to have. In reality, 16GB is the new "Minimum" and 32GB is what your target should be. Yesterday's 4GB/8GB is Today's 8GB/16GB. The problem with Mac Laptops is normally they are sealed units Upgrading the RAM is very difficult, if not impossible. Normally, you have to purchase the extra/upgraded RAM at the time-of-purchase and Apple is INSANELY OVERPRICED when it comes to upgrading RAM. For example, if I were to upgrade a fancy 27" iMac to 32GB, that will cost me around $600, give or take. If I install RAM from Crucial.com, using the same exact memory, I could increase that same iMac to 64GB for about $300. If I just went to 32GB, I'd probably spend around $150 or so with today's prices. So $150 vs $600...for the same damn RAM modules. Only difference is that Apple will cover the OEM RAM under warranty, and won't be quick to blame 3rd party components for causing hardware issues. I'm not being THAT silly when I say that Apple will blame the Crucial RAM (or other 3rd Party RAM) for when your Mouse's batteries die and it needs to be recharged. Apple will find a way to blame the non-Apple item for ANY problems you might have, even if it's nowhere near the cause of your issue. Lack of free Hard Drive Space. By default, you do not want to ever-ever-ever go above 75% full on ANY Mac HD, including externals. Well, the number is closer to 80%, but I lean towards the conservative side of things, and 75% is a good target number that allows a little wiggle-room. Just like the Mac Desktop filled with a bunch of crap, once you go above 80% full, your Mac's Performance takes a DIRECT HIT. If you go above 95% full, you are in very dangerous territory where things will come to a screetching halt and you are in danger of File Corruption / File Loss. At 95% full or above, you are seriously playing with fire. With you only having 94GB free, that isn't much area for the Photoshop Scratch Disk to work, especially if your camera is 24MP or greater. There is no where for things to go on your HD when using things like Photoshop. It's good that you run a Clean Up Program weekly, hopefully that's CleanMyMax X from MacPaw.com or an earlier version. That said, if you don't have one already, now is the time to invest in an external HD and free up about 100GB of space, at a minimum. That will help speed things up dramatically. Unfortunately, just clearing up your Mac Desktop and freeing up available HD storage space is just a treatment, and not a cure. The bottom line is, you need a new computer with more RAM and definitely a larger HD. When it comes to a Mac laptop, that's very expensive. Like around $3800 expensive. The low-end Mac Laptops that people can afford, are really just for general computing and are not meant to be a primary computer, especially if you are doing anything photo / video related. That's what the MacBook Pros are for; a regular MacBook with 8GB of RAM and a 256GB HD is meant for you to use a iPhone for Photos and to use Apple Software to do things. Once you add stuff like Photoshop, your situation changes. So start saving money, you are gonna need it.
  5. OK @JudyM, I've completed the Tutorial on "How to Make Aliases." Now, for the second part of your issue: Speed. While it's true that having all sorts of crap on a Mac Desktop slows things down, it's not the only culprit. There are two Main Suspects: Lack of RAM and Lack of HD Storage Space. Before we begin, can you do this for me and post the results in this thread? Details About Your Computer's Health.
  6. If you take a look at my example desktop images, you will notice a folder called "Junk Drawer." Now I'm sure you are wondering, if I say that it's a bad idea to keep stuff on your desktop, then why do I have a folder called "Junk Drawer" in my example. Because, it's not a folder. It is what is called an "Alias." What is a Alias? It's Mac-Speak for Shortcut. Windows has Shortcuts, Macs have Aliases. Why? So Apple could Patent the term. The word "Shortcut" is a Public-Domain / Common Term so it can't be Patented. That's why you only see "Alias" used on Apple Computers. The cool part it, Aliases are meant to be on the Desktop. The MacOS knows that they are "Shortcuts" and not "Files," so it doesn't treat them as "Opened Windows" or things running in the background. They are just Aliases. Why use an Alias and how do you make them? Read on!! First, why use an Alias, since you can drag stuff to your Photos Folder or Documents Folder, or whatever? For the same blasted reason you put them on the Mac Desktop in the first place, convenience. Sure, you can move stuff to the Documents Folder and wherever you choose, it is really is that simple. The problem is iCloud. You see, at the default, Apple gives you 5GB of Free Storage Space Total, and that includes your Documents, Contacts, Photos, etc. etc. If you go blindly putting things in the default folders, and you don't adjust what gets backed up to iCloud, you are going to run out of room really quick without realizing it. Then I foresee a post here asking why is iCloud complaining about lack of room. I'm trying to save you some hassle. The second reason to use an alias, is once it's created and moved to the Desktop, it acts JUST LIKE A FOLDER. So what I would do is create various folders located somewhere within the Macintosh HD or an External HD, then create Aliases for each of those folders and move them to the Mac Desktop. Then at that point, you can still save stuff TEMPORARILY to the Desktop, and then move those files to the appropriate Alias. Since the Alias works like a folder, you just click and drag the file over to the correct alias and "Boom!" the file exists within that folder you created and is off the desktop. Here is how you create an Alias. Open the Finder Double-Click the Users Folder Then double-click on the Profile that you are currently logged in as. It should have a "Little House" as the Icon. Create a permanent Folder within your Hard Drive that is easily accessible. You can use the Root Directory if you want. In this example, we will create three folders, "Stuff 1," "Stuff 2," and "Stuff 3." Rename those folders according to your personal preferences. They could be "Vacation Photos" or "Quick Documents," "Contracts," it does not matter. Just name them something obvious. Now select the first folder, in this case it's "Stuff 1," then right-click it and select "Make Alias." Do this for all other folders in which we are creating Aliases. Now drag each of the Aliases to the "Desktop" in the left column of the Finder. Now head to the Desktop and select each Alias, one at a time. Then right-click and select "Get Info." Do not use "Rename." It doesn't work well on renaming Aliases, it's better to use "Get Info." Remove the word "Alias" from the end of the name box and click the Red Circle to close the "Get Info" Box and apply the changes. Do this for the other Aliases on the Desktop. Then Click-and-Drag each of your items that are on the Desktop to the appropriate Alias and you are done! When Finished, your Desktop should look like this. See the little arrows in the lower left corner of your Aliases? That's how you can tell they are an Alias and not a folder, even though they act like folders. The reason that I'm mentioning this, is if you ever need to copy or move your source folder to another HD, be sure to do it on the ACTUAL FOLDER and not the Alias so you can be sure that things transfer over properly.
  7. I want you to read this multiple times, and memorize it. Ready? The more Files & Folders you have on a Mac Desktop, aka "Crap," the SLOWER the damn thing runs!! Now I get it, it's convenient to store things on a Mac Desktop. I do it myself, especially when exporting to FB or whatever. It's just easier. The thing is...the files do not stay there. My master .psd files are stored in the appropriate folders, located within a Hard Drive and NOT stored on the desktop. Once you have the Master .psd files, you can safely delete the exported JPEGS after they are uploaded or delivered to the client. You can always re-save the JPEGS from the Master .psd File. Now, in your post it's just not photos, but other files on the desktop. Well, it doesn't matter as far as the MacOS is concerned. When you store things on the Desktop, the MacOS treats those things as if you are currently working on them; they are considered to be "Minimized" (for lack of a better term) and are sitting in the background taking up System Resources. So to put it another way, the MacOS treats them as Open Windows, even if you aren't doing anything with them. For example, if you have a bunch of photos from the "Smith Family Photo Session" at the Local Park, plus a bunch of Word and Excel Documents, and a bunch of .pdf files...guess what? They are all currently running, even though they are not physically opened. Now let's take the Smith Family Session example to clarify things; you have about 300 RAW files, roughly 130 .psd files and about 120 JPEGS that will be delivered to the client. Plus the JPEGS that are posted to FB and IG or whatever Social Media. Let's say there are 20 photos for FB and IG. So that's 40 since FB and Instagram have different sizes and should be resized appropriately and sharpened accordingly to each size. So 300+130+120+40=590. When it comes to the MacOS and using this example, that's 590 opened "Windows" running in the background, plus any programs you have running. Now, that's just the "Smith Family Session." Then add all the other crap you have on your desktop, currently opened programs, plus we need to factor in each Web Browser Tab opened; the more tabs you have open, the more RAM is consumed!! See how things can get out of hand pretty quickly without knowing?!? The quickest way to regain performance with any Macintosh Computer is to not buy any programs, it's simply to get all of the crap off the desktop. I guarantee you, as soon as you clear off your desktop, you will see a performance boost. Your Mac will just "Breathe" easier and just run more smoothly. Here is what your Mac Desktop SHOULD look like: Of course, I changed the background to black for this example to illustrate, and it's normal to have a few other things, but you should always strive to have it this clean. Now, I'm sure you are wondering how to accomplish this and since you've "Always stored stuff on the desktop..." it's hard to imagine doing things the "Correct" way. That will be covered in the next section.
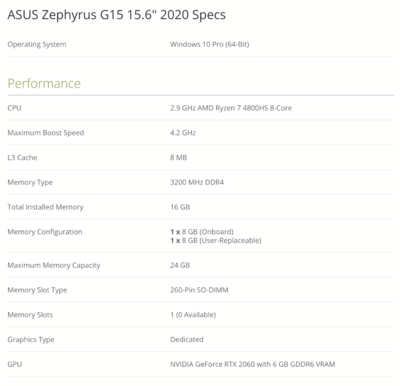
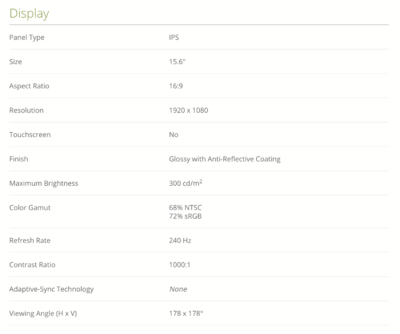
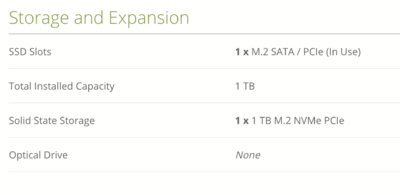
  8. IPS is the screen type. LED is the of back-light that illuminates the display. They are two different things. It seems that there are two versions of the screen, one that is 240Hz and one that is 144Hz. you want the 240Hz model for $100 more. Take a look at Asus' website for the details: https://www.asus.com/us/Laptops/ROG-Zephyrus-G15/Tech-Specs/ As you can see, the model that contains the 15.6-inch Non-glare Full HD (1920 x 1080) IPS-level panel, 240Hz, 3ms, 100% sRGB, Pantone® is the one you want to get. The dead give away is the 240Hz refresh rate. Also, that model has a better video card. So this one at B&H, the ASUS 15.6" Republic of Gamers Zephyrus G15 GA502IV for $1399.99 is the one you want to purchase. Let's keep things simple, if I had to personally buy a laptop, if I was in your situation, that model at B&H would be the one to get. That laptop has 16GB of RAM, 8GB on-board and a slot that has a 8GB stick. It is up-gradable to 24GB. I'd just go ahead and purchase a 16GB stick to max it out at 24GB. As for which one to buy, I'm not sure as the laptop hasn't been released yet, but I'm thinking the Crucial.com scanning tool will be able to figure it out. So buy the laptop at B&H and get yourself setup. Then upgrade the RAM. The other things I like about that laptop is the 1TB of storage. I'm so glad that laptop doesn't have a stupid 256GB Main Drive. Unfortunately, as I write this, Costco's website is having issues and I can't search for the laptop. If you do purchase from them, DOUBLE-CHECK THE SCREEN REFRESH RATE OF THE MODEL. Chances are, Costco might be selling the 144Hz version in their version-do not buy that version. Again, the one at B&H that I linked to above has the 240Hz screen. Keep in mind, Color Calibration IS NOT A ONE TIME THING. Sure, factory calibration usually is decent out of the box and that's meant for VIDEO GAMES. Not photo-editing. I don't care if whatever you buy is "Certified" or "Calibrated" to _________ fancy organization specifications...you are still going to need to purchase a Calibration Tool, if you don't have one already, such as a SpyderX Pro or SpyderX Elite. Then you will have to match your screen to a set of prints. Plan on calibrating every 4-6 weeks for the best results. Screens do change over time as they get broken in, that's why you never assume that things are "fine" until you physically check. As to which one? With a laptop and if you are going to use an external display, either. The difference between the two is software and the SpyderX Elite has all the features turned on. With a fancy Windows Laptop, such as an Asus ROG, I'd be more inclined to get a SpyderX Elite. With a Mac Laptop, since you can only change brightness, the SpyderX Pro tool is fine.
  9. The black marks is gravity working against the pages. They are spread out just a little and your are directly in-line with them, which is making them look more noticeable. You can't avoid the laws of physics. I'm thinking you are going to have to research or buy a class or two on product photography. My knowledge in this area is quite limited, but you are on the right track. The one second from the bottom is decent, and I'm thinking the table you are on isn't level, so head to home depot and buy a 3 foot level if you need one. You might also want to invest in a Book Easel of some sort that you can clone out easily. That should help prop the book up or you are going to have to create some sort of Jig to do the same thing. Heck even a black bean-bag might help, or some sort of reflector. You are going to have to get creative. Try a white piece of cardboard, a white shower curtain, otherwise you are going to be spending money on lights, stands, and more crap. Oh, speaking of which, more than likely, you are going to need another light. If you are wanting to get rid of the black voids in the pages, you might have to do some cloning. Damien is one to answer this topic. Especially with the Moiré. Or possibly get a Ring Light. Often you will see these lights advertised for YouTube Blogging and such, but the truth is, they have all kinds of uses. Basically, you set the ring to point directly at the books and you position your lens through the Ring Light itself; this might actually help with the black voids in the pages...as your light from the box isn't getting into the nooks and crannies. I've used this Ring Light in the past and it's very good. The only thing you will need is a light stand. I also saw this one too. Here is the thing with product photography...it's all fake. That Yummy Syrup on those Stack of Pancakes? It's Motor Oil. The Butter isn't butter either, it's shortening with food coloring. Same thing goes for that dish of ice cream...it's shortening. Same thing with the Turkey on the recipe page. It's really frozen, they just take a blow torch and "cook" (brown) the outside, cut a slice off and blow torch just that area, and spray it with glycerine / oil mix to make it look like it's piping hot. Steam from Coffee in a Mug? There are plastic tubes on the back-side of the mug connected to a steam generator. The Coffee is cold. The hardest part about this, is you are going to have to figure out your formula alone. It's fiddling and it's gonna take time. Especially figuring out your lighting and then editing. Once you get your stuff figured out...shut up about it and don't say a word to anyone. Oh, by-the-way...this is good:
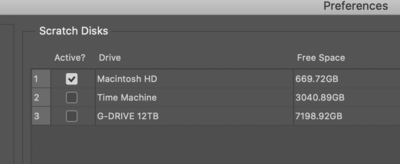
  10. Originally, I had this section merged with the "Performance Section" above, but I decided it should be on its own. The reason is, for the majority of people, this option located in the Preferences Section of Photoshop should be left alone. The only time we need to change this section is if the Main HD is getting full or we are working on something HUGE and Photoshop needs more resources. That said, if your main HD is THAT full, you have MUCH BIGGER problems than just Photoshop performance issues. if you maintain your computer and have a large enough Main HD (at least 1TB) you will never have to mess with this section. The other reason we might have to change the Scratch disk settings, is we need to move the Scratch Disk to another Hard Drive OR to have the Scratch Disk span multiple Hard Drives; this will allow a larger HD Pool to draw from. Again, if you are running out of room or PS is complaining "...the Scratch Disk is full," you have much bigger problems outside of Photoshop and you should create a thread in the appropriate Ask Brian section. To begin, click the Scratch Disks Section in the left column. If you have an external HD mounted and running, you might get a pop-up box requesting "Access to the External HD..." or something along those lines. Simply click Allow or Yes and you will see all of your available Hard Drives that the Scratch Disk can use. It should look something like this: Again, for the majority of us out there, leaving it at the Default should be fine. If we need to span multiple Hard Drives so that the Photoshop Scratch Disk has a larger "Pool" to draw from, then simply put check-marks next to the additional drives you want to use. For example: That being said, for Macintosh Users...NEVER-EVER-EVER CHECK THE "TIME MACHINE" Drive to be used as a PS Scratch Disk!! Leave that drive alone!! If you have a dedicated HD in your computer and you want to move the Scratch Disk to it, simply un-check the Main HD and select the drive that you want to use. For example: In either case, after you make the appropriate changes, click OK and then RESTART PHOTOSHOP in order for the changes to take affect. This is one of those dumb things that Adobe chooses to do for a default setting. I don't know why they choose this option, but fortunately...it's easy to change. We will start by clicking on the Cursors item in the left column, it's just below the "Scratch Disks" item. Then look in the "Other Cursors" Section (in the middle) change it from Standard to Precise: The latest update that Adobe just released at the end of June 2020 really changed the way the "New Document" module looked. For example: If you create a lot of documents directly in Photoshop, and would like to use the "Classic" or "Legacy" version that has been around forever, simply head back into the General Section of the Photoshop Preferences and put a Check-mark next to the "Use Legacy 'New Document' Interface." Close-up View of the Check-box: By making this change, Photoshop will use the standard "New Document" Interface that has been around forever: The original way, and the method that has been around since Photoshop 1.0, was recently changed by Adobe. This is turn has confused many people and were trying to figure out how to "Turn Off" the new feature. What happened is, Adobe added an extra step to "Save a Copy" instead of directly Saving / Overwriting the file, just as it always had. I understand Adobe's intentions, on the surface this sound like a good thing, but people are creatures of habit and don't like change. So finally Adobe provided a few check-boxes to enable the original method in saving files. First, you need to update to the latest version of Photoshop CC that's available. Then head to the Preferences Screen For the MacOS: Open Photoshop. Head to the Photoshop Menu (Next to the Apple Menu up top) then click > Preferences > File Handling > File Saving Options For Windows Users: Open Photoshop: Head to the Edit Menu > Preferences > File Handling > File Saving Options As you can see Photoshop itself is nearly identical between the MacOS version and Windows Version. Well, when it comes to the Preferences Screen / Setup Boxes. The main difference is how you get to the Preferences Section in Photoshop. (The Photoshop Menu vs the Edit Menu.) But I'm digressing. After you enter the "File Handling Menu," click the check-box next to "Enable legacy "Save As" After you click this first check-box, a Warning Dialog will appear, just click "OK." After you click "Enable legacy "Save As," then the check-box next to: Do not append "copy" to filename when saving a copy should automatically appear. If it doesn't, just manually select it. When finished , ensure the two check-boxes are selected: Now simply click "OK" and RESTART PHOTOSHOP. Rejoice!! Saving your files should be back to the same method that has been used since Photoshop 1.0 was around.
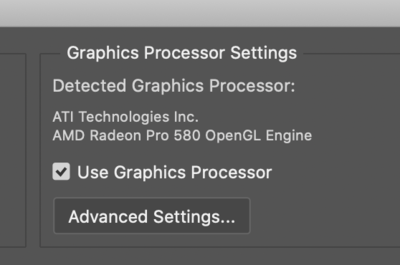
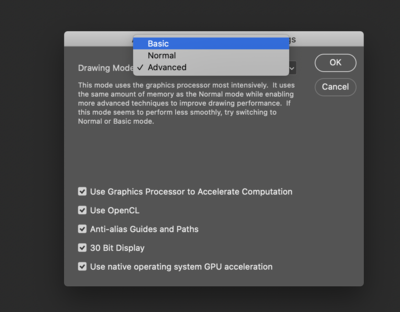
  11. Now for the final part of setting up Photoshop. There are only a few things that we might need to change and they will be covered in this section. First, open up the Performance Box under the Preferences Menu: Mac: Choose the Photoshop Menu >> Preferences >> Performance Windows: Edit Menu >> Select Preferences >> Choose the Performance Section For both Windows & Mac computers, the Performance Setting Box should be nearly identical and looks like this: The first thing we are going to change is the lower right section and set them to the following: History States - 50. Cache Tiles - 4 Cache Tile Size - 128K Next, we will head to the Memory Usage section, towards the top left. Normally, I leave this at the default, which is 70% but have been known to increase it to 80% if I'm working on something quite large, like a huge Panorama Photo. Keep in mind, the more RAM you tell Photoshop to use, the less will be available for other programs. So if you have other programs running in the background, like Lightroom or FIrefox, there will be less RAM for them to use if you set this number higher than the default. Remember, each tab in a browser takes up a little bit of RAM, so if you have Facebook, Pandora and a IM program running, they all use RAM in order to work. So my recommendation is to leave it at 70% and at least have 16GB of RAM with working in Photoshop; preferably 24-32GB should be your target when it comes to RAM. Heck, I'm running 64GB with my iMac...you can never have enough RAM. Now comes time for the Graphic Processor Settings. This will be the setting that you will adjust more often then not. With today's Adobe Products, they are utilizing the Video GPU Chip and Video Memory for a performance boost. So having a beefy video card with video drivers that are compatible with Photoshop is now more important than ever. By default, you want the "Use Graphics Processor" checkbox...checked. Adobe has changed the Advanced Settings box for the recent versions of Photoshop. For now, I will leave both of these screenshots up and as time goes on, I will remove the older one. New Style: Click on the Advanced Settings... button and verify that all of the check-boxes are checked. Old Style: Click on the Advanced Settings... button and have the drawing mode set to Advanced. Leave the check-boxes at the bottom alone: If Photoshop is complaining about your Graphics Card and/or Video Driver, or is acting weird, you might want to set the Drawing Mode to "Basic" and restart Photoshop. What do I mean "Weird?" Usually your images just will not look right or you will have the famous "Multiple Black Boxes" on your images. This is the result of your video card not playing well with Photoshop's advanced features. If Photoshop still has problems, you might have to un-check the "Use Graphics Processor" feature altogether. Again, only un-check this option IF you are having issues.
  12. Step 2: Making the Document Profile Setting visible. The very next thing that we MUST DO is make a change that is visible on the lower left portion of the Adobe Photoshop Window, the part where it might say, "Doc: 35.8/35.8" or whatever. This is the default choice, Document Size, which lets you know how large your .psd file currently is. In today's world with our large capacity Hard Drives and Gigabytes of RAM, we really do not need to know this information. What really matters is knowing what Color Space you are in AT ALL TIMES. Remember how I stated above that each time ACR updates, it defaults back to Adobe RGB (1998)? Well, this next setting will allow you to catch things before it's too late. It is IMPERATIVE THAT WE CHANGE THIS SETTING FROM DOCUMENT SIZES TO DOCUMENT PROFILE before continuing. Fortunately, it's easy to do. Just simply click the " > " arrow and select DOCUMENT PROFILE. Now when you look towards the bottom, it should show "sRGB IEC61966-2.1 (8bpc)" and NOTHING ELSE. The only exception is when we are editing in 16-bit mode, but more on that later. In either case, whether you are in 8-bit or 16-bit, it should always say sRGB IEC61966-2.1" Step 3: Choosing the correct Color Settings option. After you set the Document Profile to be visible at all-times, head to the Edit Menu and choose Color Settings in the list: You want to make sure that the very Top Line is set to North America General Purpose 2. Yes, even if you do not physically live in North America, select it. You really shouldn't have to make any other choices except verifying that the RGB Mode is set to sRGB. Everything else...leave alone. Then click OK to close the Window. Step 4: Verify that you are in 8-Bit Mode. By default, Photoshop uses 8 Bit Mode, but if we need to change this, this is the area that you make the change. What is "Bit Mode" and what does it mean to you? Damien wrote two articles on this subject and they are both worth reading. The first article uses Cake as an example to demonstrate the differences and another article instructing the proper method in going back and forth between the two modes. In case you are wondering, the term 'bpc' stands for Bit-Depth Per Channel. From Adobe's website, In a nutshell, the higher the Bit Depth, the more data or "Stuff" each pixel has to work with. So why not edit in 16-Bit mode all the time? Bigger is better, right? Well...not always. The higher the Bit Depth, the more resources and memory each pixel requires. If you were told to use 16-bit, you'll notice on just how SLOW your computer behaves, especially with multiple images open! So order to utilize 16-Bit on a bunch of photos that are loaded into PS, the more RAM, CPU Power, and Hard Drive Capacity (for the PS Scratch Disk) you will need. Basically, you will need a "High Horsepower" computer (Translation: Expensive) in order to really utilize 16-bit mode. Simply put, the quickest way to create HUGE files and make your computer come to a "Snail's Crawl" is to exclusively edit in 16-bit mode. So why use 16-bit mode if it's so "bad?" It is used when Photoshop needs to have a little more "Umph." For example, when you need to repair a image and do Photo-Restoration work or when you have SEVERE Banding that just doesn't seem to go away, no matter how much you edit. 16-Bit Mode is when you need more "Horsepower" from Photoshop on a single image, not for batching 40 photos from a Wedding or Family Session at the park. It gives Photoshop more Pixel/Data info to work with and permission to use more resources from your computer. To verify which Bit Mode we are in, head to the Image Menu and make sure RGB Color and 8 Bits/Channel is Checked. Well, that's it for the Photoshop Settings. As you can see, this should only take a few moments to adjust. The next part will have to do with the Performance Settings with Photoshop. Step 5: Set the Image Interpolation in the Preference's General Menu Head to the Preferences Menu and choose General Section. Mac: Choose the Photoshop Menu >> Preferences >> General Windows: Edit Menu >> Select Preferences >> General You should see some choices at the top, with the 3rd one in the list being Image Interpolation. The default setting is usually Bicubic Automatic. Please Note!! It is imperative that you change this setting to "Bicubic (best for smooth gradients)." Do not leave this setting to "Automatic" or any of the other settings. The reason is that we do not want Photoshop automatically sharpening your images without your knowledge or control. It's algorithms will make a poor attempt at what it thinks it's best to sharpen your photos for you. Do not let this happen. Click OK on the right to apply the change. Step 6: For Macintosh Users Only!! This option only affects Mac Users. Head to the Window Menu towards the right side of the Menu Bar. Look towards the bottom and make sure Application Frame is checked / selected. What this option does is that it makes Photoshop appear full screen and not in a "Floating Window" where you can see part of the Mac Desktop in addition to Photoshop. This helps keep things clean and distractions to a minimum.
  13. Step 1: Load any Raw file into Adobe Camera Raw. It really does not matter what photo you choose; the photo can be a picture of a blank wall or whatever, we just need something to be loaded into ACR to make the changes. Make sure it is only ONE image loaded when you do this! If you look towards the bottom of the ACR Window, depending on the version of ACR, you will either see a Blue or White URL-looking link. The current Color Space will be listed just before the Semi-Colon. For example: As you can see, Adobe RGB (1998) is the default Color-space that is used and we need you to click the link so we can change it to sRGB. When you click on the link, the Workflow Options Window appears: In this Window, we only need to pay attention to one particular section, and that's the Color Space Section. Do not change any other setting, just the Color Space choice: Click the Down Arrow on the Space Menu and choose sRGB IEC61966-2.1. It should be towards the bottom of the top section or the fifth one down from the very top of the list. From there, I like to save this Color Space Setting by giving it a unique name, this way I can quickly glance to see if I am working in sRGB. Why? That's right, every stinkin' time Adobe updates Photoshop or ACR in some way it seems the default Adobe RGB (1998) setting comes back!!! By giving it a name you'll know when it changes. After you set the Color Space line to sRGB IEC61966-2.1, click the down arrow next to the word "Custom" at the top and select "New Workflow Preset." Create a unique name that you can recognize at a glance and click OK. Personally, I use the name "You are in sRGB." After you click OK, you will be taken back to the main ACR Window. If you will notice at the bottom, it will say "You are in sRGB" instead of Adobe RGB (1998). This is a quick and easy way for you do glance down when you open ACR to see if you are still in sRGB. If that doesn't appear, you need to change it back. Finally, click the "Open Image" button in ACR, which will close ACR, save your Color Space choice, and open your image in Adobe Photoshop. We will need an image opened in order to change / verify some menu settings.
  14. In terms of "Sharpness," it's fine. Remember, you are photographing the edges of paper. Which is woven wood pulp and isn't 100% smooth. Then you have the ink soaking up into the paper so it's not 100% smooth / solid either. Then you have to deal with the separation of the pages and that creates Moiré. Remember, Moiré is part of the game!!! So you need to have realistic expectations and focus on composition and keeping the Moiré to a minimum, then the remaining can be fixed in post. Damien can help with that. Your current gear has limitations. Your lenses aren't the "Best" and your camera body is a crop body, and more of a basic model. So yes, equipment purchases will be in your future, but instead of forking out $7000+ on a full frame body, a 100 Macro L lens, a Tilt-Shift Lens, plus additional lights (you might need another one facing towards the book,) and a better tripod setup...let's get your shots looking better and figuring out your style. What you should hope to accomplish is consistency. Get one book dialed in, then replace it with another. Then take another shot. Compare the two books. How similar are they? Once you figure out what keeps Moiré to a minimum and a produces a consistent shot, you leave your camera alone. Basically, you can't use your camera for anything else. It's mounted on your tripod and settings are locked in. Of course, you could get a better tripod mount with a quick-release so you could use your camera for other things, but in reality, when it comes to commercial work such as this, you keep things stationary. I've run service calls at places that create your coupon magazines. I see the lights, the camera, the tripod, NOTHING MOVES. One thing that I think you need right now is a Hot Shoe Bubble Level. While you are more concerned about focus, I'm looking at crooked photos and it's distracting me. I'm also thinking the box idea that I gave you might have been the wrong way to go, as it seems to be a bit small. Why is the book at the edge? You might need a table lights and a backdrop. Almost like a Portrait Studio Setup, but for books. Now this is me just thinking out-loud, don't go buying anything. Now for the sample photos, photos #4 & #5 are decent. (From top to bottom.) The Moiré is kept to a minimum and they are "acceptable sharp." Keep in mind, that the magic of sharpening happens in post, and it will take time for you to learn how to properly sharpen your book edges. So Damien's Sharpening Class is DEFINITELY in your future. What I want to see is more "balance" with the sides of the book so that it forms a triangle of sorts. You might have to create some sort of Jig to raise the back of the book and to ensure that the front and back covers are even, forming a 45 degree angle, or 30 degree, 20 degree...that's something you are going to have to figure out. This is product photography, it's very technical and methodical. So quit worrying about the Moiré, let's get that book looking awesome first. Wax On...Wax Off.... PS: Give yourself some credit. You are the 1st person I've seen produce photographs like this and even after doing a Google Search, practically NOBODY photographs the edges like this. I wasn't aware that this type of thing existed. So if you have a sample from somewhere else, let me know and I can pick apart of what they did so you can produce a similar look.
  15. Why is your shutter speed so low? You really need to increase your light's power if possible. If that doesn't work, raise your ISO to at least 400. Possibly 800. Macro is the easiest to learn at f/8. So I'd start there. For f/11 or f/16, you either need a camera that can obtain a really high ISO number, and you are looking at a Full Frame Camera to do this, OR your light power needs to increase. When it comes to flash / lights, your Aperture relates to your Light Power and Shutter Speed relates to your Ambient Light. It's a completely different exposure triangle. For both images, that's Moiré and you need to change your angle of how you shoot. Or move closer / further away (and crop in.) Damien would be the one to ask on how to fix Moiré but for now, try a different angle to help minimize things. Finally, you are shooting with a Tamron Macro Zoom lens, not a Canon 100mm L f/2.8 Macro. There is a difference with professional grade OEM glass. You need to have realistic expectations. This is why you will never see me recommend 3rd party stuff. The difference is in the details. Suddenly that lens you "Saved all that money on!" becomes crap when you zoom in and pixel peep. That said, in order for you to upgrade, you are looking at forking out a few thousand dollars, or more, so let's have you fiddle some more.
  16. #cancersucks. Sorry for your loss. Glad we got you sorted.
  17. It's very important to edit in sRGB instead of a wider Color Space, such as Adobe RGB (1998). Damien has written and excellent article, "The Wide Gamut Myth," and is worth reading. To quickly condense the reasons why, we want our workflow to be consistent...from beginning to middle to end. We want an accurate histogram, accurate warnings of blown highlights and clipped darks and we want to utilize a WYSIWYG Philosophy. Meaning what you see on your calibrated screen matches your physical prints...and that requires that you edit in the sRGB Color Space. Why? Because when you export to a JPEG file, the default Color Space that JPEG (aka .jpg) uses is sRGB! Period. So if you are going to end up there, why bother editing in a Color Space that will look different on your screen than in the final output? Remember...consistency from beginning to end. Of course, if you have a multi-thousand dollar printer, that's physically calibrated to your Display and uses the Adobe RGB (1998) Color Space, then yes...you are the .001% of people out there that should use Adobe RGB. For the other 99.999% of us, which includes both myself and those reading this article, please use sRGB. Fortunately, setting up Adobe Photoshop to use sRGB is pretty straight-forward, but there are a few things that need to be tweaked. Before we get into that, first we need to make a change in Adobe Camera Raw, or ACR. That's the program that handles your Raw Files and those edits lay the foundation that the rest of your edits are based on. Things like White Balance, Color-space, Color Profiles that are used, all come from ACR. So it's very important that we start there first... Edit: If Mac user has upgraded to macOS Monterey, please ensure you are using the absolute latest version of Photoshop. Photoshop CC 2019, and Photoshop CC 2020 aren't fully compatible with Monterey. As I type this, April 15th, 2022, the current version is Photoshop CC 2022 (23.3.0 Release).
  18. Check for Windows updates again. I don't care if it says there are no Windows updates. IT LIES. Normally after running Windows Updates, I will reboot then check for updates again. You'd be surprised on just how many "Updates for the Updates" are. I also usually reboot 2-3 times, each time checking for new updates. Usually a update will appear at some point. Gotta love Windows!
  19. Hmm... Never heard of this one being caused by a Spyder Elite. What version of Elite? Is this Windows 10? I found this, I'd start here: https://windowsreport.com/audio-lagging/
  20. Yeah, it seems to be an issue when the OS is upgraded. I have seen reports with people going from Sierra to High Sierra, so it's just not a Catalina thing. Unfortunately, I haven't used Apple Mail in a long time, as I use Office 365 (specifically Outlook) to manage my mail. I'm wondering if your problem has to do with iCloud getting a copy of your e-mail and that's why the Rules aren't applying? I'm thinking you might have to call Apple on this one. I've got nothing other than a Google Search that I did. https://www.google.com/search?client=firefox-b-1-d&q=mac+mail+rules+not+working+catalina
  21. Yeah, keep me updated!! I will warn you, I am VERY GOOD at spending other people's money! I truly believe in the principle of "Buy it Right...Buy it Once." Often that is suggesting you get the "Good Stuff" and not the "...oh, it's just as good as..." things/items. Because it's not. Learn to use your current gear, because forking out $4000+ to switch to Full Frame is kinda expensive in these times. Oh! One more thing that popped into my head, Amazon likes photos that are taken with f/5.6, which will help with your light-box setup. So use your 50mm @ f/5.6 and figure out what power setting the light-box needs to be at. Start there.
  22. Now in terms for the question, "Should I upgrade?" The short answer is "Yes." As to what to purchase first, I would seriously get a tripod, use that Tamron Macro and buy that Light-Box. Let's get your photos looking more professional looking first, and not taken on your dining room table. It's like dressing for the "Job that you want," and not showing up in Jeans and a ripped T-Shirt. KWIM? If you are really serious about photography, then the "L" lens lineup should be on your list, at least if you are planning on sticking with Canon. Remember, when you buy a certain brand, not only are you buying that Brand, but you are buying into a Lens System. Nikon and Canon are the two big names on the market, and for the majority have the most options. Personally, I can't stand Canon's Menu System, it doesn't make sense to me, which is what really drove me to Nikon. I like words and menus for stuff instead of symbols. Other people are fine with it.
  23. Well, thank you for listing stuff out. Realistically, I start each answer with a single word/question: Budget? Photography has NEVER been a "Poor-Man's (or Woman's) Hobby. It's a lot like Golf. LOL!! Since you are doing product photography, or book art what you really have is "fine." Well, maybe upgrades are in your future, and that's gonna cost you a lot of money. So let's start with the basics... First and foremost, if you are really serious about taking the absolute best photos of your products the one thing that is missing from your list is... [Drumroll Pleeze...] A sturdy Tripod and Ball Head, possibly a shutter release remote/cable. I don't care how steady your hands are, each time your heart pumps, your hands move a little. This will improve your product photography. The second thing is, high-quality lenses. Hands down, the quickest way to improve the clarity / colors / contrast with your shots is to use better lenses, especially the pro-grade ones. Yes, there is a difference between a $1800 lens and a $200 kit lens. That said, you have a Tamron Macro Lens already, and I have a feeling you haven't played with it much. That needs to change. You need to fiddle, you need to learn. Do this before forking out lots of money on this sh*t. Believe me, I've spent a lot of money on this crap and you know what? Granted, taking photos is "easier" because the tools are better, but all I do now is take the same lame photos with just more expensive / fancier gear. LOL!! Until you improve your craft, I don't care how much money you are going to spend, you can't buy your way out of things. I am living proof of the "If I only had ______" way of thinking. It's an excuse, not a reason. It only justifies ideas in my head of spending money because I think __________ is the "Secret" that will take me to "The Next Level." Sound familiar? I see those ads on FB all the time. There is always someone selling a shortcut, a method, or whatever BS that will take you to "The Next Level." Of course, you have a consumer-grade kit, which is fine. I want you to learn photography all over again. Learn to shoot in Manual Mode and even learn how to light. LEARN HOW TO FULLY USE YOUR CAMERA! ALL OF ITS FUNCTIONS!! ALL OF THE FOCUSING MODES!!! Do this BEFORE you fork out any money!! The nice part about that Light-Box I linked to on FB, is it already has a lighting system. So you aren't forking out a few hundred on a couple of additional flashes. In the end, yes, you will more than likely be replacing just about everything, but let's start out with the basics. Just like you don't give a 16 year old a 800HP Corvette for their first car, you start with the 4-Cyl Honda Civic.
  24. Also, what e-mail program are you using? Normally you add a e-mail address / biz logo / whatever in what's called a "Signature Field."
×
×
  • Create New...