-
Posts
4,110 -
Joined
-
Last visited
-
Days Won
52
Everything posted by Brian
-
OK, well that limits some options. A NAS unit isn't in the picture and we are back to a traditional EHD setup. Unfortunately, you will need to spend more than $300 to lower the odds of that happening. Hard Drives fail all the time. Most don't, but it sucks when it happens to you. Anything man-made can fail; regardless how much you spend. The difference is how you backup the data and what technology that you use to accomplish this. Of course, the more technology, like a RAID System, the more money you spend. That said, I own and recommend G-Drives, which are Enterprise-Class 7200 rpm hard drives. Here is a 6TB Model of what I have for $349. Those type of HDs are usually built better and are meant for Servers, but i like the extra "Umph" than a EHD that is the "$79 Special" from Best Buy. The thing with G-Drives is they come Macintosh Formatted / Partitioned, but that's not an issue as we can use Windows' Disk Utility to delete the existing Partition and then use a Wizard to create a new one. Takes about 5 min or so to accomplish this. Brands that I avoid at all costs: Seagate. THEY ARE JUNK. I like Western Digital, but only a certain line of Western Digital drives. This is known as the WD "Black" Line. Here is one that you may not consider, as it's marketed / meant for a Video Game System. WD Black 5TB P-10 Game Drive. If you can swing a bit more, there is a better deal, a 8TB version for $199. Again, all you need to do is reformat the drive to work with Windows. It's not that hard to accomplish. So there is some options that meet your budget.
-
I'm not a fan of how Big Sur is tracking what you do, what apps you load and where you do this on what machine. I'm sure it records geographically where you use things and at what time. Apple is getting a bit too cozy for my tastes. Honestly, unless you have a brand new Mac, a brand new iPhone 12, new Apple TV and a whole new Apple Eco-system that you use on a daily basis... Don't bother upgrading. Seriously. You aren't missing much. I know, this is probably bugging you: In addition, if the current version of PS is meeting your needs and not giving you problems, then stay there. As I've said in the past, Damien, THE Master himself, uses CS6!! In my humble opinion, he seems to edit just fine. The core of PS hasn't changed a whole lot, the only things that have are the fancy tools like Content Aware and such. Photoshop is still Photoshop. If it ain't broke, don't fix it. Resist the FOMO, you really aren't missing with anything. Catalina has most of the bugs worked out by now and it's a stable OS.
-
Alright, now that's settled. First, I would NEVER purchase a Seagate HD. I'm sure there are folks out there who haven't had any problems, but out of all the brands that I have owned, or computers that I have fixed professionally, Seagate Drives fail all the time. In fact, I even had one smoke on me. Yes, there was physical smoke that came from the drive. Anyway, let's talk on what you mean by "backup." Is this a data-drive only? How large are we talking in terms of capacity? What are you storing there? Oh and what is your budget? I'm not going to recommend the $79 Special from Best Buy, and "Expensive" is relative. My external HD that is 12TB EHD cost me just under $600 if I remember correctly. $200-$300 is average for a high-capacity "typical" EHD. What software are you using to backup? Or do you just copy files manually? Do you plan on keeping a drive off-site for extra redundancy? How critical are these files? How long to you plan on keeping said files? Is this for a business with client stuff or personal? One final question, how tech-savvy are you?
-
I will move this to the Windows Hardware Forum. Gear Talk is meant for Photography stuff.
-
Who knows? The worst that will happen is that one or both will stop working.
-
Windows or Mac?
-
OK! Awesome! You finally created your 1st post. As Damien recommended, we need to know a little about your current Mac. What are we dealing with? Laptop or iMac? How old is it? What size screen, etc. etc. Fill out the form here: https://www.damiensymonds.net/thread1.html and post the results in this thread. Then we will start to tackle the next step.
-
You should be able to, provided that the MacOS matches between the two devices. For example, CleanMyMac X is the current version and is meant for Catalina and Big Sur. All you would have to do is un-register / de-authorize the one on your old Mac and then install things on your new Mac. As far as how to do this? I'm not sure. Here is MacPaw.com's support page: https://macpaw.com/support
-
Windows Pro...I prefer that version for my computers. Not only because I do more "Commercial" (i.e. Domain) stuff, it also doesn't get in your way like the Home Edition does. The Pro version is the full version of Windows, at least in my world. Sure there is "Ultimate" but Pro is just overall better in my opinion for the majority.
-
Yep! Windows does "Maintenance" stuff at 2AM as the default. Oh, make sure you are set to the correct Time Zone as well.
-
AMD has been kicking Intel's butt in their desktop line, but historically, Intel Chips in laptops seem to perform better when it comes to battery life. Intel has always been "better" in this regard to power management and laptops; they have it figured out. I've recommended that Lenovo Y540 in the past, it's a decent laptop. Sure the Dell Inspiron also checks most of the boxes, but between the two, I'd go with the Lenovo.
-
Well, if you open the lid, it will wake the laptop up from sleep, thereby contaminating the results. We want to know WHY it’s waking up on its own. If you open the lid, Windows will record that “last event” and not the 11PM PST Event. Make sense? We know that it woke up due to you opening the laptop, duh! You could set the screen saver to just turn off the display when you leave it open.
-
So you are closing the lid at night? Honestly, I'd keep it open. I'm thinking it's Windows Updates running. Last night for me would be Wednesday night, and MSFT releases patches on Tuesday. Windows Update usually kicks in around 2AM, sometimes 3AM.
-
I'm not a fan of Acer Laptops. They don't hold up over time and tend to fall apart if you move them around a lot. The problem with a lot of gaming laptops, is the lack of a IPS-Based Display Panel. That Zephrus has lots of fancy marketing graphics, but no mention of IPS, so I'd pass on that one. That said, the Asus TUF has a IPS Display, so I'd get that one out of the three: See what I mean that the manufacturers will point it out if it's installed? IPS displays on laptops are tough to find, and I wouldn't let this one slip through your fingers. Of course, you could get an external display, like the U2719 that you linked to, and that would work pretty well. Just make sure you get a HDMI 2.0 cable to hook up the display to your laptop. Well as far as the Asus TUF that you linked to goes.
-
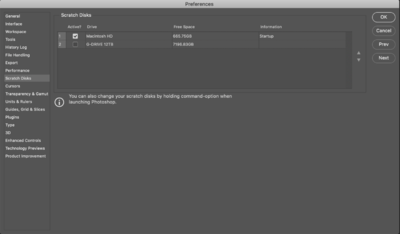
Bad news. I'm stumped. It should work. By any chance, do you have an older copy of PS CC installed on your computer? It would be listed under the Applications. I'm curious to see if the EHD is listed in the older version of PS' scratch disks settings. The newest PS CC has been a real pain-in-the-ass with all sorts of goofy problems. PS CC 2019 is the most stable version around. You might have to contact Adobe on this one and see if you can get PS CC 2019.
-
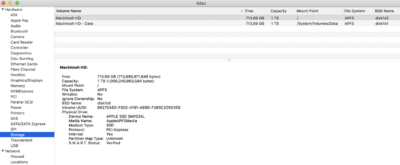
No. That doesn't tell me anything. I need this: Apple Menu >> About this Mac >> System Report Button >> click Storage in the left column >> post a screenshot here. I'm really interested in the File System Column and what's listed.
-
That’s fine. With a small HD, you need every GB you can get. How much free space are we up to, about 76GB or so? Can you post a screenshot of the storage section under “About this Mac” for me? (Click on Overview and then storage in the left column. Make your screenshot look like mine. I want to see the partition type on the LaCie.)
-
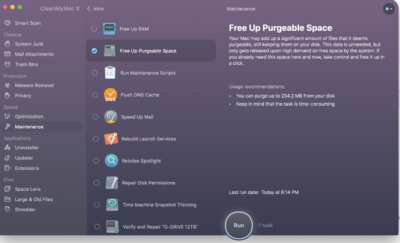
This right here: That's "Other" Space. It's what the OS deems as safe to delete, but doesn't until in needs that area. Often, it never goes away. Did you purchase CleanMyMac X? There is a spot in the Maintenance Section that frees up this area: You probably have another 75GB of space being taken up by junk in this "Other" section.
-
Good. I just emphasized some of my comments above. Be Ruthless. You do not need 75 Raw Photos taken of your Lunch from 5 years ago. CULL-CULL-CULL!!
-
You gotta click that storage section in the left column to see the hard drives. You are just under 18GB free on your main hard drive. THIS IS EXTREMELY BAD. VERY VERY BAD. YOU NEVER EVER-EVER-EVER want to go over than 80% full on ANY Macintosh HD. Once you hit 90%, you are in the Danger-Zone. (...and not the cool Danger Zone like in Top Gun.) In fact, once you hit 95% full or above, your Mac is a ticking Time-Bomb and there is a good chance it will crash and not boot at all. Seriously, once you get that low on space with Macs, it is VERY POSSIBLE that your Hard Drive will start corrupting itself You seriously need to stop worrying about your PS Scratch Disk and FREE UP SPACE ON YOUR MAIN HARD DRIVE. Like, right now. Photoshop is the least of your problems. There is a good chance that your HD is starting to corrupt itself and that's the reason that PS is being stupid. We may have to un-install and re-install Photoshop. But we will cross that bridge later. Please purchase CleanMyMac X and run it. Also go through your Macintosh HD and start deleting stuff. We want our first target to be 75GB free instead of 18GB. The more free space, the better. We will not continue until your hard drive has more free space. It's that serious.
-
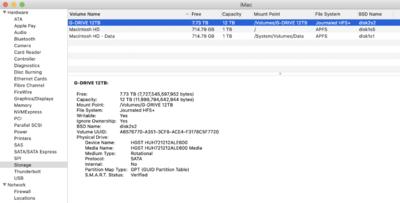
Interesting. I want to see what your Mac sees. The Storage Section under "About this Mac" is going to be really what I'm after. How much stuff is on this LaCie Drive? Is it important stuff?
-
In addition, head to your Apple Menu and select About this Mac. Click the System Report, then select storage. Post a Screenshot of that section for me, here is mine: Oh, to so a screenshot where you control what is selected, hit Command + Shift + 4. Then draw a box around the various screens that I want to see. What exact model is the LaCie Drive?
-
-
That's bad. You need that as close to 100GB Free as much as possible. Even if you got around 75GB Free, that would be better. Buy CleanMyMac X from MacPaw and run it weekly. Hit your downloads folder and delete all the crap that is in there. You'd be surprised on how much stuff ends up in there. Cull images. Delete-Delete-Delete the photos that will never see the light of day. With a 200GB Main HD, you need to be hyper anal on what is stored on that drive. How full is the LaCie Drive? How is it connected to your Mac? USB or Thunderbolt? Do you use the LaCie for anything else, like Time Machine?
-

Setting up Second hand desktop....A dilemma
Brian replied to Gingersnaps's topic in The Macintosh User Group
I mis-read your statement. As long as you have signed out of iCloud and even went as far as removing her profile from the Computer, it shouldn't affect anything on her computer. iCloud also has a habit of backing up data, which usually results in people getting error message that their "iCloud is Full." So I think you should be fine.

