Damien Symonds
-
Posts
212,185 -
Joined
-
Last visited
-
Days Won
3,494
Everything posted by Damien Symonds
-

Everything looks crunchy
Damien Symonds replied to SabraM's topic in Monitor calibration questions or problems
Ok. Can you take a screenshot for me? Showing me a photo open in Photoshop? -
https://www.damiensymonds.net/art_tscs000.html
-
Everything looks crunchy
Damien Symonds replied to SabraM's topic in Monitor calibration questions or problems
Do they look roughly the same in both Photoshop and Windows Viewer? (Or "Photos", it might be called.) -
Everything looks crunchy
Damien Symonds replied to SabraM's topic in Monitor calibration questions or problems
Yep, that sounds right. Can you describe this further? In what what do they look terrible? -
Everything looks crunchy
Damien Symonds replied to SabraM's topic in Monitor calibration questions or problems
And do you recall the resolution of your old computer? -
Everything looks crunchy
Damien Symonds replied to SabraM's topic in Monitor calibration questions or problems
Great. And what is the resolution of yours? 1920x1080 like mine, or something else? (I have an ASUS ROG too, by the way, and I want to assure you you've chosen well. It's a great computer.) -
Everything looks crunchy
Damien Symonds replied to SabraM's topic in Monitor calibration questions or problems
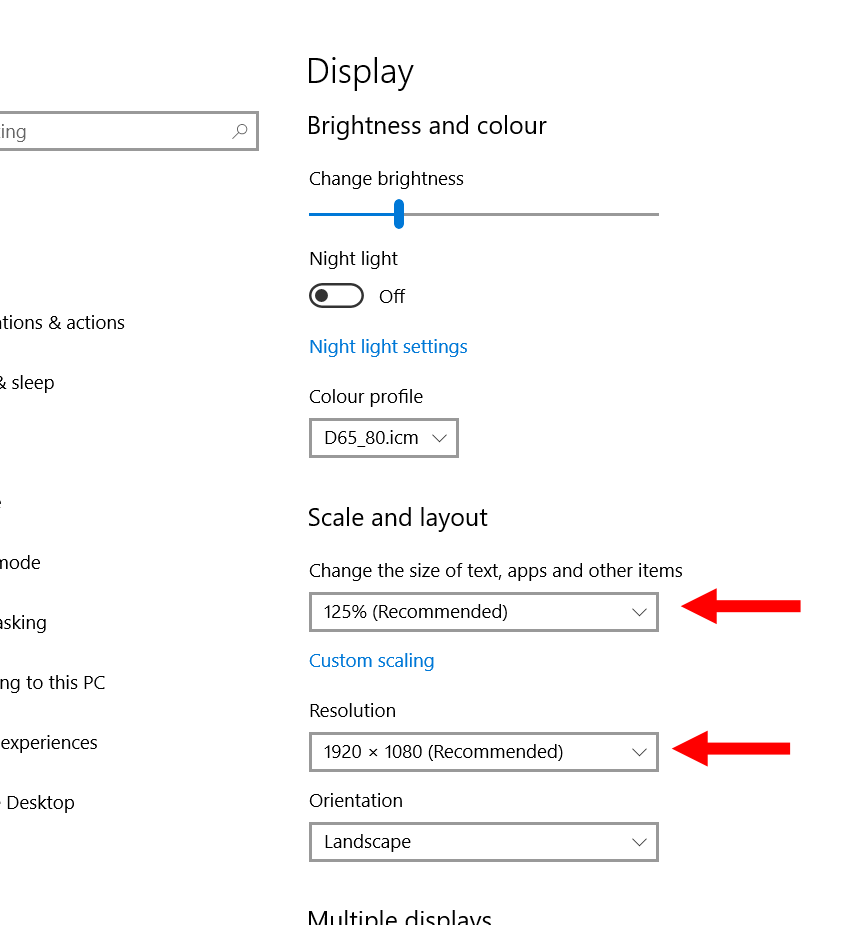
Thanks. When you right-click on your desktop and choose "Display Settings", can you confirm that both of these settings are on "Recommended"? (The numbers won't necessarily be the same as mine, I'm just making sure yours are on their own recommended settings)
-
Everything looks crunchy
Damien Symonds replied to SabraM's topic in Monitor calibration questions or problems
Hi Sabra, Was the new laptop "crunchy and contrasty" looking as soon as you started it up? Did the calibration make it better, worse, or no different? -
Please answer the question. Do you mean Adobe RGB?
-
Getting rid of color noise and really all noise in PS
Damien Symonds replied to Paige's topic in Help with editing
Then that's where you do it. ALL the noise must be removed in raw. https://www.damiensymonds.net/2010/07/raw-noise-removal.html -
File size
Damien Symonds replied to Glynda horsfall's topic in Photoshop / Elements / Bridge / ACR questions or problems
Yes indeed, that should help for a while. But be careful of your storage practices, otherwise the clutter that filled your 500GB will do the same to your 1TB. -
Getting rid of color noise and really all noise in PS
Damien Symonds replied to Paige's topic in Help with editing
Do you shoot raw? -
All photos are RGB. https://www.damiensymonds.net/2010/11/colour-modes-vs-colour-spaces.html Do you mean Adobe RGB?
-
removing watermark... for a good cause
Damien Symonds replied to diamante67's topic in Help with editing
I'm so sorry to hear about this Do you remember how you added the watermark? I mean, did you type it manually in Photoshop, or was it done by some other program? -
File size
Damien Symonds replied to Glynda horsfall's topic in Photoshop / Elements / Bridge / ACR questions or problems
How did you go, @Glynda horsfall? Have you made some space on your hard drive? -
Red skin tutorials
Damien Symonds replied to Sue Morris's topic in Questions about tutorials and articles
Correct. -
Window Light
Damien Symonds replied to S. Roberts's topic in How to achieve a certain look or effect
No no no, the whole lot. Raw, levels and skin. A complete clean edit. -
Window Light
Damien Symonds replied to S. Roberts's topic in How to achieve a certain look or effect
Yep, I reckon it's a perfect candidate. Go ahead and do all your normal editing, then post it again and we'll discuss. -
Please consider the class. It's really handy, and GREAT fun.
-
I've read that about lenses too. I have no way to confirm it myself. The "not wearing" thing is all I know, sorry.
-
Um ... did you mean to post this in class?
-
HELP REQUIRED
Damien Symonds replied to Miriam H's topic in Monitor calibration questions or problems
By themselves, they looked fine. But of course if your screen doesn't match your prints, nothing is fine. -
Shift while using brush
Damien Symonds replied to FlawlessFacesAndPhotos's topic in Questions about tutorials and articles
Hi Regina, have you read the Layers & Masks Class yet? -
Red skin tutorials
Damien Symonds replied to Sue Morris's topic in Questions about tutorials and articles
I explained it just below the second image in the article. -
Red skin tutorials
Damien Symonds replied to Sue Morris's topic in Questions about tutorials and articles
Sorry, does what cover what all?