

Damien Symonds
-
Posts
213,269 -
Joined
-
Last visited
-
Days Won
3,546
Everything posted by Damien Symonds
-
Two Monitors Calibrate for one.
Damien Symonds replied to Collette's topic in The Windows & PC Hardware Forum
Honestly, calibrate both and see which behaves better. It's likely that one will give you a closer print match than the other. Do you have both of the plugged in to your computer? Once you know which one calibrates better, that can be your editing screen, and the other one can be for your folder and panels and stuff. -
Oh, phew, I'm glad you like it. Download the PSD file First, a Levels layer to deal with the mildest of it. Then, I copied a chunk of the background from nearby, and masked it in.
-
How did you go?
-
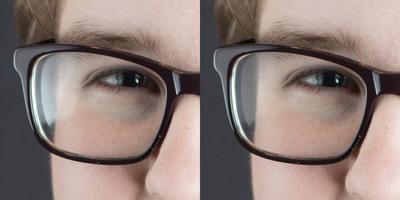
So sorry about the delay. We took the kids to the movies. Because so much detail is lost along the edge of the face, and particularly the edge of the eyebrow, it will be impossible to plausibly get rid of the glare altogether. I think that our goal must be simply to reduce it. How does this look?
-
Hi Jody, thanks. May I also have a 100% crop of the problem area? However, glasses glare is not your biggest problem presently. You have a MUCH bigger problem than that. Fix it by going here: https://www.damiensymonds.net/art_tscs000.html Follow the troubleshooter all the way to its conclusion.
-
DIY White Balance sheet
Damien Symonds replied to Tom Bootyman's topic in Miscellaneous questions or problems
Excellent! Good kid.- 1 reply
-
- 1
-

-
Download the PSD I used the red channel as the starting point, because it had the best contrast.
-
How's this?

-
I downloaded it, of course. I think I've got a plan. Could you post the 100% crop of the photo with the grey background; and a 100% crop of the background filling the frame, no mask. So I can layer them for myself.
-
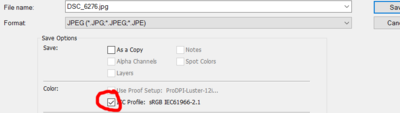
Make sure you always embed the image profile, whenever saving an image for upload.
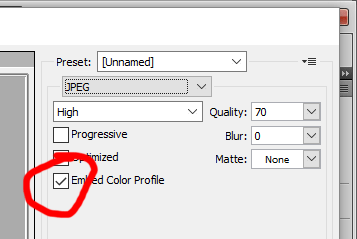
-
Some VERY important reading: Selling digital images Raw noise removal (plus the leap of faith) Also, since you have no calibrator listed in your profile, it makes me fear that you don't know how dark and ... well, kinda awful ... your photo looks. PLEASE invest in a calibrator pronto.
-
You can see how awful that is, right? It looks like you accidentally sharpened it twice.
-
Hi Katherine, may I see a 100% crop from the file you sent her?
-
It'll be ok at web size. But yeah, you'd never use it for any other purpose.
-
It should just be a matter of going to Photoshop's Help menu and choosing "Updates".
-
https://www.damiensymonds.net/levels-eyedropper
-
So I think I'd brighten with Levels, then use the SelCol layer, on "Whites" and set to "Absolute", to add maybe 5 of Cyan and 10 of Black, to bring back some strength to the lightened fabric.
-
Weird.
-
The version you've posted - is it with your adjustments applied already? Because those two are the two I'd recommend too, I reckon.
-
How did you go?
-
The sharpening. By itself, resampling does nothing, just as your correspondent said.
-
Of course he's wrong about this. Professional photographers have been printing billboards since the days of three megapixel cameras.
-
Yes, that's absolutely correct. No argument here. https://www.damiensymonds.net/art_resample.html
-
Yes, that noise removal is fine, and yes, the focus is quite acceptable.
-
Sorry, I need you to have removed the noise before posting these.


