

Damien Symonds
-
Posts
212,212 -
Joined
-
Last visited
-
Days Won
3,497
Everything posted by Damien Symonds
-
 Did you see this?
 -
Because of all the channel clipping, I assume. That kind of lighting is the WORST!
-
Just select them all, then right-click on one and choose "Develop Settings > Clear Settings".
-
Yes, cloning. Remember, don't try to clone accurately. The cloning is big and soft, the masking is what's done accurately. http://www.damiensymonds.net/2010/10/role-of-masks-when-cloning.html
-
It's not bad, but it's a bit blotchy, isn't it? The Handyman Method will help with that.
-
Yeah, I don't have any "tricks" for you. Just very careful cloning. The crease in the neck will be hardest. Maybe it might be necessary to copy and flip (and darken) the other side of the neck?
-
I'm so sorry, I've got nothing. Your only chance would be to swap the entire top of the head, if you had another suitable photo.
-
Hi Summer, may I see a 100% crop?
-
That's right, 11:15. http://www.damiensymonds.net/2011/02/selling-digital-images.html The Sharpening Class now includes guidance for sharpening them, too. http://www.damiensymonds.net/trainingsharp.html
-
Tips on where to start
Damien Symonds replied to newbornphotog's topic in How to achieve a certain look or effect
Yes, I think that's popular. But I think you should try this one first. -
I don't truly understand your question. It sounds like you want to add a border to a text box, but that kind of thing isn't the domain of Photoshop. That's what InDesign is for. In Photoshop, you'll just put the text on one layer, and the box on another layer, in the usual manner.
-
Best way to add bars to a letter jacket
Damien Symonds replied to Diana's topic in Help with editing
Shouldn't be any trouble? Just select a chunk of the Background layer like this: And Ctrl J it onto its own layer, move it down, and mask it in.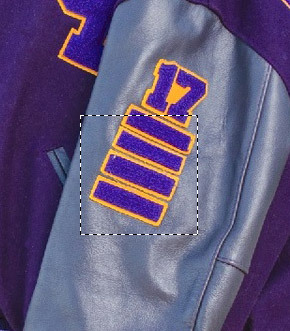
-
Watercolor Artwork Photo Editing For reproduction
Damien Symonds replied to rachelspaid's topic in Help with editing
Was the paper true vivid white in real life? I urge you to try taking the photo again, in more even light. But if you can't do that, the evening-out will be done like this. Once you've achieved that, post it again and we'll discuss the next step. -
That you're an idiot? You MUST restart every day.
-
Calibration instructions for iMac?
Damien Symonds replied to shirly526's topic in Monitor calibration questions or problems
That's an odd use of the word "finally". It makes it sound like getting a Mac is a good thing. My wife and son have been dreadfully sick with flu over the last couple of weeks, and this morning I'm feeling headachy and run down. I'd say I'm "finally" getting it too. -
Calibration instructions for iMac?
Damien Symonds replied to shirly526's topic in Monitor calibration questions or problems
That's right. http://www.damiensymonds.net/calibration.html -
Those specs look fine, but I urge you to run Glary or similar once a month.
-
I think this has been mentioned before. Try these fixes. Also, do this for me.
-
Tips on where to start
Damien Symonds replied to newbornphotog's topic in How to achieve a certain look or effect
It's called "Tone Mapping". Google and YouTube searches will find you plenty of hits. It may also be called "Tonemapping". -
Softening the edges
Damien Symonds replied to mrswright5's topic in How to achieve a certain look or effect
Then yes, the second method I mentioned. -
I mean, follow the class exactly. Forget any fanciful ideas about "not losing highlights". Follow the class EXACTLY.
-
lilac door hdr effect
Damien Symonds replied to Jackie Matthews's topic in How to achieve a certain look or effect
I got the file, but I have no solution for this, sorry. -
Harden up. This is real life. You have to work within the parameters of reality.
-
Softening the edges
Damien Symonds replied to mrswright5's topic in How to achieve a certain look or effect
Literally just add a white Solid Color layer, and use a soft brush to mask it on? Or make a Marquee selection (don't have any feather set for the Marquee Tool) around the photo at approximately the right place, then invert the selection, then add the white Solid Color layer. Then make sure you click on the mask of the layer, then use Gaussian Blur to your taste. -
lilac door hdr effect
Damien Symonds replied to Jackie Matthews's topic in How to achieve a certain look or effect
I didn't receive the file, sorry.
