

Damien Symonds
-
Posts
211,689 -
Joined
-
Last visited
-
Days Won
3,471
Everything posted by Damien Symonds
-
 Terrific. I love a happy ending.
 -
Pictures open pixelated in PS from ACR
Damien Symonds replied to Twins mama's topic in The Macintosh User Group
http://www.damiensymonds.net/2015/09/black-boxes-and-other-weird-behaviour.html -
VSCO Kodak Gold 100
Damien Symonds replied to Aitchess's topic in How to achieve a certain look or effect
The second-last photo, yours, is lovely. Can you find any VSCO examples that are akin to that? (Outdoors, greenery behind, no harsh light) -
VSCO Kodak Gold 100
Damien Symonds replied to Aitchess's topic in How to achieve a certain look or effect
Excellent examples of presets being used to "save" terrible photos. Any links to examples of photos that aren't terrible? -
Download the PSD file It's based on this tutorial.
-
Insofar as it's possible to be correct in such horrid mixed lighting, yes, I guess so.
-
Make sure you adjust the Blue channel on the Levels layer as well as the RGB channel. (In case you missed it.)
-
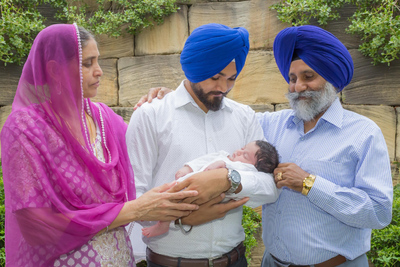
Fantastic!!! Now, add a dodge and burn layer underneath the boy layer, and start burning some shadowing on the grass around him.
-
Hmmm ... yours seems lighter than mine?
-
The masking is very rough here, but is this what you had in mind?

-
When you eventually print this, do you intend it to be portrait or landscape?
-
Photoshop Timeline missing commands
Damien Symonds replied to TinaK's topic in Miscellaneous questions or problems
Then this definitely is a computer problem. How's that space-clearing going? -
May I see the entire picture?
-
Photoshop Timeline missing commands
Damien Symonds replied to TinaK's topic in Miscellaneous questions or problems
Ok, I just tried it in CC. First you have to click on the "Create Frame Animation" button. THEN the appropriate menu items will be available over on the right. -
Photoshop Timeline missing commands
Damien Symonds replied to TinaK's topic in Miscellaneous questions or problems
I'm moving this to the General Discussion area, in case somebody else knows the answer to this. What about the menu beside the "Create Frame Animation" button right in the middle of the screen? -
Great! That's HUGE. Easily big enough to print on the entire roof of your house, if you wished.
-
Download the PSD file
-
Photoshop Timeline missing commands
Damien Symonds replied to TinaK's topic in Miscellaneous questions or problems
No, CS5 here. May I see a screenshot of that menu open? -
Uncheck Delete Cropped Pixels
Damien Symonds replied to Stu's topic in Questions about tutorials and articles
Ok, I understand. Yes, turning off DCP would make sense in this case. -
Photoshop Timeline missing commands
Damien Symonds replied to TinaK's topic in Miscellaneous questions or problems
In my version, I simply click on this menu: And choose "Make Frames from Layers". Is that what you're trying too?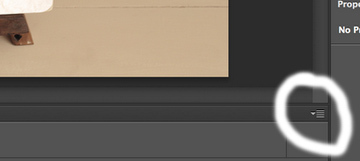
-
Uncheck Delete Cropped Pixels
Damien Symonds replied to Stu's topic in Questions about tutorials and articles
How is this possible? -
Ok, let's take it step by step. First, can you take a photo of the rug, without the basket on top of it, completely filling the frame?
-
Gosh, this is tough. What do you think of this?
-
No, now we can see that the boy's white shirt is very different from the other white shirts. Go back to raw and get the white balance right.
-
Yes, please don't add that conversion step blindly to your workflow.


