Damien Symonds
-
Posts
211,993 -
Joined
-
Last visited
-
Days Won
3,482
Everything posted by Damien Symonds
-
 I just checked my settings, and these are all the same. I don't know why it would be doing this, sorry. I'll move this to the GenDisc area, to see if anyone else knows.
 -
Making large Pano file smaller
Damien Symonds replied to Tracey Perrin's topic in Miscellaneous questions or problems
Terrific!!! So this is absolutely no different from any of your other photos. If you want to save it for web, you flatten it, resize it down to web size (eg 2048px wide for Facebook), sharpen it for web, and save it as a jpeg and upload it. If you want to print it, you flatten it, use the Crop Tool to crop it to the exact size you want, at the exact resolution your lab requires, then sharpen for print, save it as a jpeg, and upload it to the lab. In short, you adhere to the trash principle exactly the same as you would for any other photo. -
Look, the 32-bit thing is much more serious at this stage. You MUST go to Image>Mode>8-bit.
-
Making large Pano file smaller
Damien Symonds replied to Tracey Perrin's topic in Miscellaneous questions or problems
Yes, of course you'd shrink it for those purposes. But you need to keep it in its full-size glory as a master file. Have you saved it safely as a PSD file onto your hard drive? -
I know, and it's a completely disaster!!!! What on earth possessed you? Just click "None of the above" and keep following.
-
Right, so you click on "None of the above".
-
On a DVD or a thumb drive, I guess?
-
Try this: http://www.damiensymonds.net/art_vista.html
-
You're welcome.
-
Making large Pano file smaller
Damien Symonds replied to Tracey Perrin's topic in Miscellaneous questions or problems
Oh, good question! For what reason do you need to make it smaller? -
How did you go, @Chelsee.Marcuz?
-
Various computers in our house are running Windows 10, and it's been great for us on all of them - no problems at all. However, my main editing computer is W7, and like you, it's offering me the upgrade. And I'm resisting it. Everything is working perfectly on that computer, and that computer is SO important to me, so I'm not willing to change anything just for change's sake. That's just my two cents. This isn't even my section, I'm not supposed to be replying here
-
Hi Christopher, thanks for posting. Before we delve into the calibration side of things, can you do this for me and report back?
-
Lab print is no longer matching
Damien Symonds replied to SandySilveira's topic in Monitor calibration questions or problems
This. -
The best way to mask and replace the background
Damien Symonds replied to cathm's topic in Help with editing
Yes, but then I went on to talk at length about examining and adjusting it for your own image's purpose. No. They appeared because the lab messed up. -
http://www.damiensymonds.net/save-action
-
The best way to mask and replace the background
Damien Symonds replied to cathm's topic in Help with editing
http://mbf.cc/MP13Zs -
The best way to mask and replace the background
Damien Symonds replied to cathm's topic in Help with editing
Yes, but it's 20% opacity, WAY too high. And you didn't clip it to the layer beneath, so it's all over the child etc. -
The best way to mask and replace the background
Damien Symonds replied to cathm's topic in Help with editing
No, that's WAY too much noise, and it's all over everything. -
Wonderful! So, you'd do your raw processing on these two photos so they match: Then you'd combine them, so that you got the bottom of the basket. Then you'd also process this raw file so it matched: And use it to fill in the missing corners of the rug in the main photo. If you need help with all that combining stuff, go ahead and do your raw processing first, then post the photos again for me.
-
Yes, generally this means simply no resizing from your original files. Just send them every pixel you took. Their request for both jpeg and tiff files shows us that they don't really know what they are talking about, however. Nobody needs tiff files in this day and age. Let us know what they say.
-
Yes, 12 is crazy high. 9 is ample for web images.
-
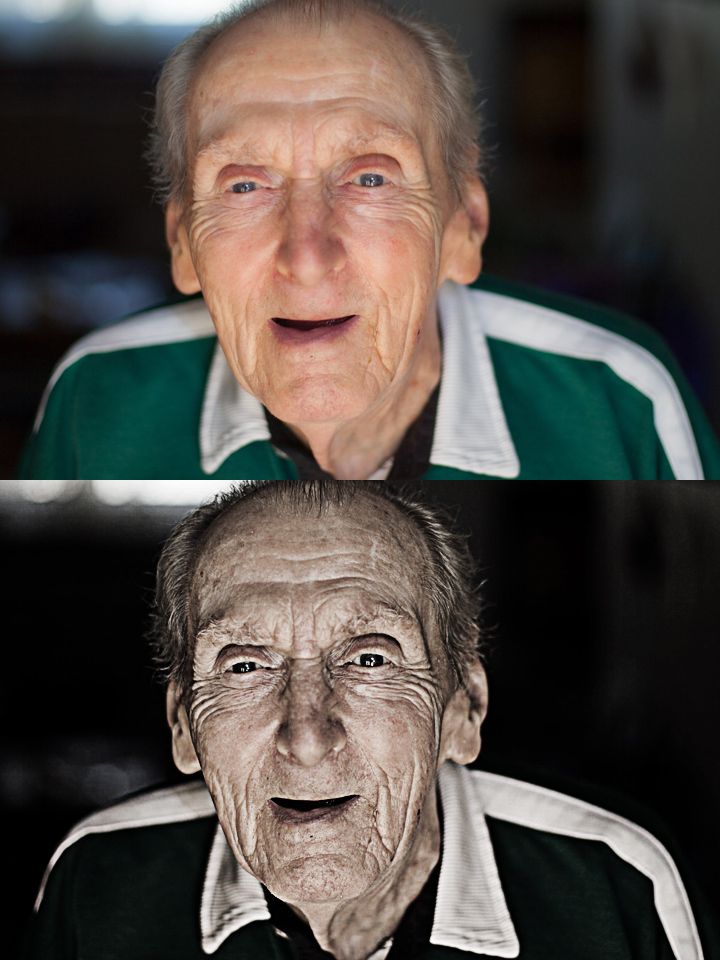
A play with the "Dragan effect". The first three layers are duplicates of the Background layer, with High Pass filter run at various radii. The radii you choose will depend on your photo, so some experimentation is necessary. Download the file here.

-
Pictures open pixelated in PS from ACR
Damien Symonds replied to Twins mama's topic in The Macintosh User Group
Did that help? -
Yeah!!