-
Posts
210,651 -
Joined
-
Last visited
-
Days Won
3,423
Everything posted by Damien Symonds
-

Macbook Air Calibration
Damien Symonds replied to SHartland's topic in Monitor calibration questions or problems
Has it arrived yet? -

Color Space Fix
Damien Symonds replied to Jacquie Bounds's topic in Photoshop / Elements / Bridge / ACR questions or problems
Did it give you good news or bad news? -

Sharpening for fb
Damien Symonds replied to Falon's topic in Output - print, websites, Facebook, email, client disk, etc
Almost certainly yes, but of course do some testing and see. -

Calibration
Damien Symonds replied to Perli halpern's topic in Monitor calibration questions or problems
Have you tried it yet? -

Dodge/Burn Methods
Damien Symonds replied to Melissa Keeney's topic in Miscellaneous questions or problems
The thing about dodge and burn is, some people try to use it for major editing of their photos. That's not what it's for. It's only for fixing little areas, like bits of troublesome shadow, or double chins, etc, as shown. Major editing must be done with Levels as usual. -

Dodge/Burn Methods
Damien Symonds replied to Melissa Keeney's topic in Miscellaneous questions or problems
This one is the ONLY one to use. It's by far the easiest, and it rocks. Here is a tutorial on it: https://www.damiensymonds.net/simple-dodge-and-burn-tutorial.html There is also a demonstration in this video: https://www.damiensymonds.net/liquify-demonstration-cloning-dodge-burn.html I used it here: https://www.damiensymonds.net/double-chin-fix-without-liquify/ And it is most important when combined with the colour fix layer of the Handyman Method: https://www.damiensymonds.net/2015/04/the-handyman-method.html NEVER use the dodge and burn tools. They're far too clumsy - having to switch between tools, and settings, all the time is incredibly time-consuming. As you yourself described: It's absolutely not worth the hassle. And this one is the same - WAY too clumsy switching between layers: -

Color Space Fix
Damien Symonds replied to Jacquie Bounds's topic in Photoshop / Elements / Bridge / ACR questions or problems
Hi Jacquie, this is what you need: https://www.damiensymonds.net/art_tscs2.html -

Calibration
Damien Symonds replied to Perli halpern's topic in Monitor calibration questions or problems
I'm about to shut down for the night. I look forward to hearing if there's any improvement after you recalibrate. -

Calibration
Damien Symonds replied to Perli halpern's topic in Monitor calibration questions or problems
Yes, but you can drag them wherever you want, yes? -

Calibration
Damien Symonds replied to Perli halpern's topic in Monitor calibration questions or problems
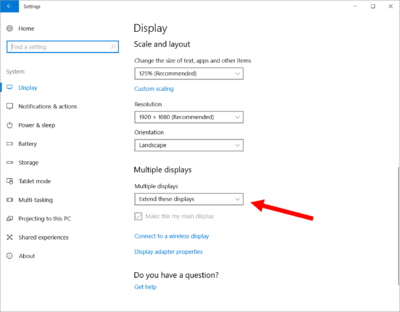
See in this screenshot, just below the "Extend" option, there's a checkbox about "make this my main display"? You can choose which of your screens you want to be the main one - that is, the one with the task bar on. Try both and see which you prefer. -

Calibration
Damien Symonds replied to Perli halpern's topic in Monitor calibration questions or problems
I don't know if they do yet. But you've had nothing but calibration failures so far with the laptop closed, and I know for certain that the default "Duplicate" setting is catastrophically bad, so that now that we've fixed that problem, let's try the calibration again. -

Calibration
Damien Symonds replied to Perli halpern's topic in Monitor calibration questions or problems
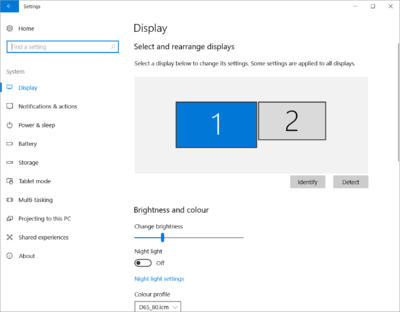
By the way, you know those two rectangles that you now have? Make sure you drag them around to represent your actual physical workspace. If your laptop is "Screen 1" and it's sitting to the right of the desktop screen, make sure its rectangle is on the right as well. If they're one above the other, make sure you have the rectangles set up this way. I can't stress the importance of this enough. -

Calibration
Damien Symonds replied to Perli halpern's topic in Monitor calibration questions or problems
Yes. You have two screens, USE THEM. Whichever one calibrates the most accurately (presently the laptop screen is winning that contest, but we'll see) is the one you edit on. The other one is the one you use for Bridge, or your folder, or emails, or whatever. -

Calibration
Damien Symonds replied to Perli halpern's topic in Monitor calibration questions or problems
Now calibrate the desktop screen again. No it's not bloody ok!!!!!!!!!!!!!!!!!!!!!!!!! -

Calibration
Damien Symonds replied to Perli halpern's topic in Monitor calibration questions or problems
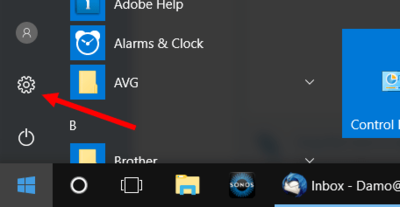
I click here: Then here: Which brings me here: You should see both your screens displayed as two rectangles, like mine. If you're only seeing one rectangle with "1|2" written in it, that's VERY bad. Scroll down a bit, and change to "Extend": -

Calibration
Damien Symonds replied to Perli halpern's topic in Monitor calibration questions or problems
I don't recognise that screen. You go to the Start menu, and hit the little cog icon to get to settings. From there you choose "System", and then Display. Is that what you did? -

Calibration
Damien Symonds replied to Perli halpern's topic in Monitor calibration questions or problems
May I see a screenshot of that? -

Calibration
Damien Symonds replied to Perli halpern's topic in Monitor calibration questions or problems
In the Control Panel. It's the Displays one, I think. I'm out at the moment, I'll check for you later if you haven't found it. -
Oh, yay! That's wonderful news.
-

Calibration
Damien Symonds replied to Perli halpern's topic in Monitor calibration questions or problems
I think I might be a dense idiot. Can you make sure your Display control panel doesn't have your screens set to "Duplicate"? That would be catastrophic. They must be on "Extend". Also, which one is designated as the Number 1 screen? -

Calibration
Damien Symonds replied to Perli halpern's topic in Monitor calibration questions or problems
That's a soft-proofing issue, and we might as well pursue that now. https://www.damiensymonds.net/2010/03/bit-about-soft-proofing.html


