Brian
-
Posts
4,137 -
Joined
-
Last visited
-
Days Won
55
Everything posted by Brian
-
McAfee and Symantec Anti Virus software are often the first two to get circumvented, because they are the two giants. There also almost always seems to be some sort of Virus Definitions update for them, sometimes 2-3 on a daily basis. This gives people the impression that they need AntiVirus software. After all, computers get Viruses!!! It's Protecting YOU!!!! Eh, not in 2022. In the 1980's and 1990's...sure. But not now. It's more profitable to install Ransomeware and Trojans and Keyloggers to obtain back-door access. This is to get as much money from you as possible. Whether that's by getting you to call them thinking there is a Virus on your computer, or tricking you into paying for some sort of service or obtaining access to your computer, which ultimately gets them access to credit cards and bank accounts. This is the true goal: "Get-the-Money-Get-the-Money-Get-the-Money-Get-the-Money!!!!" Plenty of YouTube Videos of people going after these crooks, see here and here. It's fascinating to watch on how these guys work. They sound so convincing and can steal tens of thousands of dollars from people each month. Or more. McAfee and Symantec, they often get in my way and suck up a lot of resources from your computer. So much they are often the first things I un-install!! Believe it or not, the built-in Windows Defender in Windows is quite good and is free. The downside is you need to check for Windows Updates more often to get the Definition Updates as they come through Windows Update. The other software that I like and recommend is Webroot Antivirus and they seem to be running a sale on it now. Personally, I'd just get the Webroot Antivirus, the cheapest one. If you feel that you will benefit from the more expensive options, that's fine too. Oh, the downside to Webroot is that it sometimes gets a little hyper and gets in your way, especially when it comes to installing software. I've had installer programs get obliterated before they even have a chance to touch the HD. LOL!! Even though I downloaded them and they are completely safe. Sometimes I've had to disable Webroot just to complete a task and then turn it back on. Personally, I haven't had to use AntiVirus software on any of my Macs, and I just have Windows Defender running on my Wife's computer.
-
I’m thinking you have an issue with the Controller Chip on your Laptop’s Motherboard that controls the Thunderbolt Ports or USB Ports. Which isn’t good, since that means new Motherboard which ain’t cheap. All those externals, going back and forth, sigh. Even though Paragon “works,” it’s not bulletproof as you have found out. Honestly working off as many externals as you do, going back and forth is a recipe for disaster. I have a friend like you, but she doesn’t have a Mac. I think she is up to 20 or more externals and I’m just waiting for something bad to happen. Buying a larger external and consolidating everything to one drive is one way to do things, but Apple really wants you to pick a format; Mac OR Windows, pick one. No going back and forth, and if you really want to do that, I’d recommend something else entirely: A NAS running the SMB File System, as it's the most "Universal" between the worlds (you can even have access to the NAS from your iPads and Phones and Tablets, all with SMB!) The NFS File System is also a good choice as well, but it's a little more intense to work with, meaning the Nerds and Geeks (and Enterprise/Commercial Users) that love tweaking things, they will choose NFS. NAS stands for Network Attached Storage and uses a Ethernet Port to connect to your Network. Then all you do is create Network Shares on your Windows Computer and Mac. The beauty with NAS units is they almost always have redundancy built into them with multiple drives in a RAID Configuration. So if one HD fails, other HD will pick up the slack and keep going, which gives you access to your data until you replace the failed HD. Some NAS units will automatically backup to the cloud for you, so that your data is in two different places! Sounds great, right? It is…except for the cost and noise. Having 2-3 spinning HDs in a plastic box is kinda noisy, but like I said, the NAS doesn’t need to be next to a computer, it just has to be plugged into your Router/Switch, then all your other devices will have access. Cost is an issue as well, as we do not want the “$79 Special” hard drives, no…we want HDs that are meant for NAS units and are designed for this sort of thing and they cost more. Oh, they all need to be identical and the same capacity. Plus, I order to have redundancy, some storage capacity is lost, so you’ll need bigger drives than you think you’ll need. (Three 18TB HD will give you 36TB Storage Capacity before formatting. So that's 54TBs of drive with around 34TB to play with in a RAID5 Configuration. See what I mean?) If you think this is something that interests you, I can continue and we can start talking budget. If not, you might want to get that 18TB drive and dump everything on it, providing that it will mount on both your computers, but this really concerns me; going between the two worlds on a normal almost always ends in disaster at some point. Plugging in and removing USB Devices also is a bit sketchy as most folks never “Eject” properly on their Windows computers. Just pulling a USB device out of a Windows Computer, well Macs too, can cause your data to become corrupted or kill USB interfaces, which doesn’t allow you to get to your data. So how much capacity do you need? What will be your needs going forward?
-
The cool part is, the G-Drives have all the necessary cables in the box and come Mac Formatted. So all you need to do is plug the EHD into a AC outlet, and then hook the drive up to one of those Thunderbolt Ports. Oh, do this for me: Open the Finder Then click the Finder Menu (Next to the Apple Menu) and click Preferences. Put a Check-Mark next to External Hard Drives, it should look like this: Click the Close Button (Red Circle) in the top left corner. Now your new EHD will appear on the Desktop.

-
Those USB-C Ports are the Thunderbolt Ports. In fact, they should be the Thunderbolt 4, but those devices are hard to come by and TB3 works just fine on a TB4 port. This is the drive that I currently have sitting on my Desk, holding my data: Thunderbolt 3 - G Drive - 12TB Now if you are looking for something more portable, I'd either recommend a SanDisk 4TB SSD External or this Thunderbolt 2TB 3 G-Drive. Those drives are Flash-Media based, either a SSD or a m.2/NVME Drive, so there isn't a spinning HD inside. The benefit to this is lower power consumption and there isn't a spinning HD inside, so if the drive drops off a desk, it's not a major deal as it would be with a traditional spinning HD. So which one? Both, maybe? If you plan on doing editing at a desk using an external monitor, then I'd recommend on that 12TB (or 18TB if you want to go that high) external. If you are on the go and want to edit by the Pool, in the Car on the way to Vacation, at the Airport (Please don't, and yes...people have stated they do this,) then go for the Flash-Media Based Externals.
-
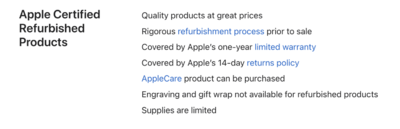
Never heard of them. You can only get AppleCare if you buy a used Mac through Apple directly, I believe. I have seen AppleCare being sold individually, but I think you have to buy the Mac new within 30-90 Days or something, but I'm not sure. That said, buying a used Mac from a 3rd party? Buahahaahaha!! This is Apple we are talking about, there is no way in Hell that is going to happen! Here is some info directly from Apple: Link to the Used Mac Store: Refurbished Mac Store Now, I just took a quick look to see what Apple had available, and of course it's filled with 21.5" iMacs. DO NOT BUY ANY OF THOSE 21.5" IMACS!!! TOTAL WASTE OF MONEY!!! Sad to say, this is the only 27" iMac that they have and it's not cheap. But it does have 10GB Ethernet and a 8TB HD, which explains the cost. If you are wondering, why 10Gb Ethernet? If you are editing video and primarily use an external storage device, like a Server or a NAS, and that device has 10Gb Ethernet, then you will benefit from this speed; since the bandwidth is greater, it would be like working off an Internal HD. Also, if you have faster Internet than 1 Gbps, you need a 10Gb Ethernet Jack (Or a 2.5Gb/5Gb) as well as other devices that are 10Gb, to obtain those faster speeds. For example, I have "1-Gig" Ethernet at my house from Comcast. My download speed averages 940-941 Mbps Down and 40-41 Mbps up. If I had 10-Gig Ethernet, I'd probably get 4000-6000 Mbps or so down and that much up. To see a demonstration on those speeds, give this Snazzy Labs Video a watch. It's pretty fun. (Well, at least for a Nerd like me.) So for the vast majority of people out there for everyday usage that don't have a NAS on their network, and have slower Internet (less than 300 down) there will be no benefit to 10-Gig Ethernet. That being said, I think we will see 2.5 Gig and 5 Gig Ethernet on computers within the next few years. For me personally, I plan on having a 10 Gig Ethernet Network on my next computer since I will be building a Network lab and such, including building my own NAS. (Network Attached Storage.) 10 Gig Ethernet will be the future, in the next 10 years or so, just like 1 Gig Ethernet is now the common standard. Back in the early 2000's, 10 / 100Mbps was all the rage.
-
What year is your MacBook Pro? Do you have a Thunderbolt 3 port? (It looks like a USB-C with a Lightning Bolt above it.)
-
One more thing( if this used Mac is coming from Apple, that’s great! One caveat: what you see is what Apple has in stock for sale. There is no “Computer in the Back.” So if you see something you like and can afford it, don’t wait, buy it. Especially since the 27” iMacs have been discontinued; that iMac you have your eye on could be gone in a few hours.
-
Here is a video demonstrating the process:
-
Lots of YouTube Videos demonstrating the process on upgrading RAM on a 27” iMac. Honestly? Takes about 10 min your 1st time, of which 7 min of that is you freaking out. When you get your Mac, let me know and I will recommend the correct RAM kit to purchase.
-
Choices 1-3 are fine. Skip 4. I like 1& 2 the best, but I’m sure they are the most expensive. Any of those, (1-3) will work. The only thing I do not like is the 8GB of RAM. Fortunately, you can increase the RAM yourself. I’d opt for a “32GB Kit” which is two 16GB sticks, or just take it a step further and get a 64GB kit, which is two 32GB sticks. Which one? Depends on what your camera is. If you are shooting with a lot of MP, like 45MP or more OR are planning on upgrading your camera, you might just want to bump the RAM up to 72GB. This way you won’t be throwing out RAM in the future. Of course, you could save cash and just upgrade it to 40GB to save money. Either way, you want at least 32GB of RAM in 2022/2023. (Or more.) Between the 580 and 580x, the X version is “faster,” which about 15% or so more powerful, which is a good thing since each update that Adobe releases utilizes the Graphics GPU and dedicated Video Memory more and more. But honestly, it’s a wash between the two when it comes to PS. It all boils down to money and how much you are left over after Tax and AppleCare, if it’s available.
-
Is this Windows 11 by any chance? Or are you on Windows 10? Head to Dell's Support Website. Identify your product by putting in the Serial Number or Service Tag ID. See if there are any updates, particularly ones for a BIOS update. It may actually request to do a scan, and I would let it. (Might download a Scanner Tool and ask for you to run it.) Oh, be sure to disable WebRoot for this. Sometimes it gets a little hyper and shoots down this type of software before it installs. The other easy thing for you to try is getting a USB Keyboard that physically attaches to your computer and see if the problems go away. If it does, it's probably and out of date driver. Oh, the USB ports you should be using are just below the Ethernet Port. Those are typically USB 2.0 ports and are more than enough for a Keyboard / Mouse Dongle. Or is this Keyboard Bluetooth? Either way, I'd check for Hardware Updates (especially BIOS) for your computer before going crazy.
-

Should I still buy a 27 inch if I find one?
Brian replied to EDi's topic in The Macintosh User Group
If you can find a 27” iMac that meets my specs to run PS go for it. The problem is, this is a Mac Pro and is way overkill for Photoshop work. If you were editing Video, I’d say this is a good deal. The problem is the lack of choices. For something new, you are looking at a Mac Studio with the new 27” Display. That’s a $5200-ish purchase here in the States, I’d hate to see the price tag in OZ. I have heard of reports that PS actually runs slower on a Mac Pro such as this one, or it’s just more likely that PS will not take advantage of the speed with this computer. Like buying a Million Dollar Sports car and only driving 5 Kilometers to the store and back twice a week. KWIM? If it were me and my money, if I was just running PS CC, I’d pass. Even though it’s a great computer. All of that Xeon stuff PS ignores. -
Thank You!
-
Oh, External G-Drives come with all the cables, not Samsung (and 99% of the other Manufacturers don't either.) It's one of those things that are so overlooked because chances are if you are a Tech, you already have a few in a box of cables that you have accumulated over the years. So I didn't think about it. My bad. If you don't want a 3-pack, I found this single SATA Cable: BENFEI SATA Cable III, SATA Cable III 6Gbps Straight HDD SDD Data Cable with Locking Latch 18 Inch Compatible for SATA That one is a straight cable, without the 90º bend, so it might be easier for you to dork around with for your first time. That one has 32,390 Ratings and it's also 5 Stars. Just be sure you click on the right boxes to select the cable that you want. SATA Cables are so common, that this shouldn't be a problem in obtaining one.
-
Yeah, you just need a simple SATA Cable. Here is one: Cable Matters 3-Pack 90 Degree Right Angle SATA Cable 18 Inches There is a 24" version if you need more length, but I'm pretty sure 18 inches will be fine. Oh, it's a 3-pack and I like that is has 14,519 ratings and it's 5 stars. The small port on the Sata SSD is for Data, this Sata Cable that you are buying from Amazon is what attaches to it. The bigger one is for the Power Connector. Speaking of which, the Power Connector is keyed, meaning it only goes on one way. You might want to look at the ends of the cable to see which end is up. Don't over-think this, installing a SSD is pretty straightforward, and like I said, the cables only go on one way.
-
Keep me posted on when you get things. I’m a bit curious about the Z9.
-
Thank You!!
-
Well, the good news is, you don't have a lot of gear. The bad news is, none of your existing gear will be worth it to use on the Z9. Out of what you have, the 50mm 1.4G with a FTZ Adapter will technically work, but to be honest, I hate that stupid lens. LOL!! (Don't get me started. It was one of Nikon's worst lenses and has caused so many threads when I had Ask Brian on FB.) Anyway... So you are starting from scratch. Since you are also switching lens mounts, this also works in your favor; though your wallet won't tend to agree. It seems that you are a "Zoom Person," which is what I am. Some folks are "Prime Lens People," which also works, though you change lenses more often. Each has their pluses and minuses. Start with: Nikon Z9 Camera Body QTY of 1 (Extra) - Nikon EN-EL18d Rechargeable Lithium-Ion Battery (10.8V, 3300mAh) Nikon BL-7 Battery Chamber Cover Nikon NIKKOR Z 24-70mm f/2.8 S Lens QTY of 4 - SanDisk 128GB Extreme PRO CFexpress Card Type B SanDisk Extreme PRO CFexpress Type B Card Reader This is the basic kit I would purchase. You could swap out the 24-70 f/2.8 S for the Nikon 24-120 f/4 S Lens, which has a bit more reach at the cost of one stop. (It only goes as wide as f/4) The lens hood on the 24-70 is reversible which makes things easier to carry around and store in your bag. Between the two, while the 24-120mm covers a bit more focal range, you can't go wrong with a 24-70, as the optics are better on the 24-70. My 24-70 is my most used lens, even though my 70-200 is my favorite lens. I couldn't imagine shooting without one these days. You could hold off on the battery for now, as the Nikon Z9 Battery lasts all day. Of course, if you shoot a lot of video, it will drain faster. I still recommend getting an extra battery and the Little BL-7 Battery Door Cover. What that BL-7 does is it attaches to the extra battery and stays on. Then it's just a matter of turning the little key flap and swapping the batteries. Otherwise you will have to transfer the BL-7 door from your other battery. This slows things down and opens you to bad things happening. I'd rather spend the $40 for the extra door to go with the extra battery. I can swap a battery on my D4s in under two seconds, or less, if I'm really in a hurry. You will see what I mean when you get your Z9, as you will have one battery and one battery door cover. I hope you read this tonight, because Sandisk is running a Sale on the CF Express Type B, so even though you don't have the body, it's always a good thing to save some cash!! (Sale ends Aug 27th.) My Recommendations For Kid's Sports (Wildlife) Nikon NIKKOR Z 70-200mm f/2.8 VR S Lens This is another staple in a Photographer's arsenal. It's my go-to zoom when I need more reach or want to be creative. Nothing beats a 70-200 f/2.8 lens. Nothing. It's the "Les Paul Guitar" of Lenses and the 24-70 f/2.8 is like a "Fender Stratocaster." You could get the f/4 version to save a little money and weight, but you can't go wrong with a 70-200 f/2.8 lens. Yes, these lenses are expensive but the Z Mount is Nikon's new mount and the old F-Mount is going away...well eventually. A good high-quality lens will last you 20 years and I've gone through multiple body upgrades but kept / used the same lens. This is where you spend your money, on the glass. You can shoot Wildlife with this lens, though depending on what you shoot, it may not have enough reach to photograph something like a Bear. That said, you do have cropping options with those 45.7 MP. I have shot my son's baseball games with a 70-200 without any issues, and again...it's my go-to lens when I need some reach. For Wildlife (Kid's Sports) Nikon NIKKOR Z 100-400mm f/4.5-5.6 VR S Lens This is a relatively new lens, but I like the focal length. The downside is the lens is a variable aperture, meaning as you zoom out, the lens automatically stops down. Your current lenses do this, so you are used to it. That said, when you experience f/2.8 glass it's hard to go back to the variable aperture stuff. Meaning, you tell the camera what aperture you want and it doesn't argue. Want to be at f/3.2 at 70 mm? Go for it. Want to be at f/2.8 at 24mm? That's fine too. Whatever your aperture you choose, it stays there. That said, chances are you are going to be at f/8 - f/11 when shooting wildlife or even f/5.6. If you want a lens with a similar focal range and a constant aperture, you are looking at a lens that's over $13,000 all by itself. So...for us mortals we just need to deal with it. LOL!! In a nutshell, this lens is great for the typical wildlife shots and if you happen to go on an African Safari, there is always a Lens Rental Company to utilize. If I was buying a Z9 and looking for a "Wildlife Lens" to use here in the States, I'd pick this one. Just like the 70-200, you could shoot Kid's Sports with this lens, as the 400mm will give you double the reach over the 200mm focal length. The downside? The variable aperture. You will not be photographing Football games in the Fall during the evening at f/5.6. Well, not unless you crank your ISO. You also won't be able to isolate your subject by blurring out the backgrounds at f/5.6. With Photography, there is always a trade-off. If you shoot Wildlife A LOT, chances are you will lean towards this lens. If you are shooting your Kid's Sports and have any sort of night games, having a 70-200 f/2.8 at your disposal is a God-Send. For Macro Photography (Mushrooms and such) Nikon NIKKOR Z MC 105mm f/2.8 VR S Macro Lens Want to do Macro? This is the Lens to do it with. You learn to use this lens at f/8 and will end up using it mostly at f/11 because the closer you get to your subject, the more you will have to stop down since the DoF is so small. It's razor thin when you are 3-4 inches away from something like a Mushroom. This is why serious Macro Shooters not only have this lens, but also some sort of Lighting Rig to illuminate their subjects, since the Apertures are so small. If you look at any of Susan Stripling's famous Wedding Ring Photos, she uses f/11 A LOT. Honorable Mention / Highly Recommend you purchase this to go with your 24-70 f/2.8 S Nikon Circular Polarizer II - 82MM Version. If you are into Landscapes or shoot Waterfalls, you NEED a Circular Polarizer. A Circular Polarizer makes your colors pop, and controls glare on thing like Windows and Water. Take a look at my Instagram Stream to see what I mean. If you'll notice, my skies in my Landscape shots are nice and blue and the Whites in the Clouds also pop. This is due to a Circular Polarizer Filter. This is the only effect that can not be duplicated in Photoshop; the reason is how a CP works, it only lets in Light Photons that are oriented in a certain way into the lens. Neither Photoshop or any other software can truly mimic this effect, because it happens before the light enters the lens. A CP Filter is a Landscape Photographer's Best Friend. Well that's what I would recommend. Hopefully you will see this and pickup the Sandisk Cards while on sale. Since you are going to photograph sports, I really-really-really want you to read your Nikon Z9 Manual and really learn the Autofocus Modes and each of the different Autofocus systems. Especially on how they differ from one to the other and when to use a particular one. I just read an article from a Photographer who primarily does Landscapes, but also wanted to capture Birds in flight. On the first day of him borrowing a Z9, he didn't have many keepers until he watched some YouTube Videos and read some articles about the Z9 Focusing Modes and how to set the camera up for a particular shot. The second day he had A LOT more keepers and was quite happy. Speaking of which, the Nikon Z9 is Nikon's Professional Grade Flagship Body. It is NOTHING like you are used to shooting with. Not just the raw power & build quality but things like the Menu Choices...there are so many choices. The DX bodies NEVER go near this stuff. You have no idea on what you are missing, so please-please-please RTFM (Read the F*cking Manual) when you get your Z9.
-
I'm sure your eyes widened when you saw that $10,000 number. Welcome to FX. Welcome to shooting with the Nikon Z9. Short Answer: NO. Long Answer: In order to take full advantage of the power of a Nikon Z9, it requires either high-quality professional grade lenses, like a AF-S 105mm f/1.4 with the Adapter, or better yet, Nikon "S" Lenses, which is the Mirrorless Body line of Lenses meant for those bodies. Speaking of which, I have a friend who shoots newborns, and she switched from her Nikon D4 to a Nikon Z6 as she was having hand issues with the weight of the D4. She kept using her existing 24-70 f/2.8 and used the FTZ adapter. Her photos were "fine," but seemed off. She pixel-peeped and pixel-peeped and was driving herself nuts because the photos just seemed "Off." (It was hard to describe.) Well, after talking her down from the proverbial ledge, I convinced her to give the Nikon 24-70 "S" lens a try and see what happens. I told her you could always return it, but I have a feeling your issues will go away once you switch, because that lens is meant for Mirrorless bodies and you will get the 5 Axis Vibration Reduction." Sure enough, she got the lens and her problems went away. She had way more keepers and her photography even improved because she started to see issues in her technique. So after having this real-world experience, I've come to the conclusion that if you are going to switch to the Nikon Mirrorless Line, you are going to need the Mirrorless "S" Lenses to go with it. Period. (Especially if you have the DX only lenses.)
-
My next question is, "Why a Nikon Z9?" I get it...it's the Marketing and YouTube Videos and all the awards. All those articles and Blog posts. I'm sure there is "Last Camera Syndrome" at play as well. The, "I'm tired of buying cheap cameras. I want one that will last!!" or "This is going to be the last camera that I buy, so I'm going for a good one!!" If this sounds anyway remotely familiar, I'm glad you are talking to me first, before taking the plunge. I also want to take the time and give you a major head's up: Your photos will suck when you switch over to FX. It is, but it takes getting used to. Takes about a month or so for you to adjust, and when you do, your DX body will feel / act like a toy. Because a DX Sensor is physically smaller, it only uses the center-most portion of a lens, which is the "best" part of the lens. It's almost like always eating Filet Mignon and then eating the other parts of the steak, which have a little more gristle and fat. Same difference. You will be surprised on how quickly you will see the flaws in your lenses, especially in the corners when you switch to FX. Because the FX sensor is physically larger, it picks up this stuff that the DX body couldn't see. Combine that with the "Angle of View" change, also takes getting used to. You can't simply "f/2.8 all the things" like you could on a DX body, it doesn't work that way. f/2.8 on a DX body is closer to f/4 on a FX body. Why? Because the FX Sensor is physically larger the DoF Changes. You no longer have to multiply the focal length by 1.5 to get the "Equivalent" Focal Length. This is why a 50mm 1.8 lens is used for portraits a lot on a DX body. For a FX Body, you need an 85mm f/1.8 lens to produce the same "Look." Since the Angle of View is different, it forces you to change your shooting position on where you stand, thereby changing the Depth of Field. Understand? Of course, if you don't have f/2.8 glass, you have no idea on what I'm talking about. Which could be a good thing, since there won't be any existing habits and ways of thinking. Here is a comparison between a Nikon D700 (FX) and a Nikon D7000 (DX) from an old friend. A tripod was used and it was the same lens between each of the body. The camera did not move and it's a quick-and-dirty way of seeing what the "Angle of View" change between a FX/DX body that I'm talking about. OK...get me your list of gear and computer / storage specs. I need to see your "Whole Eco-System" so you "Buy it Right - Buy it Once." I hate wasting money on this shit...and trust me, I've wasted plenty.
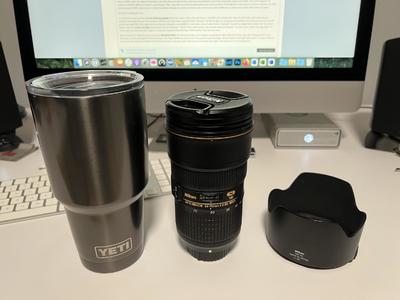
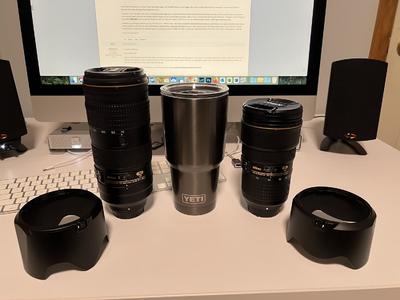
-
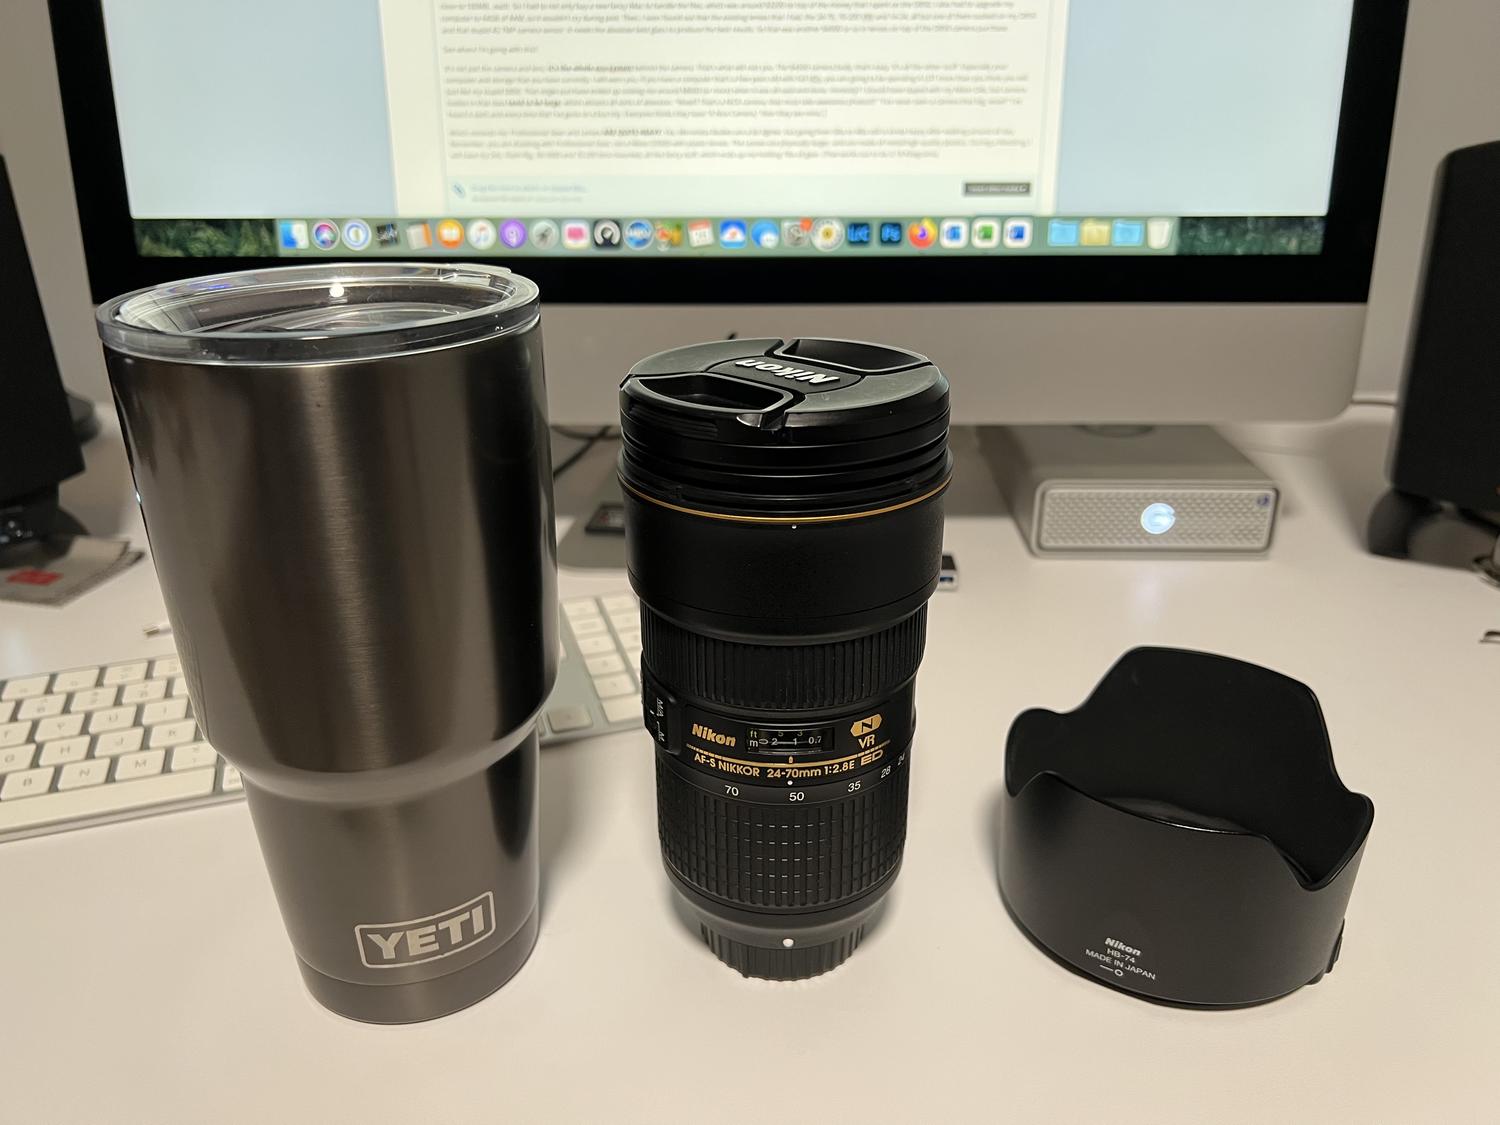
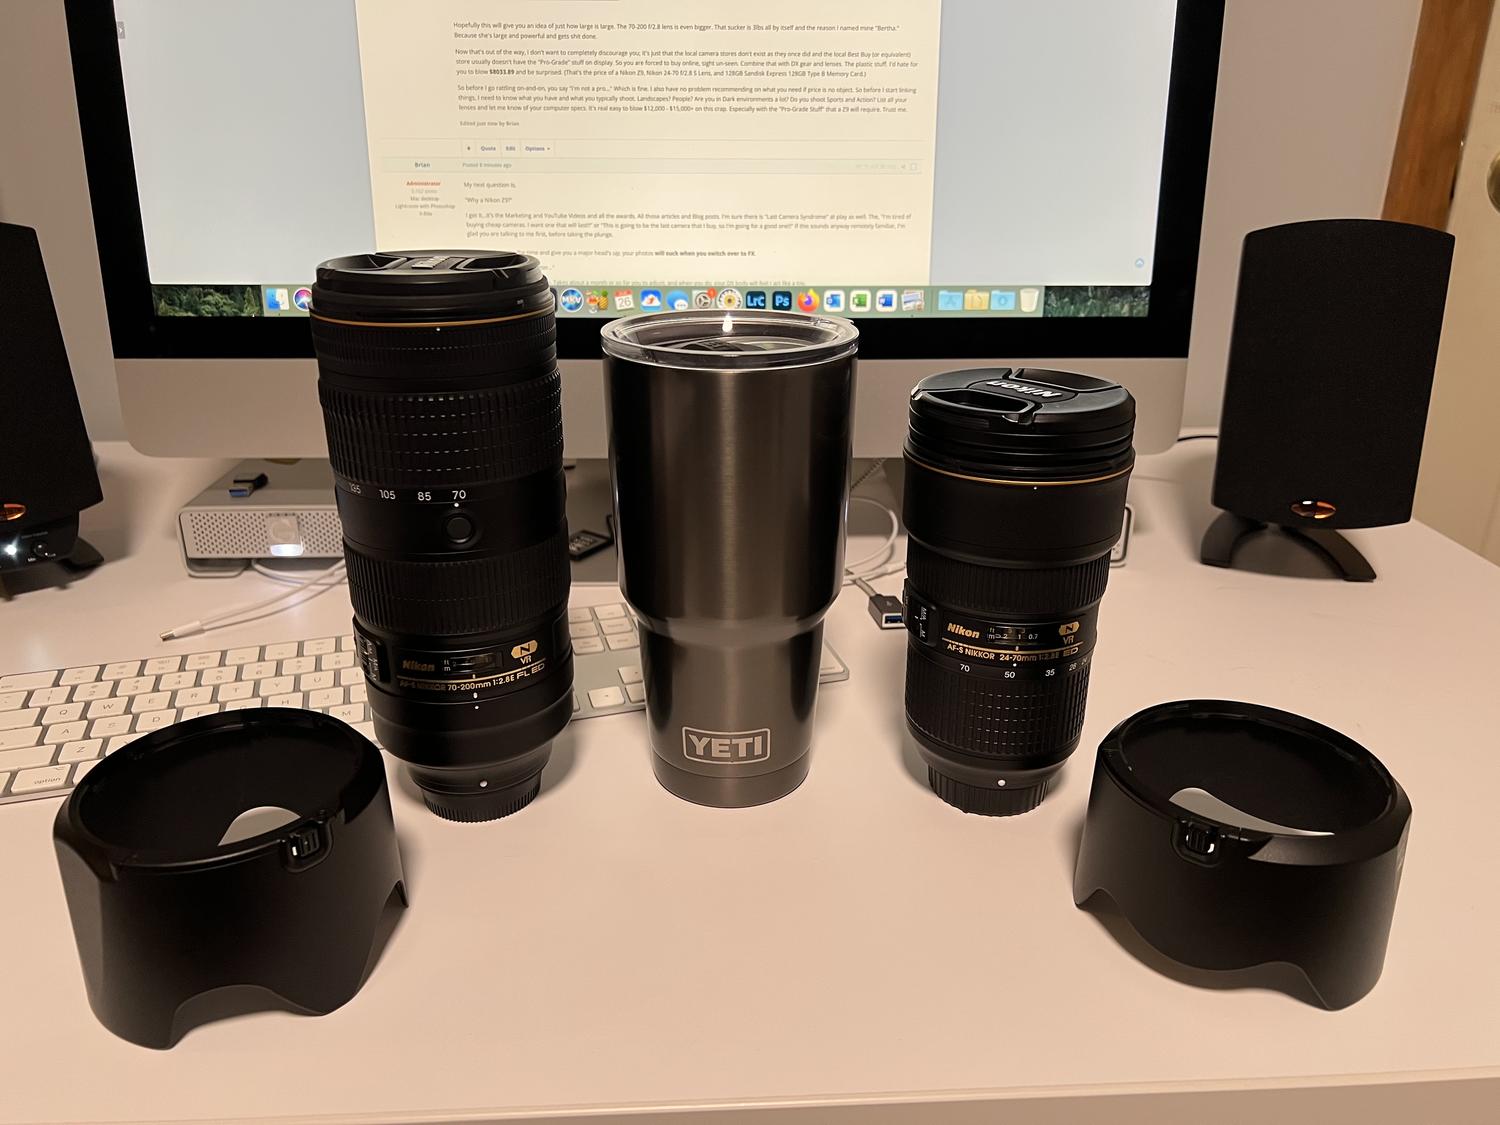
Finally!!! A camera question, in the Photo Gear & Equipment section!!! I'm so happy right now. Yeah, Z9 questions are non-existent here, as this is a pro-body, and people who buy those cameras are typically Pros. BUT! I will answer your question as to save you a bit of a headache. Of course, I'm having a little fun. But I have helped a lot of people over the years, both here and on FB that have been in your situation. They want to ditch the "Crop-Sensor Training Wheels" and switch to Full Frame (FX.) Unfortunately, there is more that they need to look at than just the fancy marketing that's out there trying to get you to buy. So here's the thing: It's not just the camera body and lens. Nope. It's things like CFExpress Type B Cards and a Reader. An Extra Battery. Plus all the other accessories. Then "S" lenses, and then the camera body. Can you feel the $$$ signs adding up? Which leads me to the next paragraph. But wait! We aren't done. That fancy Nikon Z9 Camera Body. It's won all sorts of awards. "It's amazing!!" Everyone says so. It also has 45.7 MP, which is the same amount as my Nikon D850...and the camera body that I regret buying. Why? It's because of that D850 and it's 45.7MP. My Raw files are huge because I don't use any fancy compression for my photos. They are close to 100MB...each. So I had to not only buy a new fancy iMac to handle the files, which was around $3200 on top of the money that I spent on the D850, I also had to upgrade my computer to 64GB of RAM, so it wouldn't cry during post. Then, I soon found out that the existing lenses that I had, the 24-70, 70-200 VRII and 14-24, all but one of them sucked on my D850 and that stupid 45.7MP camera sensor. It needs the absolute best glass to produce the best results. So that was another $4000 or so in lenses on top of the D850 camera purchase. See where I'm going with this? It's not just the camera and lens, it's the whole eco-system behind the camera. That's what will cost you. The $4500 camera body, that's easy. It's all the other stuff. Especially your computer and storage that you have currently. I will warn you, if you have a computer that's a few years old with full HDs, you are going to be spending A LOT more than you think you will. Just like my stupid D850. That single purchase ended up costing me around $8000 (or more) when it was all-said-and-done. Honestly? I should have stayed with my Nikon D4s, but camera bodies in that class tend to be large, which attracts all sorts of attention. "Wow!!! That's a NICE camera, that must take awesome photos!!!" "I've never seen a camera that big, wow!!" I've heard it each and every-time that I've gone on a bus trip. Everyone thinks they have "A Nice Camera," then they see mine. Which reminds me. Professional Gear and Lenses ARE QUITE HEAVY. Yes, Mirrorless Bodies are a bit lighter, but going from 5lbs to 4lbs still is kinda heavy after walking around all day. Remember, you are shooting with Professional Gear, not a Nikon D3500 with plastic lenses. The Lenses are physically larger, and are made of metal/high quality plastics. During a Wedding, I will have my D4s, Flash-Rig, SB-5000 and 70-200 lens mounted, all the fancy stuff, which ends up me holding 7lbs+ of gear. (That works out to be around 3.18 Kilograms). Here is a quick photo that I just took of my Nikon 24-70 f/2.8E and a Large Yeti 30 oz Tumbler: Hopefully this will give you an idea of just how large is large. The 70-200 f/2.8 lens is even bigger: (70-200 f/2.8E - Yeti 30 oz - 24-70 f/2.8E. Lens Hoods for each lens are on L/R) That sucker is 3lbs all by itself and the reason I named my 70-200 "Bertha." Because she's large and powerful and gets shit done. Now that's out of the way, I don't want to completely discourage you; the local camera stores don't exist as they once did and the local Best Buy (or equivalent) store usually doesn't have the "Pro-Grade" stuff on display. So you are forced to buy online, sight un-seen and I want you to make an informed purchase. Combine that with DX gear and lenses. The plastic stuff. I'd hate for you to blow $8393.88 and be surprised. (That's the price of a Nikon Z9, Nikon 24-70 f/2.8 S Lens, and Two 128GB Sandisk Express 128GB Type B Memory Cards as the Z9 has dual slots.) Remember, we haven't even purchased more cards, a card reader and at least one extra battery. That adds another $825-ish on top of the $8383.88. Let's round off prices, $8395 + $825 = $9220. Plus Tax and any shipping. Here in PA, our sales tax is 6%. Yours might be higher where you are. If I multiply $9220 by 6%, that comes out to $9773.20. So call it $9775. That is approximately $225 LESS THAN TEN THOUSAND DOLLARS, for a stupid camera! One Lens, One Camera Body, One Extra Battery, Two Sets of Memory Cards & Card Reader. Just under $10,000 after tax. Let that sink in. So before I go rattling on-and-on, you say "I'm not a pro..." Which is fine. I also have no problem recommending on what you need if price is no object as I'm very good at spending other people's money. So before I start linking things, I need to know what gear you have and what you typically shoot. Landscapes? People? Are you in Dark environments a lot? Do you shoot Sports and Action? List all your lenses and let me know of your computer specs. It's real easy to blow $12,000 - $15,000+ on this crap. Especially with the "Pro-Grade Stuff" that a Z9 will require. Trust me.
-
Yeah, that drive is fine. It’s a new model, but I like G-Drive’s stuff. Well, I think Sandisk owns them now? But they still make high quality items. I’d buy it.
-
Yeah, once you start wanting “faster” components in attempts to not be obsolete sooner rather than later, the cost really jumps up. I still think the $1699 model will work well for you. I’d buy it.
-
You could also upgrade to this Motherboard, the ASUS ROG Maximus Z690 Hero. Which is a "Better" Motherboard, but the cost increases. This is what that config would look like: Of course, the new cost is $3379. It's all about money. If you would like, give Digital Storm a call or setup a Chat Meeting. Tell them what you are doing and see what they recommend. As of right now, I think the $1699 is the "Best Bang for your Buck" model. It's the "$999 PC" from several years ago, or it's equivalent. Of course, you'll need to either use an exiting Keyboard and Mouse and have a IPS Display on hand. If you need those things, it adds to the cost. (Most Gamers like using their own keyboards and such, Digital Storm makes "Gaming" PCs, hence not having keyboards/mice as a standard option. Honestly? You could head to Best Buy or whatever and buy a Keyboard and Mouse for like $40 or so. Or again, if you have a Keyboard/Mouse that you like and works for you, and is USB based, save yourself some cash.

-
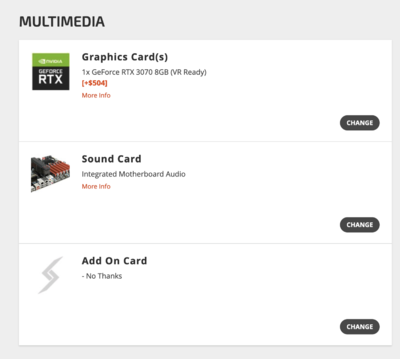
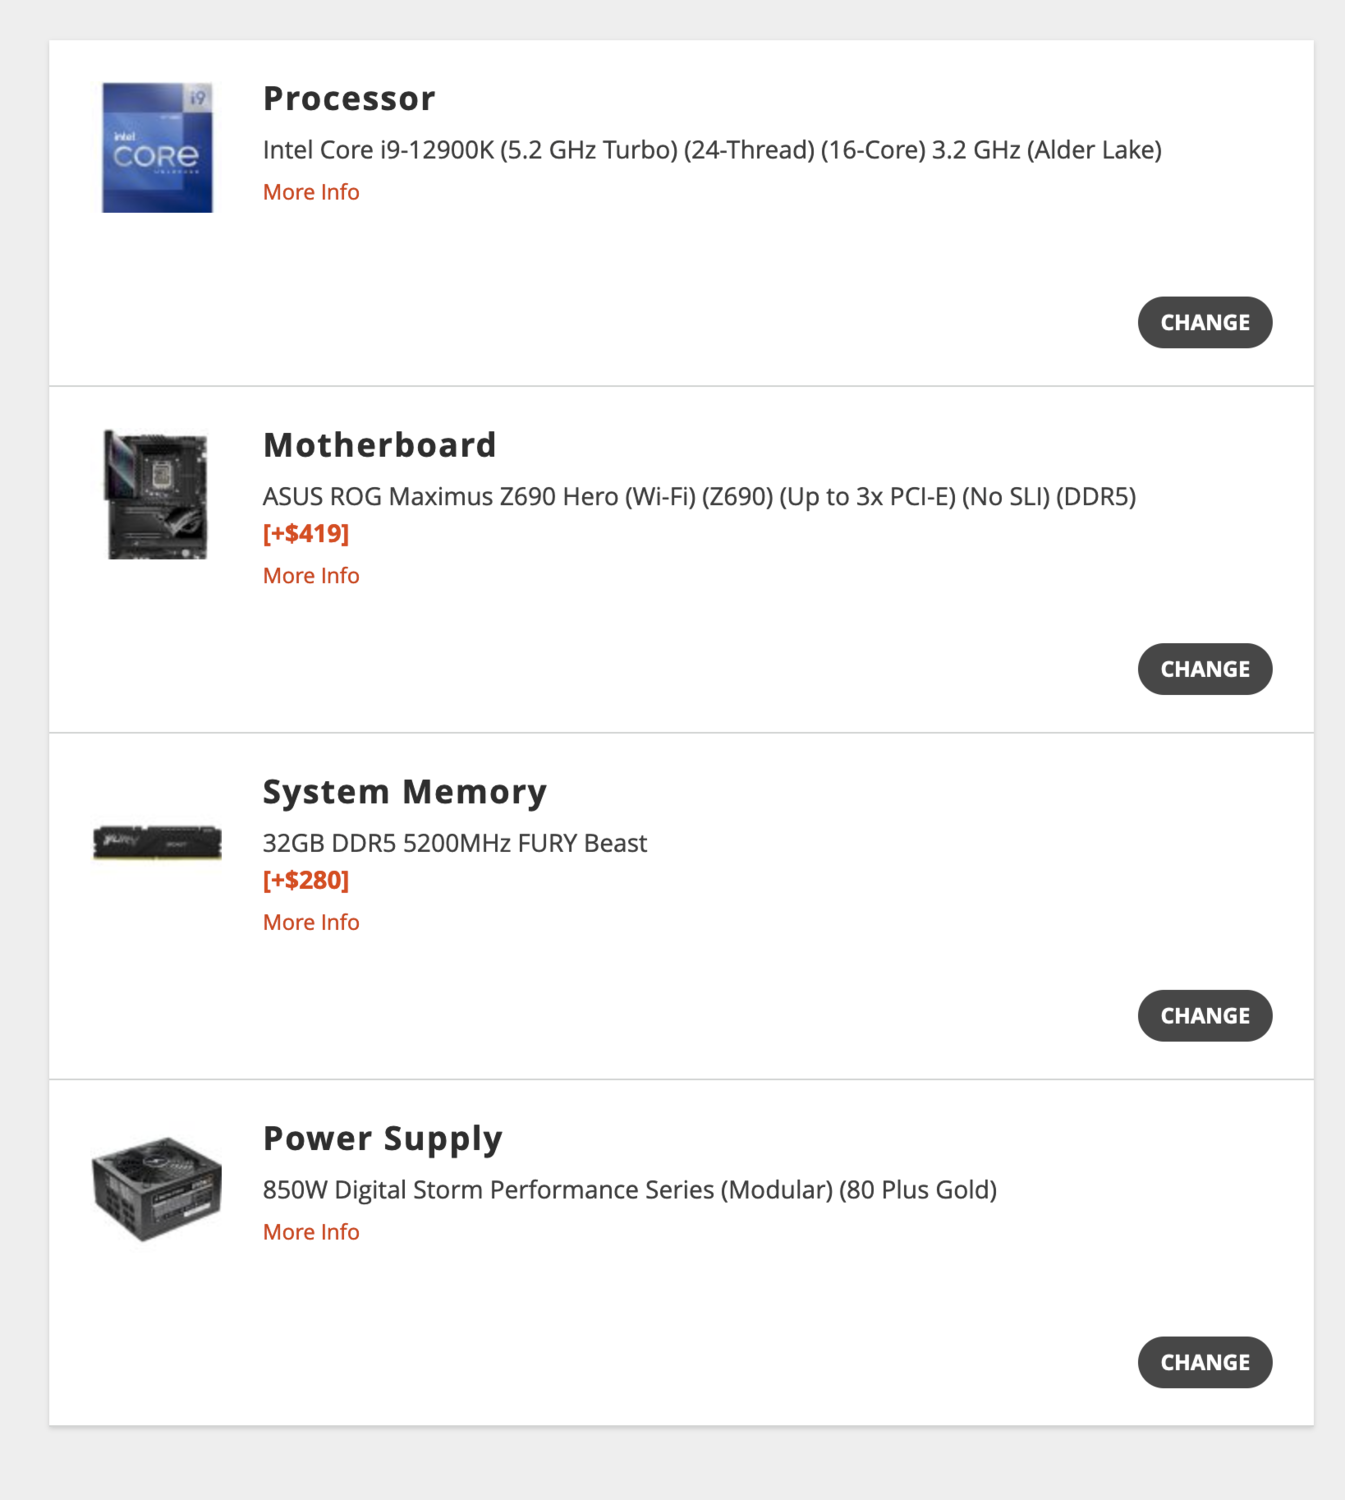
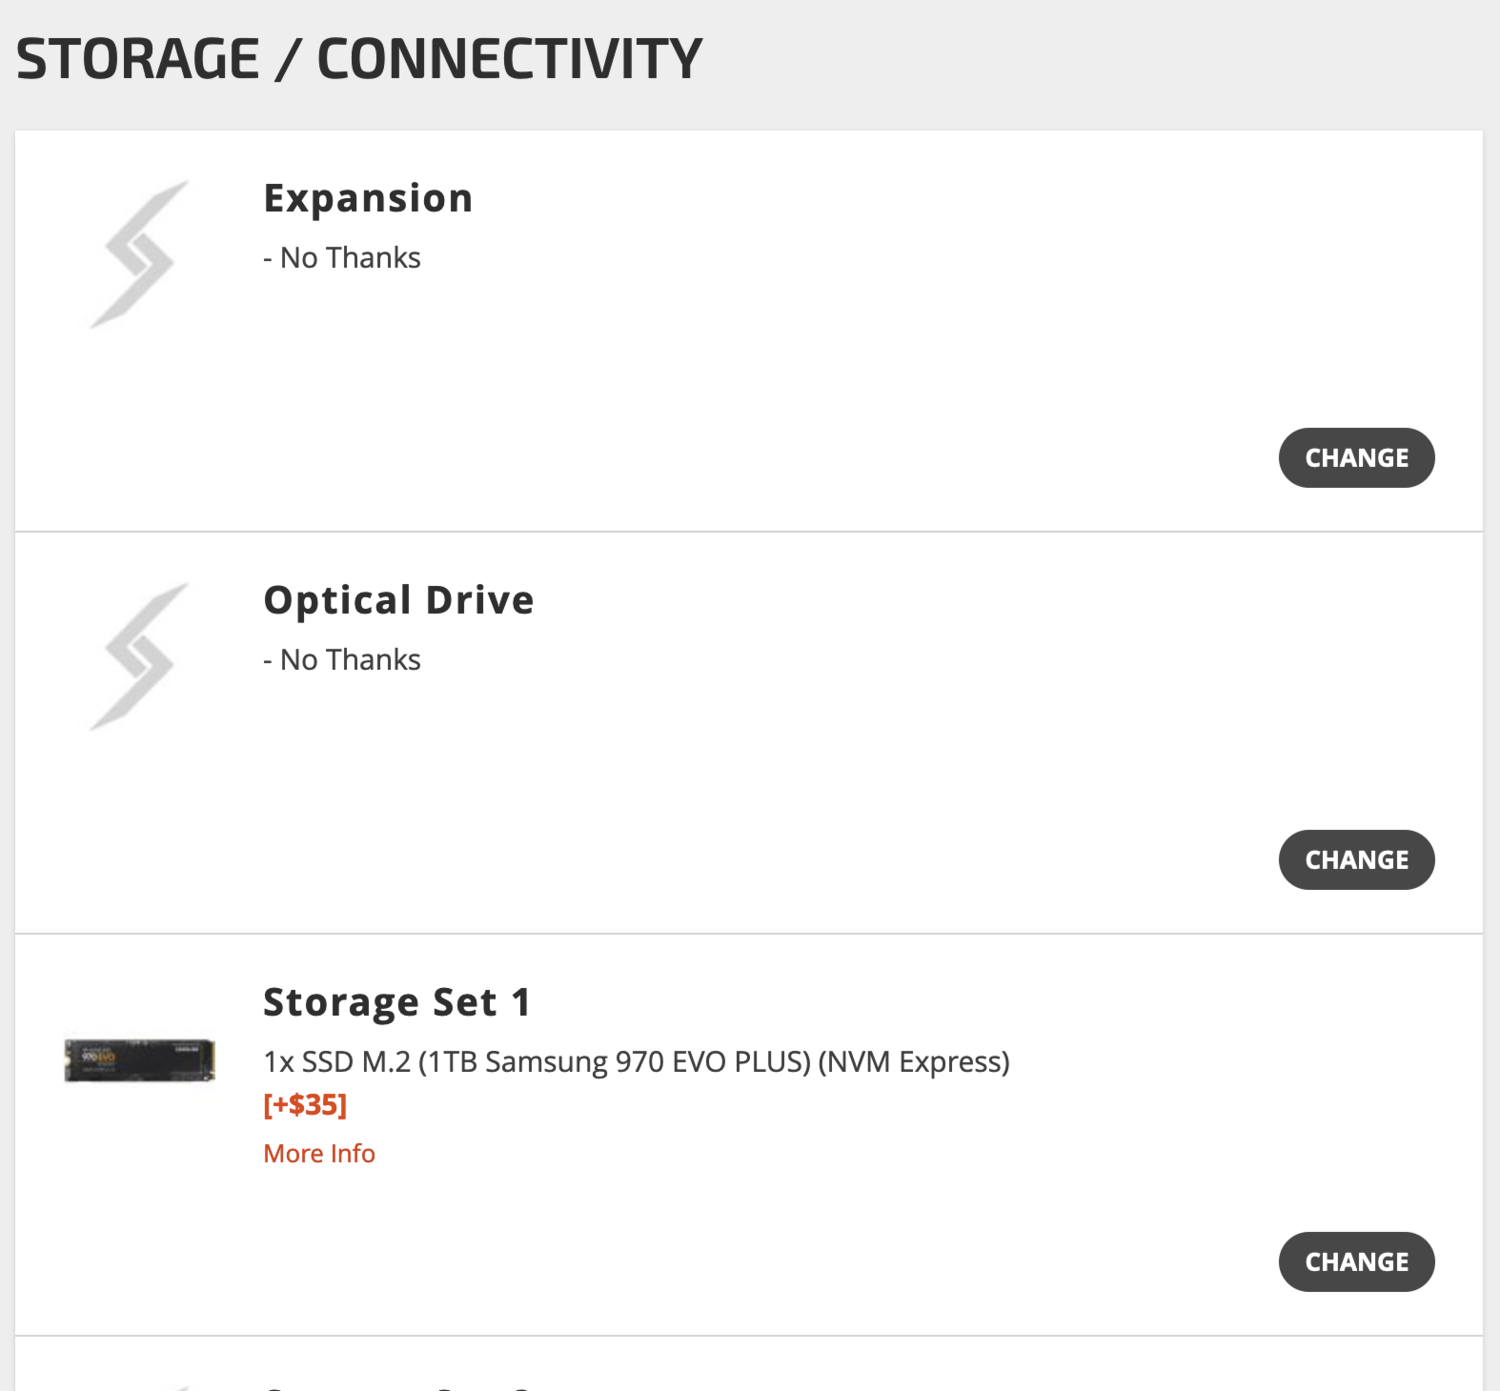
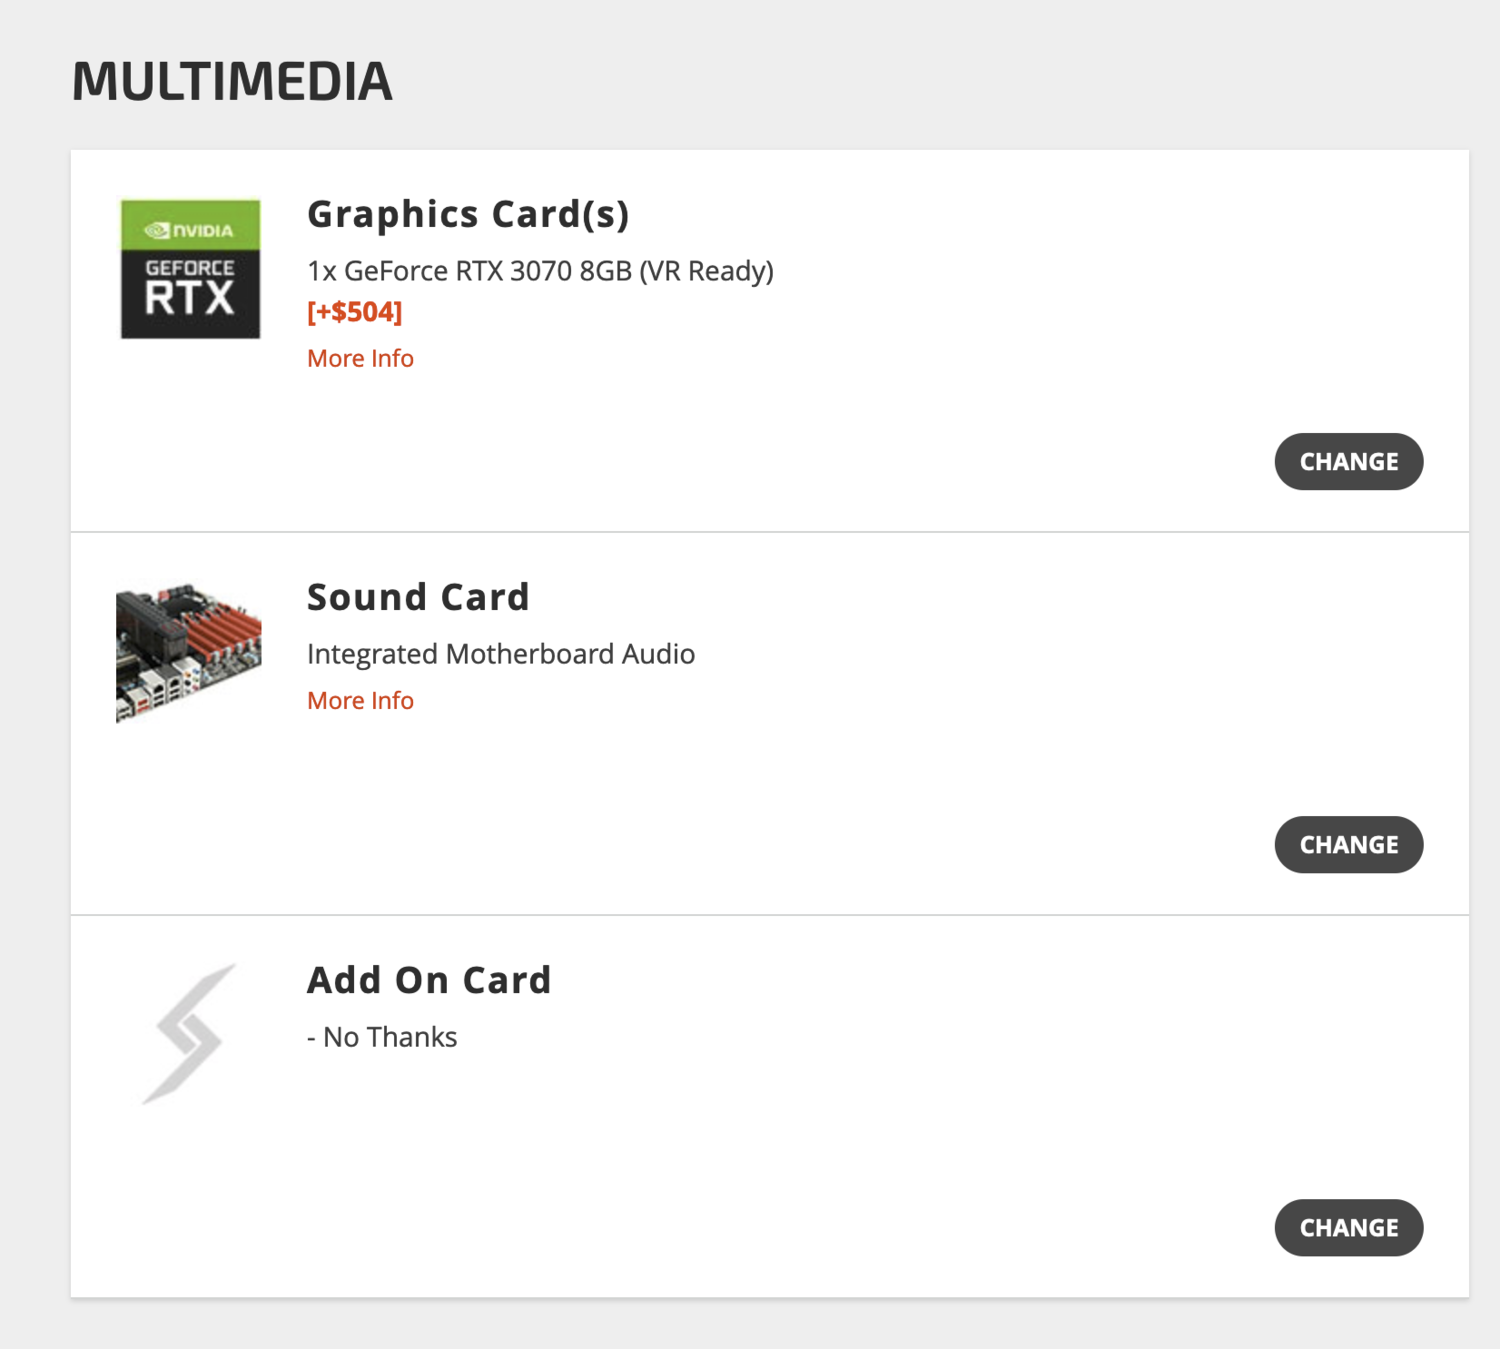
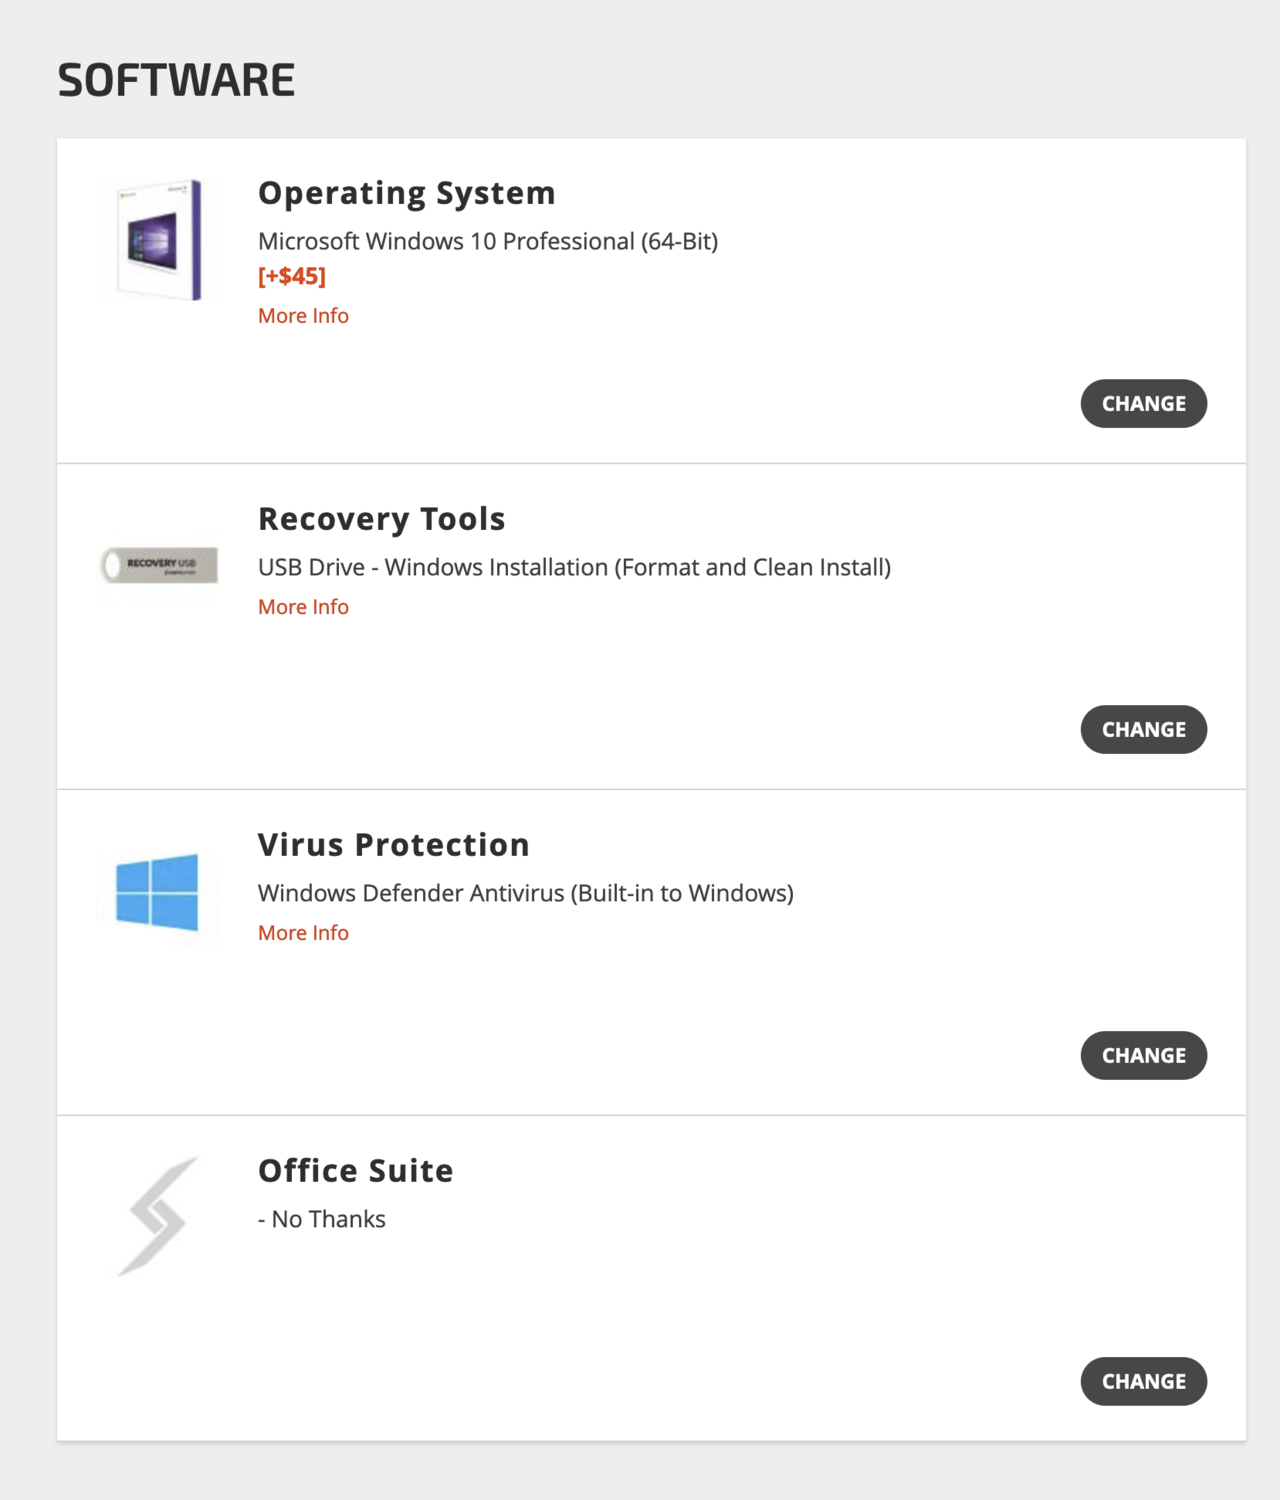
Here is the specs that I chose: i9 CPU ASUS Prime Z690-A (Intel Z690 Chipset) (Up to 3x PCI-E Devices) (No SLI) (DDR5) 32GB DDR5 5200MHz FURY Beast Power Supply left at 850 Watts. Upgraded the SSD m.2 Drive to a Samsung 970 EVO Plus verion instead of generic. Selected the GeForce RTX 3070 8GB Downgraded the OS to Windows 10 Professional 64-bit. I will upgrade to Windows 11 in 2025, waiting for it to "Cook" in the oven for a few more years. Windows 10 Pro is worth the extra $50. When things go wrong, it's easier to fix things since it stays out of your way. You could select Windows 10 Home 64-bit though. Up to you. That configuration will cost you $3064 before shipping and tax. I could add more, but honestly? I can buy a 2nd HD off of Amazon and install it. Here is a Western Digital Black 10TB Version. You can add this at a later date. I would use this HD just for storage of my image files / data. I could help you install the drive, it's actually really easy to do. Windows 10 Pro makes it really easy to setup as well. Takes about 20-30 minutes, depending on your skill level.