Brian
-
Posts
4,137 -
Joined
-
Last visited
-
Days Won
55
Everything posted by Brian
-
Welcome to the 2022 Edition of "Buying a Mac for Photo-Editing." My inbox and recent posts here in The Macintosh User Group have been mostly centered on one topic: WHAT HAPPENED TO THE 27" IMAC?!?!! It seems people are either getting Tax Refunds or have been saving and now they are ready to buy. Unfortunately, I have VERY BAD News... Yep, you have read that correctly. For the first time since...what, 2008? 2009? Apple is no longer offering a 27" iMac and a computer that is user upgrade-able. Meaning you can not add additional RAM, replace the Hard Drive...basically do ANYTHING other than to use the computer when it was originally configured for the life of the computer! If you want more RAM in a few years time, too-bad-so-sad...you are buying a new computer! I'm not happy with this situation. At all...and I'm a Mac Guy! In fact, I'm typing this very article on my 2017 27" iMac. So what happened? In November 2020, Apple released the first Macs with a brand-new processor that had a completely different Architecture than the previous Processor, namely the Intel CPU Line. For whatever reason, Apple made known to the world that the new M1 Line, was the future, and the days of them using a Intel-based computer were coming to an end. The new M1 Chips are known as a ARM CPU. What is ARM? ARM stands for Advanced RISC Machines. So what's the big deal? What's the difference? I could write an entire Article explaining the particulars that would make the average person's eyes glaze-over. But to put it in Layman's Terms, a ARM CPU is a flavor of a RISC CPU. RISC CPUs have been around since the 1990's but have never really caught on until now. A RISC Based CPU consume less power and is much more efficient than an Intel-based CPU Chip, at least on paper. Especially when it comes to Memory Management and how it is treated. Plus, since Apple is now designing and building their own CPUs, they get to save a "whole 'lotta money" without having to pay another Manufacturer or pay licensing fees for them to use another company's technology. Given the fact that the M1 chips can be used across different models, from Smartphones, to iPads, to Desktop Computers...it just makes sense from a manufacturing and cost standpoint to have a single source of chips. As we become more and more portable, and let's face it, iPhones are little computers that make Phone Calls, and we are so addicted to laptops....our needs are changing, and we want better battery life. The push towards being portable and not being chained to a desk are stronger now more than ever. The problem is, this is a completely new way of thinking. We are no longer dealing with a computer that has Intel-based Architecture; namely you need to purchase things like extra RAM, Graphics Power and even storage options because for the most part, everything is built into one chip!! How does that affect you and me? You are stuck with the initial configuration of your computer with no upgrade path! So let's say in 3-4 years...you start noticing your computer is "Acting Slow" or certain software is complaining that there isn't enough resources available. (e.g. not enough RAM, lack of HD capacity, etc.) In the past with your typical computer, you were able to add more RAM to provide additional resources for the software to use. This also allowed one to span money paid out over the course of several years; you can buy a computer now, use it with current software and when new software that came out in a few years required more "Horsepower" from your computer, you could purchase a upgrade to get a few more years of life out of your investment. Sounds logical, doesn't it? ...and I'd have to agree with you. It's my way of thinking since dealing with computers starting in 1981. (Man, I'm getting old...but I digress. ) Anyway, Apple is and always has been a company that has created computers that their software and hardware are completely integrated. They also like to control what they call the "User Experience." You play by Apple's Rules or you don't play at all. It's this way of thinking that Die-Hard Windows Users have such an extreme problem with. These folks seem to go out of their way to bash Apple's products and state that Windows is better because there are more choices which drives down costs and blah-blah-blah. I'm not here to debate, as this conversation has been going on since 1984 and will not be resolved anytime soon! So where was I going with this? Oh yeah...Apple's way of thinking. Apple is a company that wants you to "Go Big or Go Home." You get a better value and more offerings if you spend more money. Sure, they have lower-end and more "Affordable" products, but those products are often purposely crippled and frankly, a waste of money. Remember this when it comes time to choose a new Macintosh Computer. OK, now that's out of the way, how does this affect everyone? First, to get the most performance out of your new M1-based computer, is your software needs to be optimized for use with a M1 chip. For the folks here in Ask Damien, they are mostly Adobe Photoshop and Adobe Lightroom users. They will be REQUIRED to use the latest versions of those two programs, and at the time of this writing is Adobe Photoshop CC 2022 - Version 23.2.2 and Adobe Lightroom Classic CC - Version 11.2. Gone are the days of holding onto an older copy of Photoshop, even one as recent as Photoshop CC 2019. Nope...you are stuck using the most current version, complete with any bugs or quirks that come with that software. It also doesn't just apply to Photoshop or Lightroom, but ALL software used. So before you purchase a computer, check to see if there are any updates for them to be compatible with the M1 Line of computers. Since the M1 Macs have been out for a few years, this isn't as big of an issue as it was in 2020 / early 2021. OK, I'm sure if you have made it this far, you are getting a little impatient with me. I do thank you for sticking with me until this point. Now onto the next section and the one you all have been waiting for...
-
The problem is, it is VERY EXPENSIVE now to buy a Mac that's "Good for photo editing..." Really expensive. Like $5200 expensive. The 24" iMac is off the table, as the screen is not compatible with the current Calibration Devices, meaning...until the manufacturers update their Calibration Devices (the part that goes on the display) you won't be able to Calibrate your screen. Apple quietly discontinued the 27" iMac and it's unfortunate that you weren't able to buy one 6 months ago because now I'm stuck having to recommend over-priced options . I'm finally getting around to writing that Article. Stand-by.
-
Buy Brian a Beer!! (PayPal Donation) Thank You!!
-

What happened to the 27 inch iMac??
Brian replied to Michelle Pena's topic in The Macintosh User Group
I've been busy with my day-job. Yes, the article will be posted shortly and it will be here, not on Facebook...I'm never coming back to Facebook. It's going to be a pain in the ass. Apple makes it very easy to switch from a Windows Computer to a Mac, but not the other way around. It is doable though. Let me write this article. -
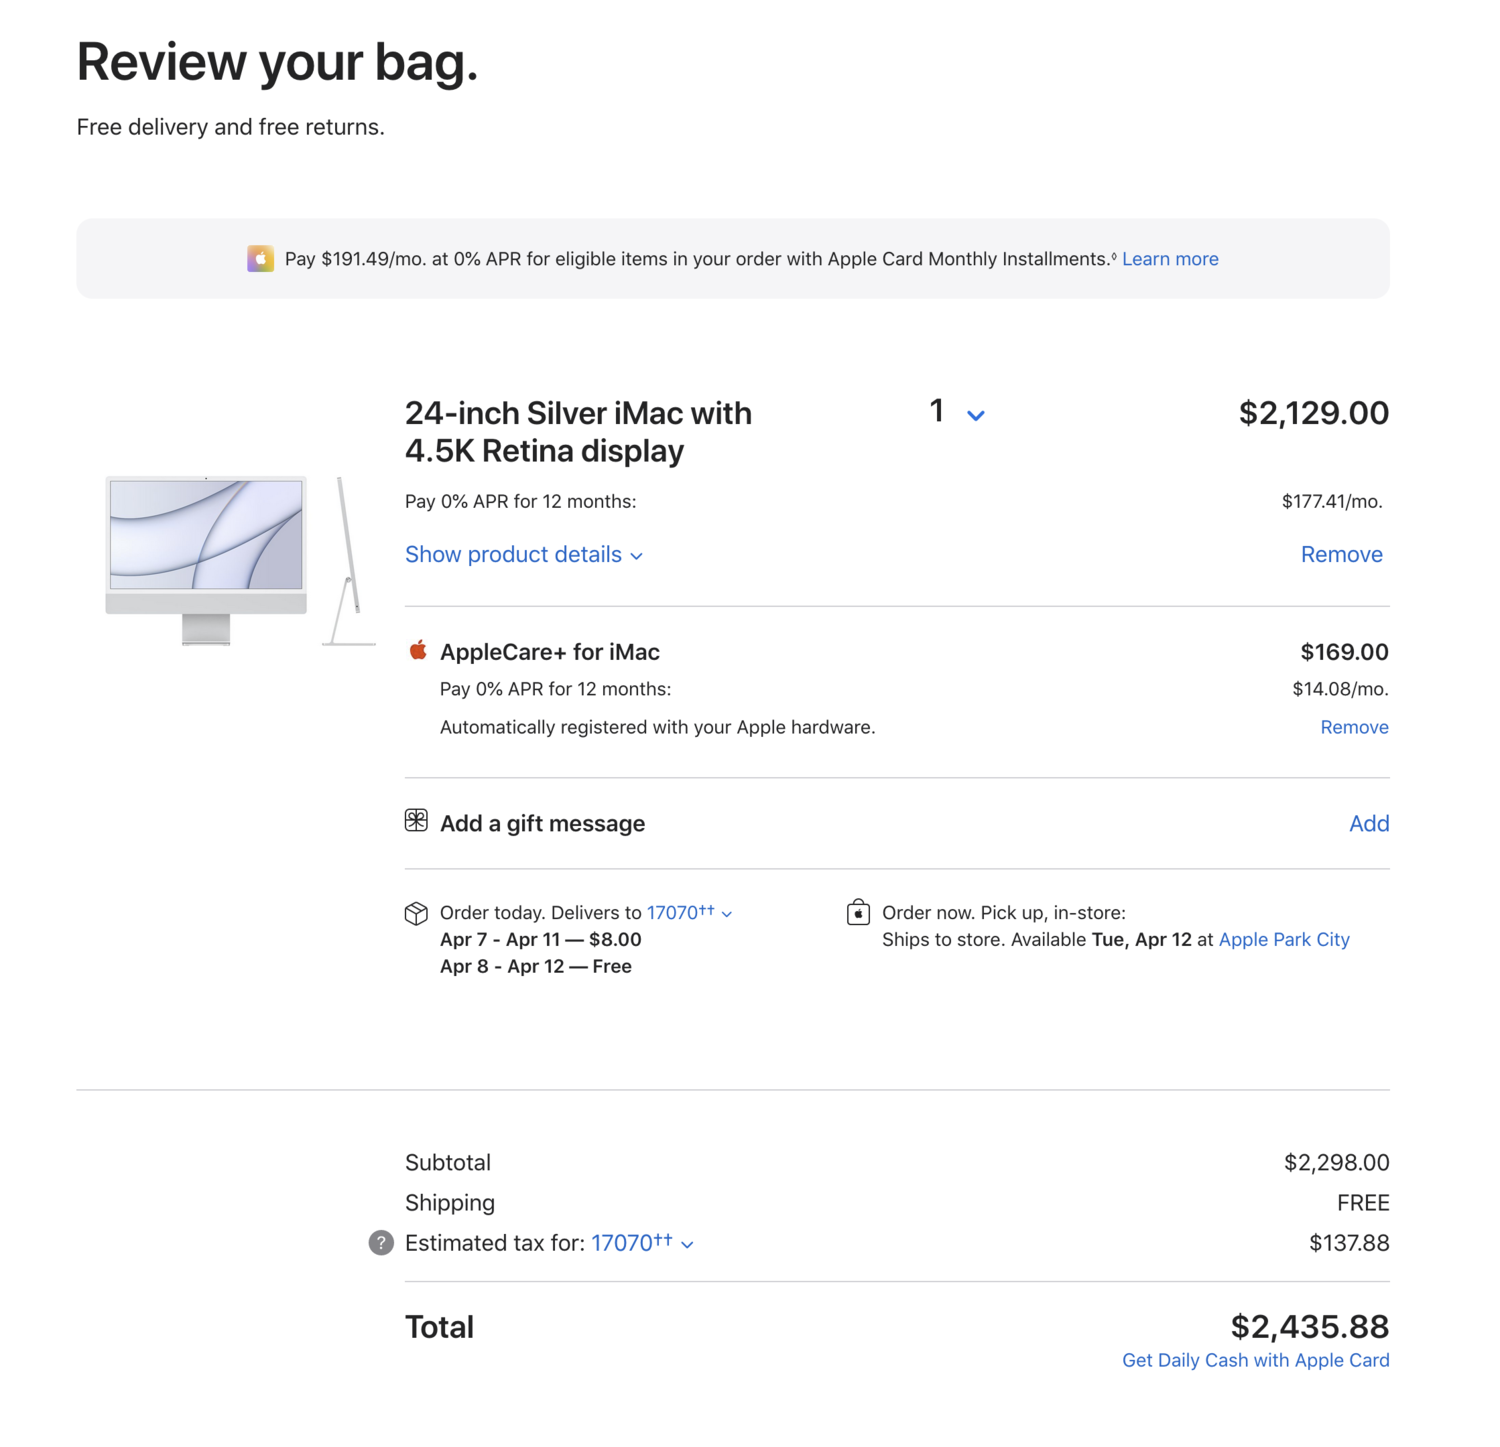
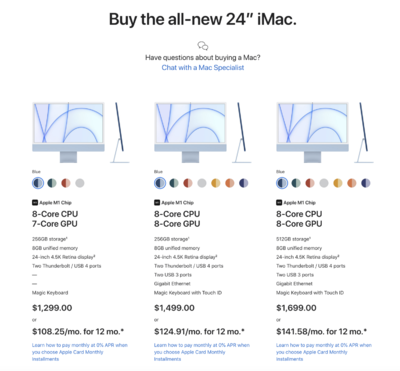
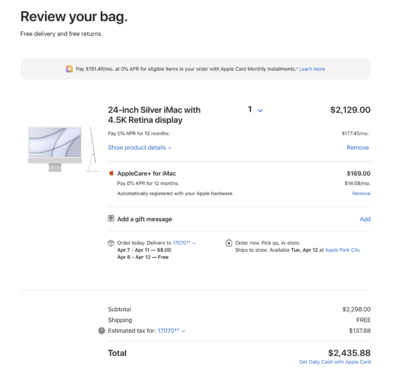
OK, good. That's a healthy budget. Now if anyone else comes across this thread, the only reason that I am recommending this model is that Kathy's sister IS NOT EDITING PHOTOS!! For "General Computing" and a budget of $3000, I'd recommend a 24" iMac, but with a few upgrades. Since the new 24" iMac is basically a sealed unit, and the RAM & GPU is "unified" with the CPU, meaning the RAM, Graphics Chip and CPU chip are all integrated on a single chip, there is NO UPGRADING AFTER THE INITIAL PURCHASE. So it's important to configure things correctly now to get the most life out of your computer. First, head to the 24" iMac Section. Start with the model all the way on the right, yes...this is the most expensive option, but with this model, it has all upgrades available. Then select the color you wish. Personally, I'd pick Silver but that's just me. Then Click the SELECT Button for the $1699 24" iMac. Now start upgrading things: Upgrade the RAM to 16GB Upgrade the HD to 1TB Upgrade the Keyboard (Optional) Personally, I find the Keyboard with the built-in number pad is totally worth the extra $30. If she likes the small keyboard you can leave this at the default. The real important thing is to upgrade the RAM and HD. Click Add to bag. Then select three years of AppleCare for $169.00. (Prices may vary depending on your Country, I'm in the US.) Yes, AppleCare is worth it. Apple is the only one who fixes their stuff. Authorized Repair Centers are few-and-far-between. Click Add to bag, then click Review your bag. It should look like this: The cost of my configuration, including my local sales tax is $2435.88. So call it $2500-ish for a 24" iMac, depending on your local tax rates. Shipping is free so that's a plus. This fits well within her $3000 budget. Now, when I configure things, I have a 7 year time-frame in mind; I want my computers to last at least 7-8 years. This is why I feel that it's important to upgrade to 16GB of RAM and increase the storage to at least 1TB. While it's true that the M1 Chip treats RAM more efficiently, and 8GB on a M1 Chip is more like 16GB on a Intel CPU Chip, RAM is RAM, and if you are the type of person who likes using Chrome with 150 tabs open, "Because they are all important!!" you are going to want 16GB of RAM, which acts more like 32GB of RAM on a Intel CPU. Make sense? Plus, since it's built on the CPU chip and in 4 years time you are finding that 8GB just isn't enough...too-bad-so-sad, you are buying a new Mac to get more. I'd rather spend a few hundred now than a few thousand in 3-4 years. Buy it Right...Buy it Once. Why do I NOT recommend a 24" iMac for photo editing? On the surface it looks fine, but you can not calibrate the screen!! That's right, even the modern Calibration Devices such as the SpyderX line ARE NOT COMPATIBLE WITH THE 24" IMAC DISPLAY!!! Hopefully things will change because since Apple quietly discontinued the 27" iMac, it's really difficult not to recommend a Mac "That's Good for Photo Editing..." at a $5200 price-point. Apple has a hole in their line-up; we have a "General Computing Model," such as this one we are talking about, but not "Advanced" Model that is good for Photo Editing that is "Affordable." Sure, there is the new Mac Studio and 27" Display, but by the time you are done you are around $5200 for a stupid Mac Computer. That's an insane amount of money to spend on a computer, but welcome to 2022/2023 pricing.
-
Pretty much anything is on the table, it all boils down to her budget. The current range of Mac products CAN NOT be upgraded after the fact, so things like adding RAM in a year and maybe upgrading the HD etc., those things are off the table. You are stuck with choosing Apple's over-priced upgrades at the time of purchase. Speaking of overpriced, it's 2022. Prices are triple for what they should be. The nice part is Apple does keep the prices pretty much the same, however; what you get for your money is a lot less so she needs to be sure on what she is buying. Apple has always been a "Go Big or Go Home" type of company. You get a better value spending more money. So I guess before I start linking to a bunch of things, what is her budget? (Hint: It needs to be triple or at the very least, double of what she wants to spend.)
-
First question, what size is your screen? 27” or 21.5”?
-
What happened to the 27 inch iMac??
Brian replied to Michelle Pena's topic in The Macintosh User Group
I believe so, though I'm not 100% sure. Just make sure you have the latest version of the Calibration Software for your particular device. Speaking of which... Bad news. Well it's not THAT bad, but there is something you should be aware of. I don't care how "Compatible" Apple claims their M1 chips to be, but OLDER SOFTWARE IS NO LONGER IN YOUR VOCABULARY!! Meaning you are on the very latest of Adobe Photoshop CC 2022 and forget about using PS CC 2019. In fact, ANY software that is not "Optimized" for use on the M1 Chip, more than likely you will have problems. Or it will just be really quirky. I know PS CC 2019, the version you are on, has all sorts of issues with the M1 chip, forget about the newer just-released M1X chip! Photoshop CC 2019 is so bad that Adobe's "Fix" is for people to upgrade to the absolute latest version of PS CC 2022. Which isn't terrible, but it seems that with each release, Adobe always finds a way to make their software more bloated, act weird and less compatible with every release. LOL!! Oh, and the new Macs are coming with MacOS Monterey, which as of now has had a few updates and is mostly stable. Anyway, before forking out lots of money, take a hard inventory on the software you use on the computer. EVERYTHING. Calibration Software, CleanMyMac X, Adobe's products, etc., all of it; make sure that software is "Optimized" for use on the M1 chip. Or is certified to work in some way. Fortunately, software that is meant to be compatible with the M1 chips usually state something in the update notes. Bottom Line: At least for the next year or two, you are really going to have to pay attention to the software that will be used on your new computer. It needs to be programmed for use with the M1 chip and the latest version of the MacOS, Monterey. -
Buy Brian a Beer!!
-
What happened to the 27 inch iMac??
Brian replied to Michelle Pena's topic in The Macintosh User Group
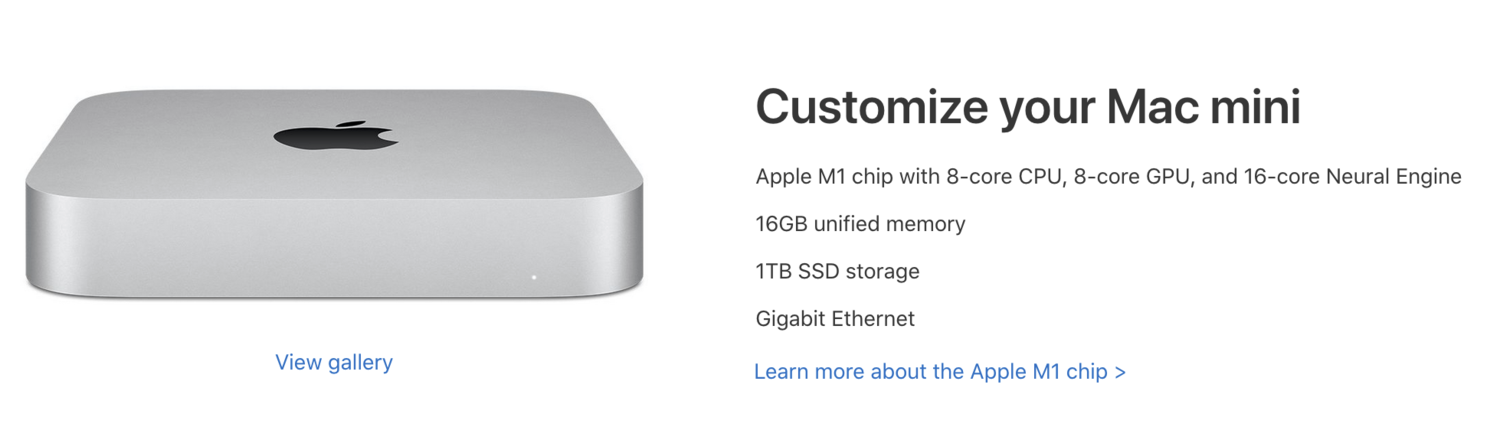
MacBook Pros are a complete waste of money. Granted, they are popular, but you are still spending around $4000 or more to get one that is "Good for Photo Editing." I also hate laptops, LOL. So i'm probably the last person you should ask. The thing with Windows computers, is they aren't cheap in 2022 either. Gone are the days of buying a computer for $999 that's "Decent Enough." Nope. It's more like $3000-ish. Here is the LG 5K Display that I was talking about. Apple worked with LG to come up with this Display and it's a good match for the M1 Mac Mini: LG Monitor 27MD5KL-B Ultrafine 27" IPS LCD 5K UHD Monitor for Apple Mac - $1349. Apple Mac Mini with 8-Core CPU, 16GB RAM and 1TB HD - $1299 So that's $2648 before applicable Tax, Shipping and AppleCare. This configuration will be the cheapest. If you want to have everything Apple, you can buy the new more "Affordable" Apple 5K Display and pair it with a Mac Mini.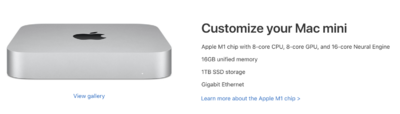
-
What happened to the 27 inch iMac??
Brian replied to Michelle Pena's topic in The Macintosh User Group
Yeah, the M1 chip utilizes RAM much more efficiently than a Intel Chip. The downside is your software really needs to be optimized for the M1 chip. So if that photographer is not using the latest version of LR CC, there could be all sorts of weird issues. The problem with the 24 inch Mac OS that they can’t be calibrated as the screen panel is incompatible with even current caliber tools like the SpyderX Elite. So there is a bit of a waiting game. The “Cheaper” configuration is basically using a Mac Mini and a LG 5K Display. But don’t get your hopes up, welcome to the new pricing that’s here to stay; it still won’t be cheap. -
Once you get all of your Hard Drives, I want you to go into Disk Utility and verify THE PARTITION TYPES!! HD Manufacturers have gotten lazy and drives today come pre-formatted using exFAT for a Partition Type since they work on both Windows and Mac Computers. It's the easy way out and cuts down on their support calls. The downside is exFAT is basically a "Garage Project" that Microsoft came up with, but isn't main-stream. It's also not as bullet-proof and I wouldn't use it with any data that you can't stand to lose. So in a nutshell, pick a format and stick with it. A Macintosh Partition or a Windows Partition. Pick one. I can help if needed. Just don't go crazy and start copying stuff over to your new EHDs without checking things first. I'd hate for you to have an issue in 8-9 months and lose all your data because exFAT isn't 100% bullet-proof.
-
Prices are still double / triple than what they should be. COVID and supply shortages and all the BS happening in the world, have driven up prices. It's not just technology and things like Rent, Food, Housing have all increased. Homes around me 5-8 years ago would have been $250,000 - $300,000-ish are now starting in the low 400's. Granted, I'm fortunate to live in a cheaper area on the east cost of the US, but still...almost half-a-million for a stinkin' new house that's built like crap is a little unsettling. My salary hasn't increased much either. Anyway, back to computers... A Windows Computer that's "Good for Photo Editing" has historically always been cheaper, are now $2400-$3000 on the average. Not including the cost of the Display if needed. The 27" Intel iMacs were right around the same price-point, though in the $3000 range. I've never seen where a Windows Computer and Mac were around the same price since 1984!! Let that sink in; Macs have always been priced more. So Apple, and other manufactures are trying to make up for lost revenue. I am thinking of a Mac Mini Configuration with a LG 5K display, though good luck getting the display. Either way, that price will probably be around $4000-ish. Look for my article later this week. Edit: We have gotten used to "Cheap" prices with Macs. In 1984 a 128K Macintosh with a B&W 10" screen was $2495. Adjusted for inflation, that is $6813 in today's money. So Macs are still "technically" cheaper than when first introduced and are way more powerful. Still sucks for your wallet though.
-
What happened to the 27 inch iMac??
Brian replied to Michelle Pena's topic in The Macintosh User Group
Unfortunately, Apple quietly discontinued the Intel 27" iMac. There is a "replacement" for lack of a better term, but your Wallet isn't going to like it. At all. Budget should be around $5200. I'm a little busy today, but an updated article for a Mac that's "Good for Photo Editing (2022 / 2023 Edition)" will be written shortly and posted this week. -
Switching an external hardrive to new PC
Brian replied to Dena Dendy's topic in The Windows & PC Hardware Forum
Nothing special, but the Drive Letter is dependent on what the OS deems on your new computer. You can always change a Drive Letter, that's pretty straightforward. Plug in your EHD into the new computer and go from there. Let me know if we need to change the letter or not. -
I just re-read your original post above. You have a 21.5" 2017 iMac. You have two TB3 ports. They are the USB ports between the Ethernet Port and the USB ports. For reference: https://support.apple.com/guide/imac/take-a-tour-215-inch-imac-and-27-inch-imac-apddfab3bd1b/mac
-
You get today's GOLD STAR!!! That is EXACTLY what should be on the desktop. Believe it or not, you are the first person in MONTHS that does things correctly. I mostly deal with people that have THOUSANDS of files / images on their Mac Desktop and then they come in here complaining that their fancy new Mac is acting sluggish. There is, but you'll need to delete the existing APFS Partition, create a new one and format it. Takes about 5 min to accomplish, but like I said, you'll need to Nuke that drive so make sure you get stuff off of it first, THEN we will convert it. ALL of my important Photos are on my 12TB Thunderbolt 3 G-Drive. Thunderbolt 3 is FAST it's almost like working off my internal HD. So if you do have a TB3 Port and aren't taking advantage of it, you are missing out. It's way faster than USB 3.0. As for the photos on my internal drive...come to find out (I just checked,) I do. But these photos are minor and might be the result of auto-importing stuff, which I normally don't do. Hmm...I'm going to have to do a little house-keeping myself. Though the quick check that I just did, they aren't THAT important. But assuming that everything is on my external is not correct. Sandisk now owns G-Drive. So it's probably a G-Drive. LOL!! That said, Thunderbolt 3 is still faster, especially if you only have USB 3.0 ports. You'll need USB 3.2 Ports to take advantage of any speed upgrades. TB3 ports look like USB-C Style Ports, so check your Mac. You might have one or two of them not being used.
-
You may find the lights work fine for other subjects. This is one of the things about Photography, "Know your gear..." I know it's not as fun as buying something to "Take you to the NEXT LEVEL!!" but knowledge is knowledge and it's FREE. So these lights don't work for pets. Try something else.
-
Umm…yeah. That’s like an Alien Bee. There is a difference between a light that is a few hundred (or less) and one that is $2000. Here is what I would do: Rent some better lights. Figure out which ones work for you. Granted, you may find out you need a fancy $2000 Profoto Light or can get away with a Einstein 640. There are so many different lights on the market and it’s hard to recommend one. The two that I mentioned are good starting points. Another thought is to invest in Continuous Lights. In either case, you have proven the problem is coming from your new lights and I don’t think there is a way to fix it…it-is-what-it-is.
-
It’s probably the flash duration. Speedlights are BAM!! and then turn off. Lights with a longer durations are more of a Phoomph!! and the light hangs around. So what’s happening is the light being produced by your new lights is hanging around and the light is bouncing around inside the Dog’s Eyes and causing your issue; it’s just like a person with Red Eye in photos. If you are shooting Animals on a normal basis, you might need to ditch these lights and get better/more expensive ones that have a quicker duration. What lights are you shooting with? Alien Bees?
-
Should I upgrade my iMac? Or just the RAM?
Brian replied to Ashley Jayde's topic in The Macintosh User Group
Sigh. It’s a 21.5”. There are RAM slots on the motherboard, but you need to find a local repair shop that will do it since you have to COMPLETELY TAKE THE ENTIRE DAMN MACHINE APART TO ADD RAM! Why? Because there isn’t an access panel on the back of the computer to make adding RAM easier Honestly? It’s a 21.5” Model, and Apple has purposely crippled that line. Slower CPU, slower Motherboard, Slower HD, and a Video Card that PS can’t utilize. With today’s modern Photoshop, the choice of Video Card is just as important, if not more important than choosing the right CPU! The 21.5” iMacs are meant for general computing, not Photoshop. How people get sucked into them is the lower price-point; not everyone can fork out $3000-$4000 for a computer and I totally get that. It’s just unfortunate that they don realize that they are throwing money away until things like PS become so laggy and slow. Now for even more bad news. Apple quietly discontinued the 27” iMac. I just configured the model that will replace it, a model that I feel that will be a computer that’s “Good for Photo Editing.” Yeah…it’s 2022 prices are double if not triple on what they should be. The cost for this new iMac? About $5100-ish. (Depending on your local sales tax.) That’s right, over $5000 for a new Mac in 2022 that’s good for photo editing Personally, I’d take your iMac to a repair shop, max out the RAM and deal with the slowness for now and save-save-save. Yes, you need more RAM, but also need to have realistic expectations since it’s a 21.5” iMac. But this is better than spending over Five Grand. How much you should get? If you can upgrade to 32GB, get 32GB. Or if by some chance you can go as high as 64 (very unlikely) go that route. You want to upgrade the RAM once since the whole iMac needs to be taken apart. (Oh, I personally wouldn’t attempt this, and I’ve been a Professional Technician for almost 30 years.) -
OK, refresh my memory. You had some sort of AMD Radeon Graphics Card. What was that exact Make/Model Number of that Video Card again?
-
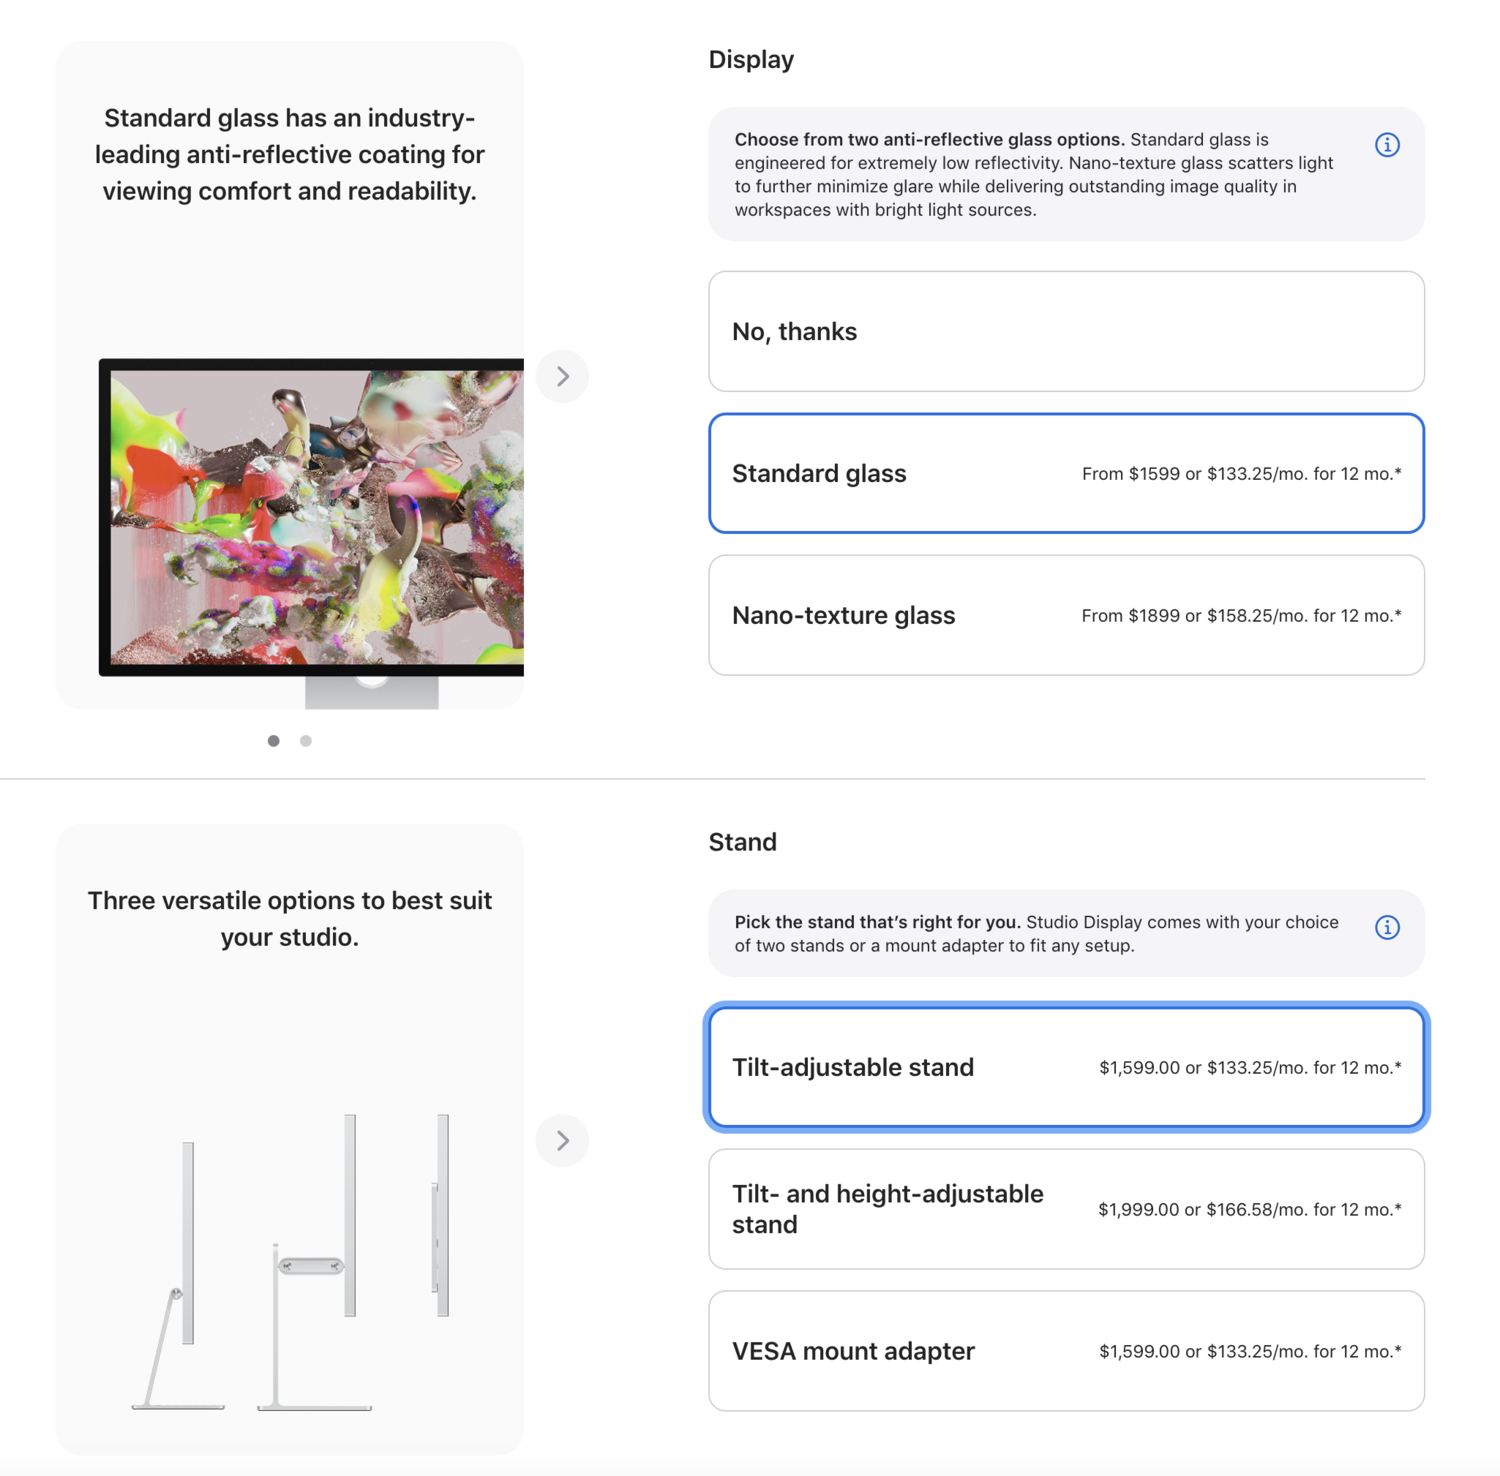
OK. I'm now sitting at my computer and have checked out Apple's Website. As I've stated above, Apple quietly discontinued the 27" iMac. There is a potential work-around, and it's basically buying a 27" Mac that is not an "All-in-One," but a Classic Display / Computer setup. Which isn't a "Bad" thing, just different. Chances are, my next Mac in the future will be something along those lines. The downside, your wallet needs to brace-itself. Buy a M1 "tricked-out" Mac Mini and purchase a new Mac Studio Retina Display. This is where it gets a little expensive as with any M1-based Mac, you need to purchase the "extras" various OVERPRICED Upgrades at the time of purchase. No trying to upgrade things after the fact. If you want to upgrade, you are buying a new computer. Period. Now, I'm sure someone will try and tell me that I'm wrong, and that you don't "NEED" certain items, because it's not an Intel CPU, but I am a firm believer in "Buy it Right - Buy it Once." When I configure my computers, I have a 7-8 year time-frame in mind. I do not like buying a new computer every 3-4 years, but ALL Manufacturers today want you to do just that; buy a new computer every 24-36 months. Why bother fixing it? Why bother making a computer that lasts? There is MONEY TO BE MADE!!! LET'S GET YOU BACK IN THE MARKET SOONER RATHER THAN LATER!!! OK, I'm really digressing here and I need to write that updated article. Anyway... The Mac. Basically pick one. A tricked out Mac Mini is an option. So is buying a new Mac Studio, which is what I'd probably buy. Apple seems to be splitting the 27" iMac in to two components for more flexibility. For lack of a better term, there is what I will call a "Standard" Mac Studio and an "Enhanced" Mac Studio. They are basically the Standard Model and Performance Model, or a "Pro-sumer" Model and a "Professional" Model. Or...one that is meant for still photos and graphics, the other for more video and music production. Basically, pick-your-poison and your price-point. It's only Money, right? OK, now that's out of the way, here we go... For the majority of Photographers, this is what I picked for the "Mac Studio" and as of right now, what I would personally purchase today: Start with the new $1999 Apple Mac Studio on the left, and upgraded a few things: Upgrade the CPU to the Apple M1 Max with 10-core CPU, 32-core GPU, 16-core Neural Engine Increase the RAM to 64GB Increase the Hard Drive to 1TB Then add AppleCare It should look like this: Click Continue, this will take you to the screen where you can choose the Display Pick the Standard Glass Pick the Tilt-Adjustable Stand Add 3 Years of AppleCare Service It should look like this: Click "Add to Bag." At this point, you have the option of purchasing a new Mac Keyboard with Number-Pad (The Number Pad is totally worth it) and Magic Mouse. Keep in mind, there are two colors, a Keyboard with Black Keys and one with White Keys. Same thing goes for the Magic Mouse, there is the classic White Version and now a newer Black Version. You could save a little here and use a Keyboard & Mouse from an older iMac, or purchase this one without the Touch-ID feature. That said, many some people like everything to match so for this example, we will add both of the same color. I'm choosing White. Alright, still with me? Now it's time for your Wallet to Cry-out in PAIN. The cost for all the items in your cart is now $5093.30. Depending on your region, Tax & Shipping may more may-not be added, but it will be listed. At this point you are probably looking around $5000 give-or-take before applicable Shipping and Tax. That pains me to type that. $5100 for a Mac, that's not even a Mac Pro!! Apple really wants you to "Go Big or Go Home" and people thought the 27" iMac for $3800-ish (tricked-out) was expensive. Welcome to 2022 pricing!!


-
That is BAD. Very Bad. Move those images off that TM Drive. Keep your Time Machine Drive separate from everything else. While technically you aren't "breaking" anything, the more Icons / Files / Folders (aka CRAP) you have on your desktop, the slower your Mac runs. The only thing that should be on your Mac Desktop is the HD Icons and shortcut files called an Alias. Now granted, I myself will put things on the Desktop to keep things simple. The problem is when people use it for long-term storage. "I haven't had any problems..." Yeah, I get that a lot. A person could also say they routinely drive 100MPH / 160KPH and have never gotten a speeding ticket. LOL!! It's your Mac. It's important to stay current with CleanMyMac. The current version is CleanMyMac X. What trips people up is they hold onto say, CleanMyMac 2 or CleanMyMac 3 and run it on a modern OS. Then they come in hear wondering why CleanMyMac screwed up their computer. In 2022 the days of holding onto software for 10+ years are over. You must stay current for the best results, or at the very least don't upgrade things (which causes problems eventually all by itself,) to keep all the version levels even. Talk about complicated. Ask any Engineer, the more complicated you make something, the greater the chance of things going horribly wrong. Pick something and fix it. Start moving Photos off the TM drive and personally I'd recommend formatting the TM drive and then run a fresh TM backup will fix the TM issues. But I can understand if you don't want to nuke that drive. Still, get those photos off of that TM drive. Put them ANYWHERE but the Mac Desktop and the Time Machine Drive. Also, BackBlaze and other Cloud Storage Services: They are NOT Fool-Proof. You must read the fine print. I think it's BackBlaze that will delete files automatically after 30 days if they aren't stored locally on your computer. So you might think things are backed up, then clear stuff out of your HDs...only to find out two months from now those files are GONE. So make sure things are where they are supposed to be. At least for the really important stuff. If I'm wrong, perfect. Your files are still there and your world is happy. If I'm right, then you have discovered something and can be pro-active. APFS is Apple's newest Partition Type. It's perfect for SSD (Flash Based) Media. Spinning Platter / Traditional HDs? It's best to use MacOS Extended (Journaled). The Windows equivalent to that Partition Type is "NTFS." Hell to the YES!! I have Two G-Drives sitting on my desk as I type this. A USB 3.0 4TB G-Drive that is currently running a TM Backup and a Thunderbolt 3 12TB G-Drive that houses my photos / Data Files. G-Drives are my default recommendation. Especially the beefy Enterprise-Grade 7200RPM Models. I never cheap out on my Hard Drives. Big, Beefy, Robust are the ones I like. Yes, they cost more but guess what also costs money (and stress?) Data Recovery. Not the Data Recovery with free software...no, Data Recovery where they transplant HD platters in attempts to get your data back. Way more expensive than a $500 fancy HD.
-
Send the lens to Canon. Fine Tuning the AF is a little over-rated. If it's THAT BAD, send it to Canon to have them look at it.
- 1 reply
-
- 1
-