-
Posts
210,653 -
Joined
-
Last visited
-
Days Won
3,423
Everything posted by Damien Symonds
-
How did you go, @Brandicm?
-
@StudioPopJess?
-
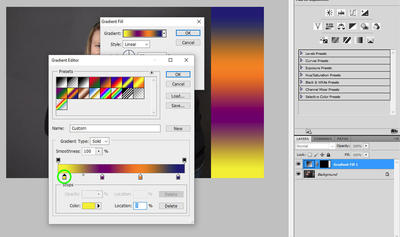
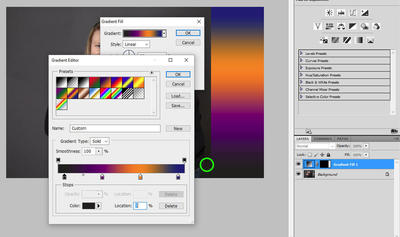
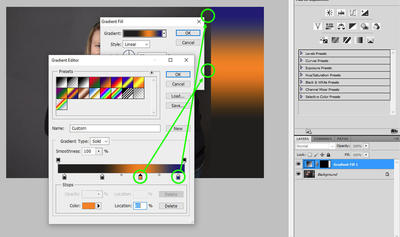
Needless to day, you can add more colour markers if you need to, and you can move the position of any of the colour markers.
-
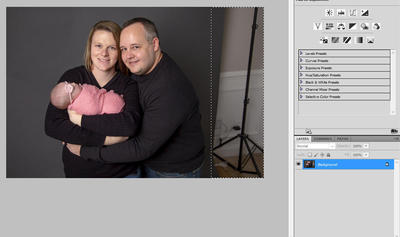
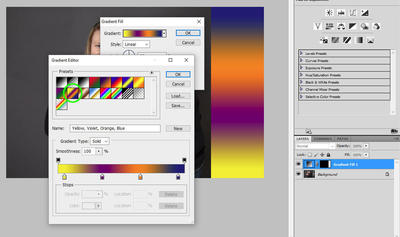
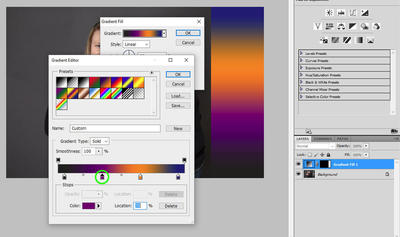
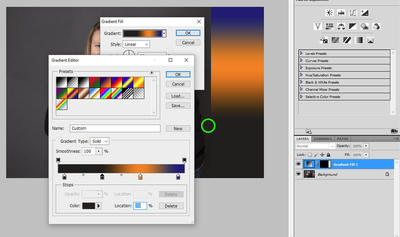
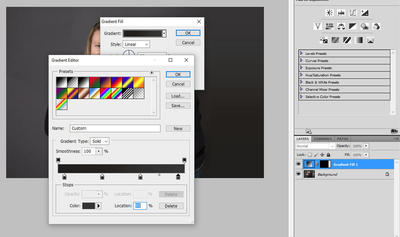
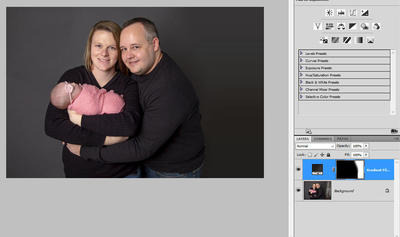
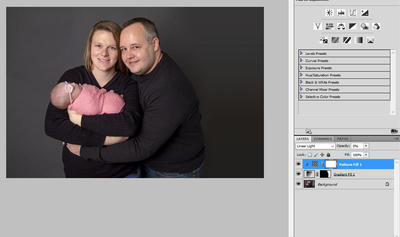
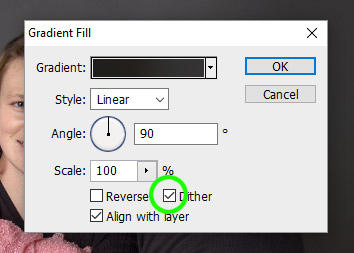
It's really really easy. As you probably already know, the solution is a gradient layer. I've written about it here: https://www.damiensymonds.net/preventing-banding-in-backdrops/ This tutorial is also important, please read if if you haven't already done so: https://www.damiensymonds.net/2012/10/using-photoshops-gradient-layer.html Sometimes these gradient background fixes can be rather complex, involving multiple layers. But yours is blissfully easy. First, make a marquee selection down that side. Make it just wide enough so that the left-hand edge of the selection encompasses the existing backdrop: Then add a Gradient layer, and choose a nice colourful preset with a sufficient number of colours. Sometimes two or three are enough, but for this one, let's choose the four-colour preset: Single-click on the first swatch: Then single-click on the real backdrop just beside that colour on the image. This will immediately change the yellow colour to the correct dark colour: Then do the same with the next colour. Single-click on the marker ... ... then single-click on the proper colour right beside the purple on the image: Do the same for the remaining colours: Voila! Here is the result: Press ok to the Editor window, to return to the first Gradient window. Make sure "Dither" is checked: Then press OK to that as well. Then hide the gradient with a black mask, then paint on with a nice soft brush to make it blend naturally. In this screenshot I've enlarged my Layers panel so you can have a slightly better view of the softness of my mask: Finally, add the noise layer (per the first link I gave at the beginning of these instructions): Piece of cake.
-

Is this a preset?
Damien Symonds replied to seraphim's topic in How to achieve a certain look or effect
Can't wait to see some of your creations! -

Is this a preset?
Damien Symonds replied to seraphim's topic in How to achieve a certain look or effect
SelCol has some similarities to Hue/Sat, but for this kind of work, Hue/Sat is definitely the one you need. -

Is this a preset?
Damien Symonds replied to seraphim's topic in How to achieve a certain look or effect
(By the way, when you want to change the colour of the greenery, go to "Yellows" not "Greens".) -

Is this a preset?
Damien Symonds replied to seraphim's topic in How to achieve a certain look or effect
Here's a suggestion for your playing: Add two Hue/Saturation layers to your photo. For the top one, simply move the Lightness slider on the Master channel to about +10. Then on the bottom one, change its blend mode to "Hard Light". Then start playing with the sliders. Play play play. Play with the sliders on the Master channel first, then tweak the individual colour channels after that. -

Is this a preset?
Damien Symonds replied to seraphim's topic in How to achieve a certain look or effect
https://www.damiensymonds.net/2015/07/creamy-silky-perfect-angelic-skin.html -

Is this a preset?
Damien Symonds replied to seraphim's topic in How to achieve a certain look or effect
-

Is this a preset?
Damien Symonds replied to seraphim's topic in How to achieve a certain look or effect
-

Is this a preset?
Damien Symonds replied to seraphim's topic in How to achieve a certain look or effect
How far back does this problem go? -
I'm so sorry, I don't know. This is entirely new to me.
-

Is this a preset?
Damien Symonds replied to seraphim's topic in How to achieve a certain look or effect
Oh crap! https://www.damiensymonds.net/art_tscs000.html -
May I know your name?
-
Sorry, I don't understand this. How/where do you mark fonts with a star?
-
For the fourth one, a Channel Mixer layer with these values: Red channel: +100, 0, 0, 0 Green channel: +58, 0, +40, -11 Blue channel: 0, 0, +120, -21 Mask to the glare area first, then you'll see it has discoloured the whites of her eyes (and the catchlights) a little too much, so mask those areas off very slightly with a low opacity black brush.
-
For the third one, this is the best I can offer: Download PSD
-
For the first and second ones, they're very easy. Just add a Solid Color layer and choose a skintone colour, then change the layer's blend mode to "Color", and mask it on to the problem areas.
-
Well ... exactly the reason I said. Because with a solid black background you don't need to artificially create any edges of the lady.
-
If you don't choose a solid black background, it will be necessary to artistically create an edge around the lady which doesn't presently exist. And I fear you don't have the necessary Photoshop skills for that very difficult task yet. I urge you to stick with black for this one.
-
How did it go, @Dianna Cameron?


