Damien Symonds
-
Posts
212,193 -
Joined
-
Last visited
-
Days Won
3,494
Everything posted by Damien Symonds
-
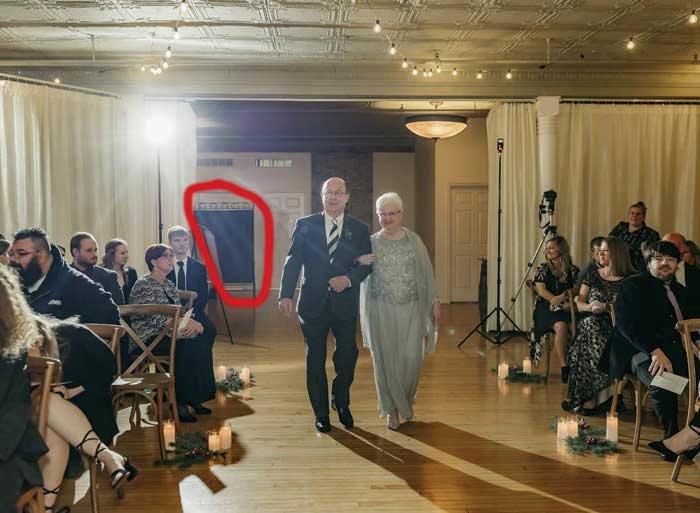
This black screen thing is the key to it: Add a Levels adjustment layer, then choose the little black eyedropper in the levels panel, and click on that screen to force it to be black. (This will make the whole photo crazy black) Then invert the mask. Then use a big 10% white brush to broadly paint over the hazy area, to apply a gentle amount of the blackness that you need.

-
 @Samantha Vivenzio have you tried soft-proofing yet? What did you discover?
 -
lol, no, the one without the light stand is BIGGER. Never crop AT ALL. Period. https://www.damiensymonds.net/2011/09/cropping-tutorial.html
-
Ps v25.5.1
Damien Symonds replied to Miguel's topic in Photoshop / Elements / Bridge / ACR questions or problems
Well, I updated to it, and it's been okay for me so far. -
Flick between the two, and see the different crop.
-
I gave you very precise numbers based on the exact image you'd given me. This one: But the image you applied my numbers to was different. A different crop, and a different edit. That's why my numbers didn't work for you.
-
This is a different version of the photo than you posted for me before?
-
I assume a combination of channel mixer and https://www.damiensymonds.net/2011/01/ridding-pesky-rainbows.html
-
I'd say the flare can be fixed. Her face can be improved, but I doubt the haze can be removed altogether.
-
...Order some prints right away...
Damien Symonds replied to Françoise B's topic in Questions about tutorials and articles
I found this thread: https://www.facebook.com/groups/askdamien/posts/3761344393925733/ -
...Order some prints right away...
Damien Symonds replied to Françoise B's topic in Questions about tutorials and articles
Soft-proofing is explained here: https://www.damiensymonds.net/2010/03/bit-about-soft-proofing.html But as I said, you can't do it yet, because you haven't calibrated. So I urge you to put it out of your mind for now. -
...Order some prints right away...
Damien Symonds replied to Françoise B's topic in Questions about tutorials and articles
Yes. HELL NO. Your files must always remain in sRGB. Semi-gloss. Sometimes also called Lustre. Oh, this is SO regrettable If you use this lab, and are successful in calibrating your screen to match their prints, you need to accept that your online photos will look too blue to everyone else. This is not the greatest tragedy in the world, but it's not ideal. Soft-proofing can only be done AFTER you are successfully calibrated. You must ignore this part for now. -
From Bridge there are two ways to open a raw file. One is Ctrl O, the other is Ctrl R. Have you tried both?
-
Cropping
Damien Symonds replied to KimMoore's topic in Output - print, websites, Facebook, email, client disk, etc
First, crop to your liking with NOTHING in the options bar. Then open the Image Size window, make sure the "Resample" checkbox is checked, and the units are set to pixels, then literally replace the largest value with 3000.
-
Cropping
Damien Symonds replied to KimMoore's topic in Output - print, websites, Facebook, email, client disk, etc
Do you see it? -
Cropping
Damien Symonds replied to KimMoore's topic in Output - print, websites, Facebook, email, client disk, etc
What site is it? -
Cropping
Damien Symonds replied to KimMoore's topic in Output - print, websites, Facebook, email, client disk, etc
Um ... I don't understand what you don't understand? You're cropping to 4 pixels by 6 pixels. That's TINY! -
Cropping
Damien Symonds replied to KimMoore's topic in Output - print, websites, Facebook, email, client disk, etc
Screenshot please. -
Color LCD is fine. Once you get a calibrator and calibrate her laptop, the calibration profile will automatically replace that.
-
Right. If this problem persists, you might need to roll back to Photoshop 24.
-
See where it says "RGB" in that little pull-down at the top? That's where you find the individual channels.
-
No, but it might mean you have to roll back one version of Photoshop, and stay there. Which version are you running at the moment?
-
Calibration results suddenly different
Damien Symonds replied to Glen.W's topic in Monitor calibration questions or problems
Great! Then I'm not concerned about the curve at this stage. But if it continues to increase, a print match might be harder to achieve. -
What? I just told you how to fix it.