

Brian
-
Posts
4,137 -
Joined
-
Last visited
-
Days Won
55
Everything posted by Brian
-
Notebook? You mean My Book? I'm not understanding.
-

How do I prevent my iMac from going to sleep?
Brian replied to DaniGirl's topic in The Macintosh User Group
Yes. Though I would set your slider to 15 min or turn on a screen saver. (Just like my screen shot above.) You don't want your display idling. While LED based displays aren't as prone to burn-in as older plasma-based displays, it is still good practice to either let them go dark or at the very least display a screen saver for long periods of inactivity. Head to your System Preferences and click on Desktop & Screen Saver. Click the Screen Saver Tab at the top. I usually choose "Flurry" in the left column for my Screen Saver. Then set the time to "Start after 10 Minutes or even 20 Minutes" if you prefer.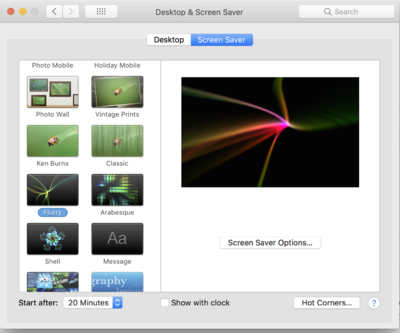
-
How do I prevent my iMac from going to sleep?
Brian replied to DaniGirl's topic in The Macintosh User Group
Head to your System Preferences. Click on Energy Saver and uncheck the box "Prevent Computer from Sleeping Automatically when the display is off." at the top. Also make sure "Wake for network access" is checked as well. If you have a laptop, this option may not be available. Here is a screen shot from my iMac:
-
16 bit work crashes photoshop what to look for to solve
Brian replied to Awsomesauce's topic in The Macintosh User Group
You ordered the correct kit. The problem is the existing RAM in your computer. In order to get 32GB (or more if you have a 2017 iMac) you need two 16GB kits. So just buy the same exact part number and remove the existing RAM (the 4GB Sticks) and you will have a quantity of four, 8GB sticks for a total of 32GB of RAM. Most people will work fine with 16GB or 24GB but for those working on large files, like 16-bit images, editing video, or those people that have three browsers open with 50 running tabs each will benefit from 32GB RAM. So just find your receipt from your Crucial Order and purchase the same part number. It usually starts with "CT" or something along those lines along with a 8 or so digit code. If you want to keep file sizes manageable, don't flatten during editing. Honestly, Damien has been doing this a long time and I'd follow his directions, 16-bit before delivery. Editing in 16 Bit has it's place, but not for the normal 99% of editing. It's used when we need to work with more data / stuff in the image file to fix specific problems, like banding among other things. -
16 bit work crashes photoshop what to look for to solve
Brian replied to Awsomesauce's topic in The Macintosh User Group
I’m thinking your problem is one of two things: 1. MacOS Mojave. That OS seems to have a lot of quirks when it comes to PS. There isn’t any fixes that I’m aware of but Adobe has released a few updates 2. The Wanker that Damien mentioned. I’m thinking your techniques of creating your files is causing issues. Especially if your images come from a camera that has a 24MP camera (or more.) Your Files might already be huge and then you are working in 16 bit. ————— For your EHDs...I’m not liking how both of the externals are setup to be used with Time Machine. You don’t want to backup an external to another external while backing up your main drive. Pick a single External HD to be used for Time Machine and ONLY use that EHD for Time Machine Backups. Never-ever store regular data files on your Time Machine Drive. Life is too complicated as it is to have potential data corruption on a TM drive. Since you are working in 16-bit, we also might have to replace your two 4GB stick and install 8GB sticks to get you to 32GB. Run a scan from Crucial.com or find the box / receipt for the 16GB upgrade. RAM works the best if it’s all the same speed and type. -
Think of your computer as a Library. You are the CPU chip, the bookcases are the hard drives, the shelves are partitions and the programs are the books. Are you with me so far? Inside this library are tables and chairs in addition to the books. The Table is the RAM. So say you want to use a program, lets use Photoshop for this example, so you go over to the bookcase and pull out the very large book called Photoshop. You then place it on the table. Now the "rules" state that none of the edges of the book can go over the sides and there needs to be a 1/4" gap between other items (such as other books, one called Bridge) and Photoshop. It all needs to be neat and tidy. The problem is, that the Photoshop Book gets larger and larger. There are also other things on this table. A laptop, a bag of some sort, a lamp, a drink...all sorts of various things. These "things" are background processes/drivers and other programs, that are all competing for space on the table. Since PS is using at least half of the table, the CPU chip (You) needs to spend lots of time shuffling things around, because you need to keep that 1/4" gap between things at all times AND you can't go over the edges of the table. This is the "slowness" that you are experiencing, all that shuffling around since PS is so massive these days. Speaking of Photoshop and resources. Head into the PS Preferences. How much RAM have to told PS to utilize? 70%? 80%? The reason that I ask is if you have that to a high percentage, PS will take more of your available RAM to perform better. Now this isn’t a problem if you have a large amount of RAM, like 32GB, but is an issue with 4GB or 8GB. Therefore if you tell PS to take advantage of 75% of your available RAM, that leaves 25% for everything else, including Windows. That’s why things slow down. Keep in mind, that we are just taking about PS loaded. If you have Bridge, Chrome with multiple tabs open, plus all the other stuff, your 8GB of RAM becomes an issue. Most folks seem to lock into their Hard Drive Capacity; the how much stuff can it hold portion of their computer when it comes to memory. “It’s gotta a 1TB. I’ve got plenty of room...” They also need to pay attention to the other side, where the programs go when loaded.
-
Building a PC, help with specifications please
Brian replied to Kim Fearn's topic in The Windows & PC Hardware Forum
Check out this thread: We configured a Dell XPS 8930 and bumped up a few things. Since you are doing video, you will need a bit more, like 32GB or RAM and more HD. -
Bridge and Photoshop are taking half of your RAM, all by themselves. Plus you have multiple tabs open in Chrome (looks like to be about 9 or 10) and then there is all the other stuff that's running, CrashPlan, Antivirus, Etc. Each time you open a browser tab, it takes a chunk of RAM. LOL!! Also, Chrome is not color managed. I hope you aren't judging any photos from within Chrome. Anyway, you need more RAM. Period. 8GB is no longer sufficient for your needs. Hopefully we can get you to at least 16GB, or even higher, like 24GB or 32GB. Head to Crucial.com and run their Scanning Tool. Post a screenshot of its findings.
-
Interesting. Actually, it's processes that we need to look at. So click on that Tab (in Task Manager) and give me a few screenshots. You might want to click on the top of memory column / portion to display which process is using the most memory. The next thing I want you to do is to head to crucial.com and download / run their scanning tool. I want to see if your laptop can go up to at least 16GB of RAM.
-
Not as much as you think it would. Killing a Service or two will only be a drop in the bucket; meaning you could kill services and only get a 1% boost in speed. I need more info about your computer. Would you mind filling out this form? Details About Your Computer's Health What I did notice is you are running McAfee Antivirus / Web Monitoriing. McAfee is a resource hog. If you let your subscription lag, I've noticed computers get really slow. These days I recommend is Webroot Internet Security Plus. I am very curious about how much RAM you have and how full the HD is.
-
Unless a service is hung up or is using up all of your available RAM, they should be left alone. Why are you in there? If you are trying to get more RAM available, then we should be looking at RAM upgrade options for you.
-
Meh. The sun is at the wrong angle. It needs to be 90° to the camera’s lens for the greatest effect. So I would make an L with either your left or right hand and have your thumb point to the Sun. Your index finger will be where the lens should be pointed at. I would try testing on a sunny day with poofy clouds. Rotate the ring on the CP to make the sky more blue and the clouds white. Oh, keep in mind there will be a loss of a stop or so when you mount the CP. whenever I use mine, I automatically bump the ISO to 400.
-
Continuation from FB - Adobe CC apps won't launch
Brian replied to LauraA's topic in The Windows & PC Hardware Forum
Sweet!!! SSD drives are WAY faster and the bonus? Don't require that much power to run. So you should get more battery life while travelling. As for the RAID, I agree. Having more space is always a good thing. The downside to a RAID 1 setup is data corruption; if a file is corrupted on one drive, it is automatically corrupted on the other drive. I think your problems have been fixed. From what I can tell, I think the majority of issues that people are having with and existing botched up Windows and the latest round of Adobe updates just aggravate things. Since you have a clean slate to work off of, future Adobe updates should not be an issue going forward. Enjoy your new Hard Drives. -
Amazon Polarizer? No. I use a Nikon Circular Polarizer or would purchase a B+W one. My recommendation is to always purchase a high-quality polarizer due to color-shifts on the cheaper models. That said, it's $16.50. I would try it out first and pixel-peep. You might have found a good deal or you could discover a pinkish or orange hue to your photos. Either way it's good to know what you are dealing with before heading out. Now for the strap, that is an eternal question. I use a over the shoulder strap and know what you mean. If you are truly hiking and climbing, you might be better off with a backpack. Which is another Pandora's Box. I almost bought a Mindshift 26L but that bag isn't big enough to hold gripped bodies, like my D4s. I ended up with a ThinkTank Shaper Shifter 17. Now for the darkside to backpacks, sure the Shape Shifter fit ALL of my Gear, when it was all said and done, it was over 40lbs. LOL!!! I think it was about 49 lbs. Ugh. Not the best when hiking all day in the dessert. Going forward, I'm thinking about getting a Nikon D850 and the newer version of the Nikon 24-70 and just stick with that. When playing tourist, that's usually what I end up shooting with 99% of the time.
-
Matt Granger trick to nullify background -is it right way ?
Brian replied to rahullele's topic in Photo Gear & Equipment
The reason that Zack is a white seamless guy is the type of Photographer he is: A Commercial, Editorial and Corporate Photographer. If you go into any supermarket, take a look at their magazine section. 95% of the Magazine Covers will have a person / model on a white background. It’s easy for the Graphic Artist doing stuff to work with a white background. If you have enough room, you can turn a white background to a grey one or even make it black, all by positioning of your lights and the distance between your subject and background. What’s killing you is your lack of room. Especially 7’ High ceilings. The light is just going to bounce around. What you want is 20’ High Ceilings. So you might want to invest in a seamless black / gray background. Thanks for the link I will watch it later on my computer. -
That’s a good example. Another one would be someone who never gets an oil change and wonders why their car breaks down.
-
Continuation from FB - Adobe CC apps won't launch
Brian replied to LauraA's topic in The Windows & PC Hardware Forum
Oh yeah. The Windows 10 updates alone...you NEED high-speed internet. Fingers crossed. -
Just in case you have a corrupted operating system. It's something that you could do that shouldn't cost you any money if you did it yourself. I'm not saying to just re-install windows, I'm saying you nuke the computer (format it and take it back to day #1) and reload everything fresh. To be honest, I have no clue why PS is not seeing your video card or why its doing what it's doing. Since updating the driver seems to temporarily fix things, I'd say you do have a software / driver problem. The only way to fix that type of problem is to remove / re-install drivers, update to a newer driver or if those options do not work, format the HD, re-install Windows and reload everything from scratch. Of course, the third option is the last resort; however, I've been doing this process lately with customer's computers and even their servers. Back in the Windows XP days, I used to format my HD twice a year due to weird issues / garbage that it would collect during normal use. It seems that we are back to those Good 'ol Days.
-
If it's working, leave it alone. Honestly, I personally think the majority of issues are with people's computers that are screwed up to begin with and the PS CC 2019 update just aggravates pre-existing conditions. It seems that those who have the most problems don't have a clue on the health of their computer, they just "update" without thinking. Or having a decent backup for a catastrophic event. Software is volatile, and while it might seem that things should work perfectly for the most part, that is not the case at all.
-
Paid software is almost always more powerful than the free stuff. Though no software is 100% fool-proof. That said, $29.99 for Recuva is not a bad price at all. Personally, I have used Data Rescue and have recovered some important images that got accidentally deleted on my Mac, and RescuePRO Deluxe Software works really well. RescuePro Deluxe recovered even more than Data Rescue. The problem with labeling something "THE BEST" is that its all relative, usually based on personal experiences.
-
Matt Granger trick to nullify background -is it right way ?
Brian replied to rahullele's topic in Photo Gear & Equipment
Can you provide a link to the video in question? You are correct, your typical flash is not powerful enough to over-power the Sun. There is also the Inverse Square Law to deal with so I really need to see what voodoo he is trying to sell. -
Fresh install / format might help things. You will more than likely have to download the driver from Asus, even though it's an Nvidia card. The power brick also concerns me, you might want to get that replaced first. Personally, I wouldn't throw any money at a laptop. In fact, I'm very anti-laptop, especially for photo editing. The biggest problem with laptops, is that they only last for a short time. Not only from a hardware standpoint, but driver updates as well. Laptops today get orphaned so quickly; back in the day, you'd have a Spring Line and a Fall Line of laptops. You could get all sorts of accessories for it, a year or two after purchase. Now...you are lucky if the laptop model stays current for 90 Days. So what would I do? Backup everything, and format / reset the laptop / reinstall windows, etc. etc.
-
Adobe's current products have a few minor quirks with Mojave and there are work-arounds. Of course, this info is a bit dated, so I'm hoping Adobe has fixed a few things. Download and try it. If things happen or you get an error message, report back. Personally, I haven't upgraded to Mojave.
-
Continuation from FB - Adobe CC apps won't launch
Brian replied to LauraA's topic in The Windows & PC Hardware Forum
OK, if you want to install Windows 7 Pro that Microsoft gave you, that's fine since you are upgrading your laptop within the next year or so. Just be sure to do all the Windows Updates before Microsoft pulls the plug a year exactly from now. If you want to install Windows 10 Pro, that will cost you $199. I'm cheap. Windows 7 for your old laptop is fine. -
Continuation from FB - Adobe CC apps won't launch
Brian replied to LauraA's topic in The Windows & PC Hardware Forum
Yep. 16GB is the maximum for your laptop. Fan might just need to be blown out.


