-
Posts
210,565 -
Joined
-
Last visited
-
Days Won
3,418
Everything posted by Damien Symonds
-

Shoe photo with ribbons
Damien Symonds replied to Iva's topic in Miscellaneous questions or problems
May I see what your shoes look like? -

Help with website tutorial
Damien Symonds replied to lacogada's topic in Questions about tutorials and articles
You just do. It works exactly as demonstrated, I promise. If it's not working, it means you're trying it on an inappropriate photo. That's why I need to see it. -

Help with website tutorial
Damien Symonds replied to lacogada's topic in Questions about tutorials and articles
You're welcome. Let me know how you go. And I'd really love it if you could provide a white background photo at some stage, so we can address your original question. -

Help with website tutorial
Damien Symonds replied to lacogada's topic in Questions about tutorials and articles
Needless to say, we have no wandered a long way from your original question. The approach for a coloured background is much different from a black or a white one. -

Help with website tutorial
Damien Symonds replied to lacogada's topic in Questions about tutorials and articles
I'll press ahead ... let me show you one of my favourite methods: Download PSD file It will perhaps look more complicated than it truly is. Basically, you choose a colour which is most desirable for the background (that is, most similar to the existing background, or an average thereof) and add a Solid Color layer of that colour. Then immediately invert the mask of that layer to black, then duplicate the layer three times. So you will have four identical Solid Color layers, all of them hidden by their black masks. Then: change the blend mode of the first layer to "Multiply". That will be the layer that you use to gently darken the too-light areas change the blend mode of the second layer to "Screen". That one will be for lightening too-dark areas change the blend mode of the third layer to "Color". That will be the layer you use to fix any wrong-coloured areas leave the blend mode of the fourth layer on "Normal". That will be your actual backdrop layer. Then paint on the mask of the top layer everywhere, and close to the hair, but don't quite touch the hair. Then use a very low opacity brush to "massage" the other three layers as needed, until everything blends nicely. (I've also added one more layer at the top of the file, to demonstrate changing the colour of the finished background.) -
The catchlight from your flash is a bit more elongated in his eyes than hers. He must have moved a bit in this one.
-
This one definitely is a DOF issue. The boy's right (our left) shoulder is in good focus, and it's on about the same plane as the girl's face. The boy's face, however, being a bit further forward, has missed out.
-
That's because you're used to taking much closer photos, of course.
-
Really? May I see another example? No. Well, only in desperation.
-
In that case, I'll move this post into Brian's area.
-

Pure white background for product shots
Damien Symonds replied to Laura T's topic in Help with editing
Well, if you want no shadows, you're pretty much committed to the Solid Color layer method for everything. If you're happy to have shadows, you can also use the Solid Color layer method, but you might also have options to use Levels with the eyedropper, akin to this, if you choose. But as I just mentioned on your other thread, any kind of Levels method would only work for darker fabrics, not for very light ones. -

Help with website tutorial
Damien Symonds replied to lacogada's topic in Questions about tutorials and articles
You are aware, I trust, that it is completely impossible to make this a white background? If it was your intention to make a plain background for this photo, it would need to be a dark red one to match the current background (reasonably easy) or black (not too hard) or another similarly dark colour (tricky, but feasible). So, can you clarify your intention for this one? -
All I know is that you can't use this. For actual technical discussion of the problem, we'll have to wait for @Brian.
-
You're too hasty to blame yourself and your camera. It's not shake, he just moved.
-
Yeah, a Facebook-sized image will never do for that
-
@Ginger Wick?
-
The ppi is irrelevant. Only the NUMBER of pixels matter. You could have a file that's 15ppi, as long as it was 15 megapixels, it's absolutely fine. https://www.damiensymonds.net/art_resolution.html
-
Are you still there, @abfriesen?
-
Some important information about CMYK: https://www.damiensymonds.net/2011/05/please-be-wary-of-cmyk.html https://www.damiensymonds.net/cmyk-rgb-files-press.html
-
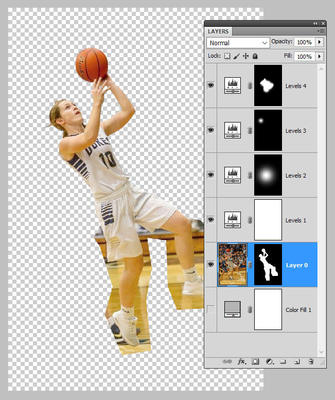
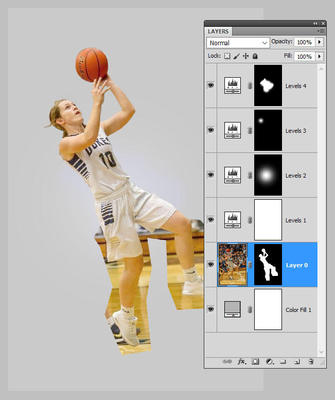
There is only one correct way to do the cutout, and it's vitally important. First, you double-click the Background layer to turn it into "Layer 0". Then you add a mask to that layer. Below that layer, insert a Solid Color layer of a similar colour to what will be there in InDesign. (It doesn't need to be the exact colour, as long as it's in the ballpark.) Above it, you can do your Levels work as required to make the photo look its best. Then mask very carefully around the subject: Once all the masking is done, turn off the Color layer to leave the transparent background only: Then save this as a PSD. It MUST be a PSD. Then close it. Then place that PSD file in InDesign. I can't stress this enough. This entire task is done with one PSD file. Never save as a jpeg, or a png, or anything else. On single PSD file for both the edit and the InDesign placement.
-
I'm so sorry, I can't see any pixelated areas as such. But I do have a number of grave concerns about this project. Firstly, if that is a true 100% crop, it means the photo is very small. What is the size of the page you're designing? Secondly, have you actually liaised with the printing company to find out exactly which CMYK colour space they require? You must never automatically assume that they want Web Coated (SWOP), because if you get it wrong, the consequences can be dire. Thirdly, how did you actually perform the cut-out? What method did you use?
-
Also, @abfriesen, could you tell me a bit more about the history of this photo? Was it provided to you already like this? I mean, in CMYK mode, and badly cut out?


