Damien Symonds
-
Posts
211,529 -
Joined
-
Last visited
-
Days Won
3,468
Everything posted by Damien Symonds
-

Scanning: print vs negatives
Damien Symonds replied to CarmenRM's topic in Questions about tutorials and articles
The V850 can do all sizes of negatives. So you should definitely get the scanner, and do the test yourself. Find a few print/negative pairs, and scan both, and see which give the better results. -
Scanning: print vs negatives
Damien Symonds replied to CarmenRM's topic in Questions about tutorials and articles
This all depends on what scanner you have? -
Brian will probably ask for this info. Also, while you're waiting for him, run Glary if you haven't already.
-
I think all you can do is carefully clone out the very worst of the hairs, then darken all of her hair as much as you can plausibly get away with.
-
desaturated with a bronze twist.
Damien Symonds replied to Wally's topic in How to achieve a certain look or effect
Can you link to a specific image? Remember that the lighting must be the same as yours. -
Shauna
Damien Symonds replied to Damien Symonds's topic in Photoshop / Elements / Bridge / ACR questions or problems
And I suppose you could give this a go if you feel brave: https://themacgo.com/adobe-bridge-cc-2017-v7-0-dmg-mac-free-download/ -
Shauna
Damien Symonds replied to Damien Symonds's topic in Photoshop / Elements / Bridge / ACR questions or problems
LR is evil, and Bridge is much better. But you're in the Raw Class, not the Bridge Class; and the Raw Class uses Camera Raw. -
Shauna
Damien Symonds replied to Damien Symonds's topic in Photoshop / Elements / Bridge / ACR questions or problems
Great! Then you can use Camera Raw. -
Shauna
Damien Symonds replied to Damien Symonds's topic in Photoshop / Elements / Bridge / ACR questions or problems
And it works fine? -
Shauna
Damien Symonds replied to Damien Symonds's topic in Photoshop / Elements / Bridge / ACR questions or problems
I don't care about Bridge. I'm asking about Photoshop. -
@Shauna N let's sort this nonsense out. Are you saying that you can't run Photoshop on your computer?
-
Did you follow my exact instructions here? https://www.damiensymonds.net/calibration-instructions/
-
Gosh, how weird.
-
Sam, did you try this? What files do you have there?

-
You forgot the noise removal.
-
So your screen is too pink, is that correct?
-
Asus ProArt
Damien Symonds replied to Nastassja's topic in Monitor calibration questions or problems
Have you gone into the tablet control panel to map it correctly? -
Asus ProArt
Damien Symonds replied to Nastassja's topic in Monitor calibration questions or problems
That's bad. Now that it's on Extend, calibrate again. It shouldn't really matter. -
Asus ProArt
Damien Symonds replied to Nastassja's topic in Monitor calibration questions or problems
And just to check, you've got the new screen set up correctly? https://www.damiensymonds.net/working-with-dual-screens-windows-10/ -
Asus ProArt
Damien Symonds replied to Nastassja's topic in Monitor calibration questions or problems
Remind me ... do your prints match your laptop screen accurately? -
Sam
Damien Symonds replied to Sam165's topic in Photoshop / Elements / Bridge / ACR questions or problems
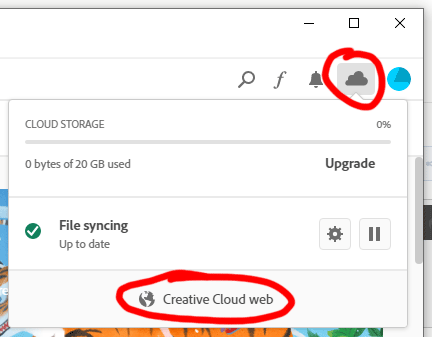
@Sam165, if you click here then here ... ... it'll take you to a web page where I think you might be able to examine the files you have in the cloud, and see if they can be deleted.
-
Sam
Damien Symonds replied to Sam165's topic in Photoshop / Elements / Bridge / ACR questions or problems
Your cloud is probably still full of LR junk, though. -
Sam
Damien Symonds replied to Sam165's topic in Photoshop / Elements / Bridge / ACR questions or problems
I'm so sorry, I don't know why it would be like that. Mine is at 0. Have you had Lightroom installed in the past? -
Sam
Damien Symonds replied to Sam165's topic in Photoshop / Elements / Bridge / ACR questions or problems
I'm sorry, I don't know what you're referring to. May I see a screenshot of that? -